
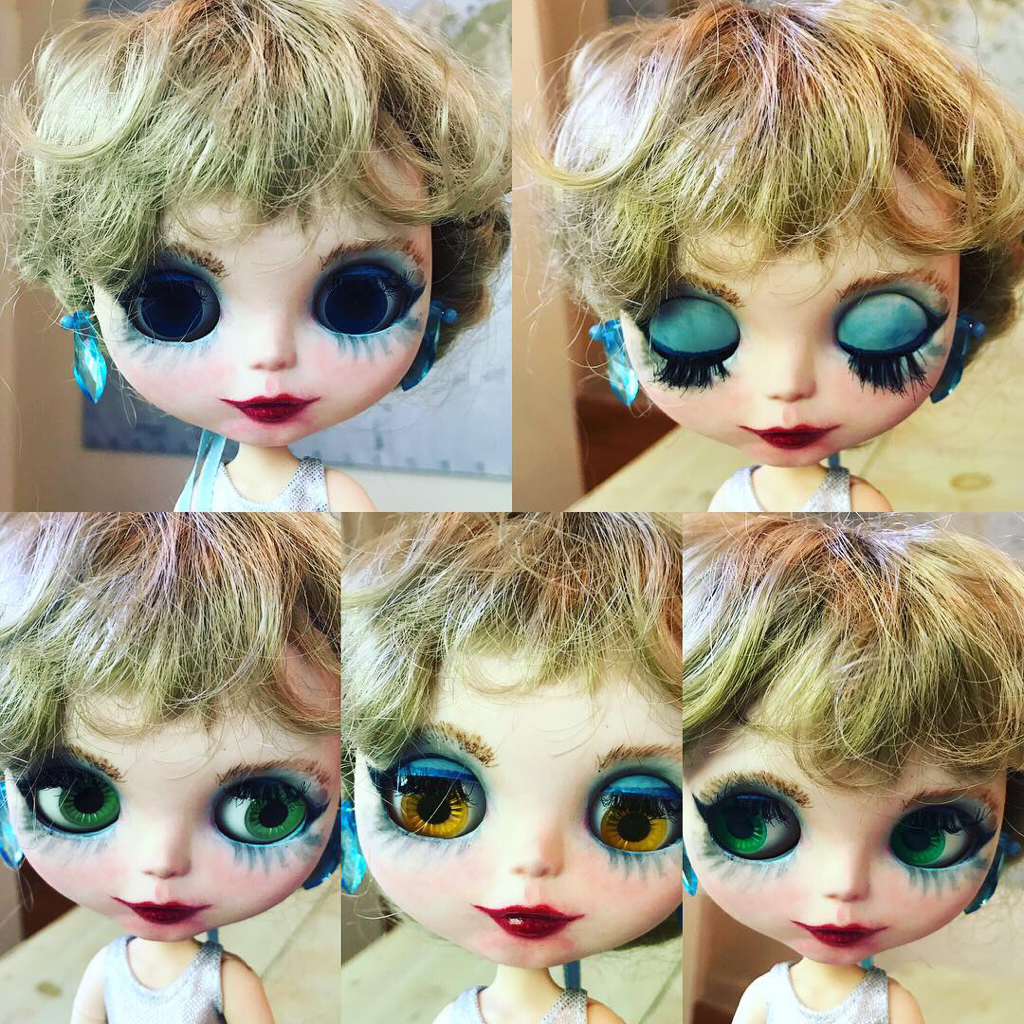
 Unfortunately, Weebly has a glitch that deletes photos or even substitutes them with the wrong ones after a while and it's messing up all my tutorials. Click the button below to download a cheat sheet tutorial with the proper photos for this repair. The doll above is a Factory Blythe with the original eye chips and positioning, although with eyes modified to "sleep" and replaced eyelashes. I cover those changes my sleep eyes tutorial. Today I'm going to show you how to replace the original Blythe doll eye chips and change the positioning of the gaze as shown in the doll below. 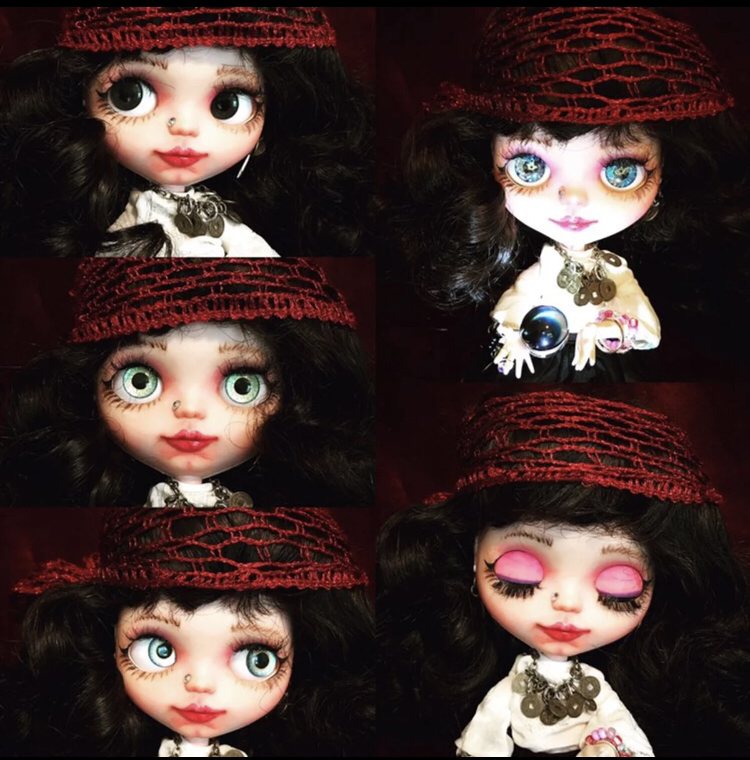 If you've been following along you may remember a couple months ago I customized my first Blythe dolls and promised tutorials. but then my son required a bone graft surgery and we spent November going to one or more doctor's appointments every week to prepare. My son had surgery on Monday. It went exactly as planned and we spent only one night in the hospital, less than half the time usually required. He's recovering well and you can keep up with his progress and see photos on my Instagram and Facebook. I had a suspicious number of orders for a Monday, almost all from repeat customers, and I know that's because many of you are trying to support us. I want you to know we are all sincerely touched and extremely appreciative! 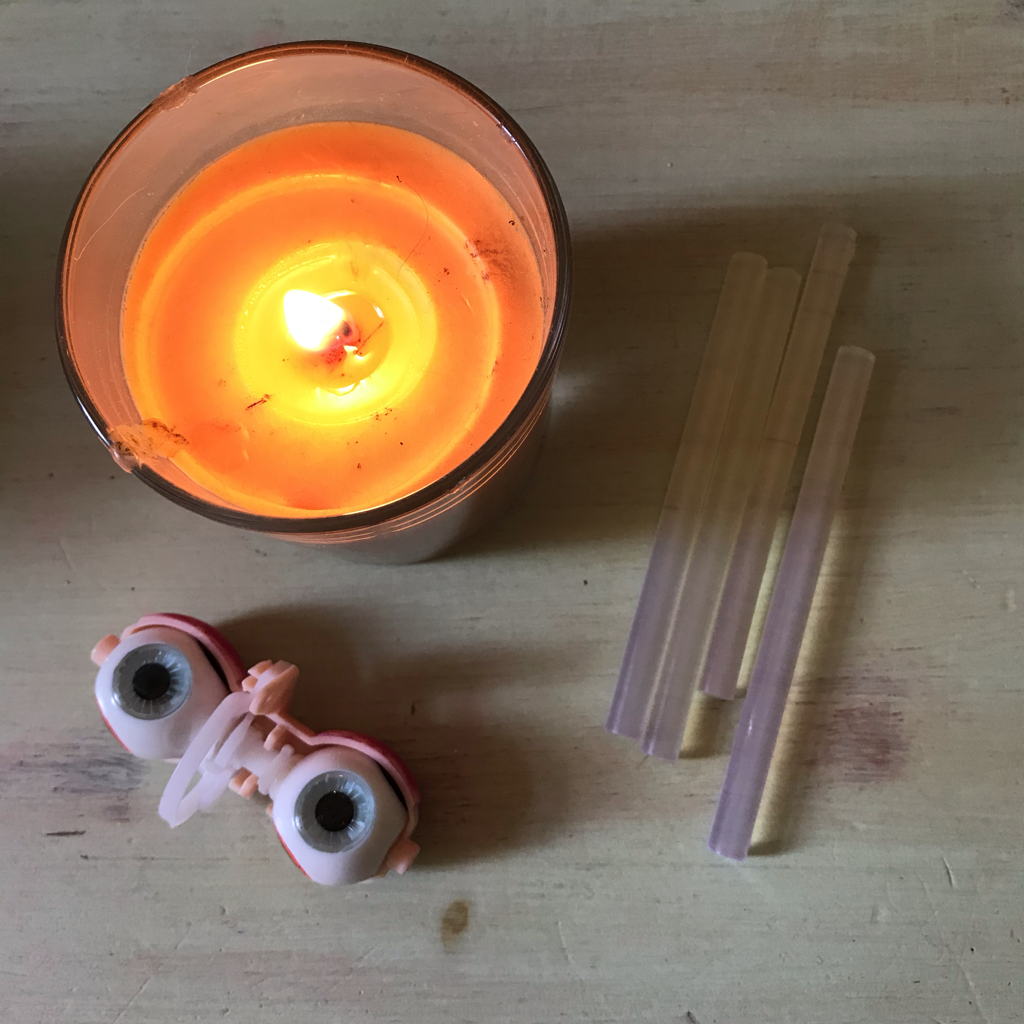 So, on to the tutorial. I apologize if it's a little confusing; I took photos of the same process using two different dolls. Just follow the steps for any Blythe doll, and possibly also for Pullip dolls, although I will have to update once I've customized one of those. Begin by gathering your materials. You will need a candle, glue sticks, a Blythe doll, and new eye chips. You can purchase new eye chips from my shops, especially Etsy, from the link in the Home page. Make sure the eye chips you buy will fit the Blythe doll you are customizing. There are several sizes of Blythe dolls. Right now all the eye chips I am selling are for the 12 inch Blythe. I am also working on a Blythe eye kit. 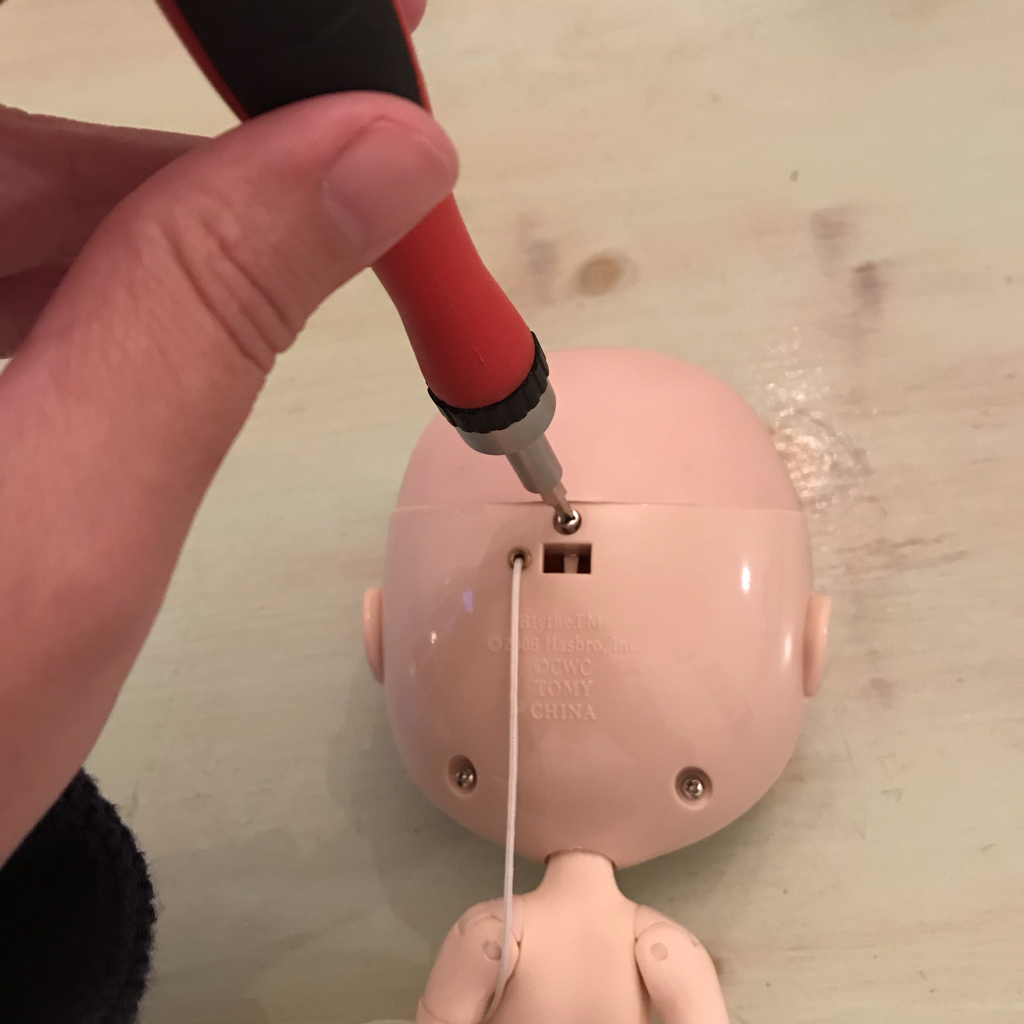 To remove the eye mechanism first remove the back of the head. Remove the screws first and make sure you save them. 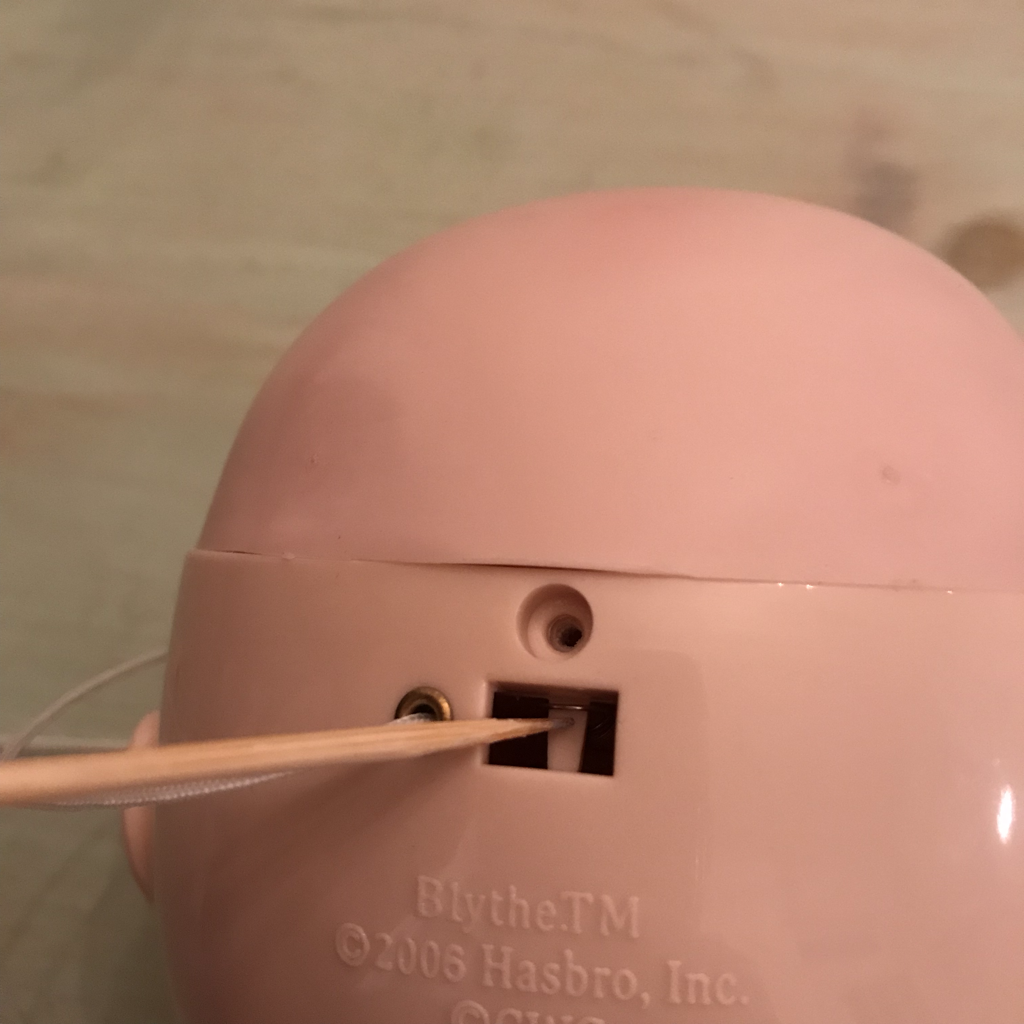 Next use pliers or a skewer to unhook the spring from the bar next to the eye pull string. If you want the eyes to "sleep" you will not need the spring, but if you want them to work as the originals you will need to save the spring and not pull it out of shape, so be gentle.  When you have removed the screws and spring you can pop the back plate off with a flat head screwdriver, butter knife, or similar implement. 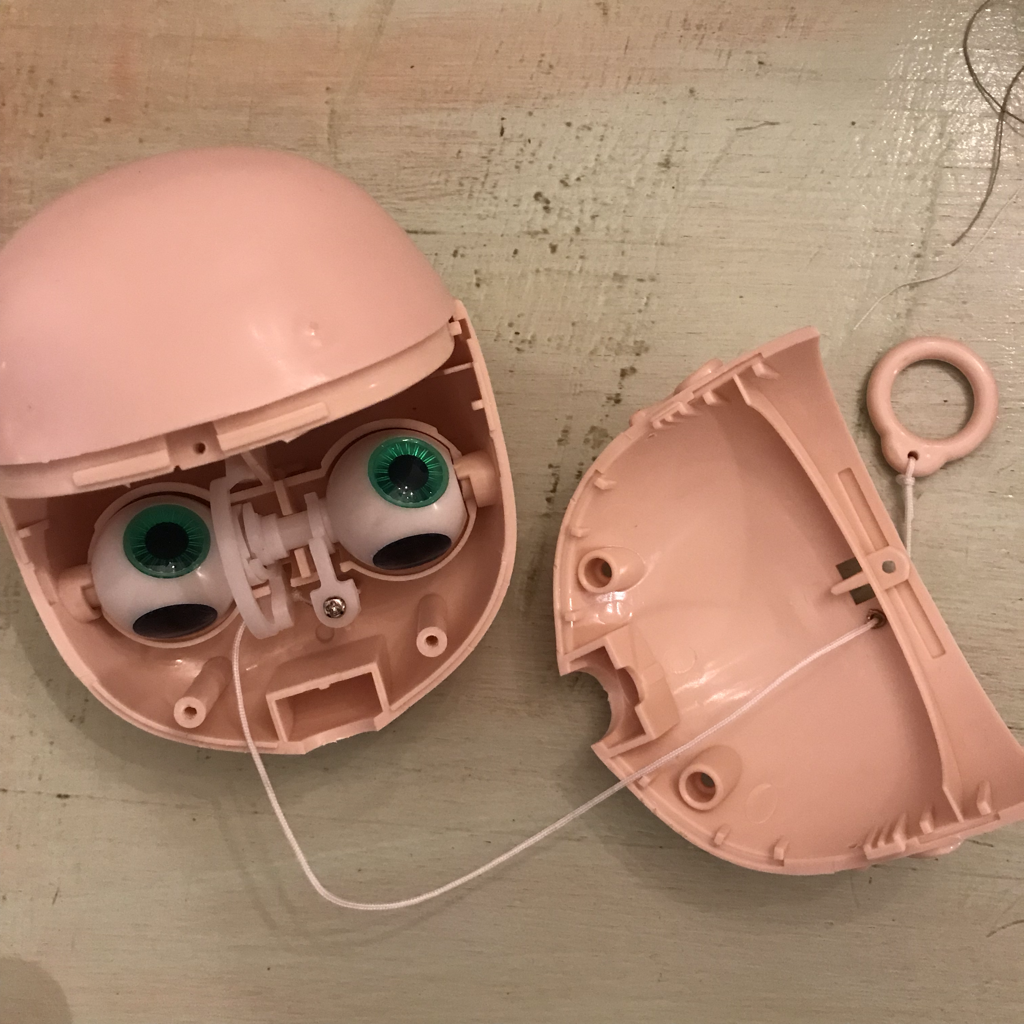 Here is the original mechanism. Make sure to take a photo or make note of the arrangement of all the pieces before you remove anything. Unscrew the gaze bar, which is the little paddle-shaped plastic piece screwed in as shown above. The original Blythe gaze is slightly downcast, as shown in the first (blond) doll in this post. If you desire that just leave the paddle as is. If you want Blythe to look up, as shown in the second (brunette) doll in this post you will need to sand the straight top edge of the paddle's "handle". That is the part of the paddle without the screw hole. The more you sand this edge the more your Blythe's gaze will look up. Be very careful when removing and sanding this piece and don't lose it. It is essential to the function of Blythe's eyes and is not easily replaced. 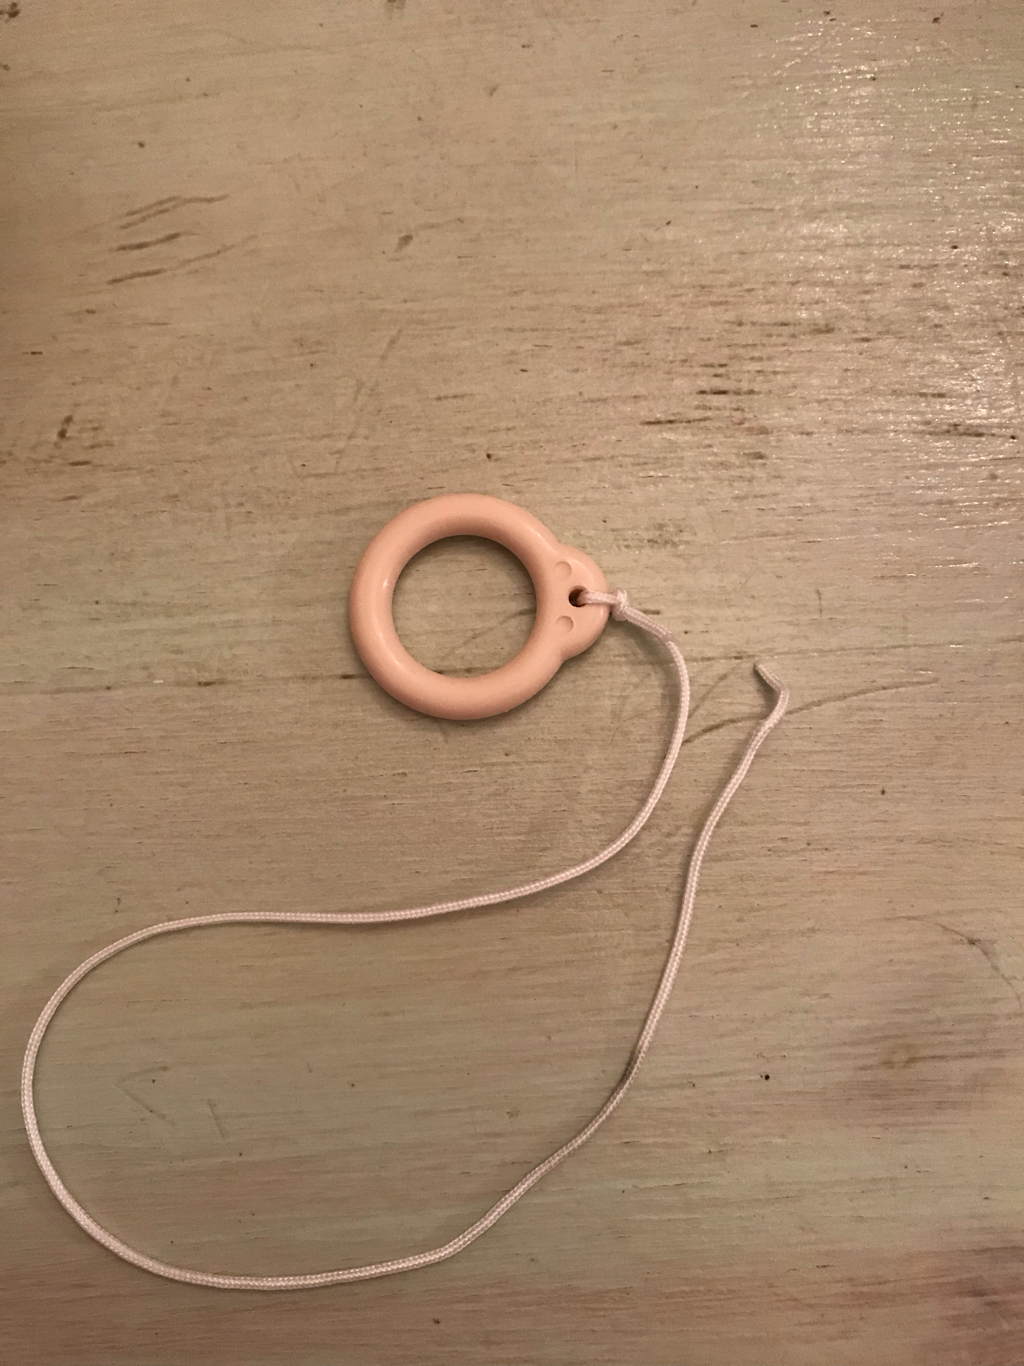 Next remove the pull string. You can use tweezers to help you untie the end if you want to save the string. If not you can just cut the string, but you will need ribbon or something to replace it. 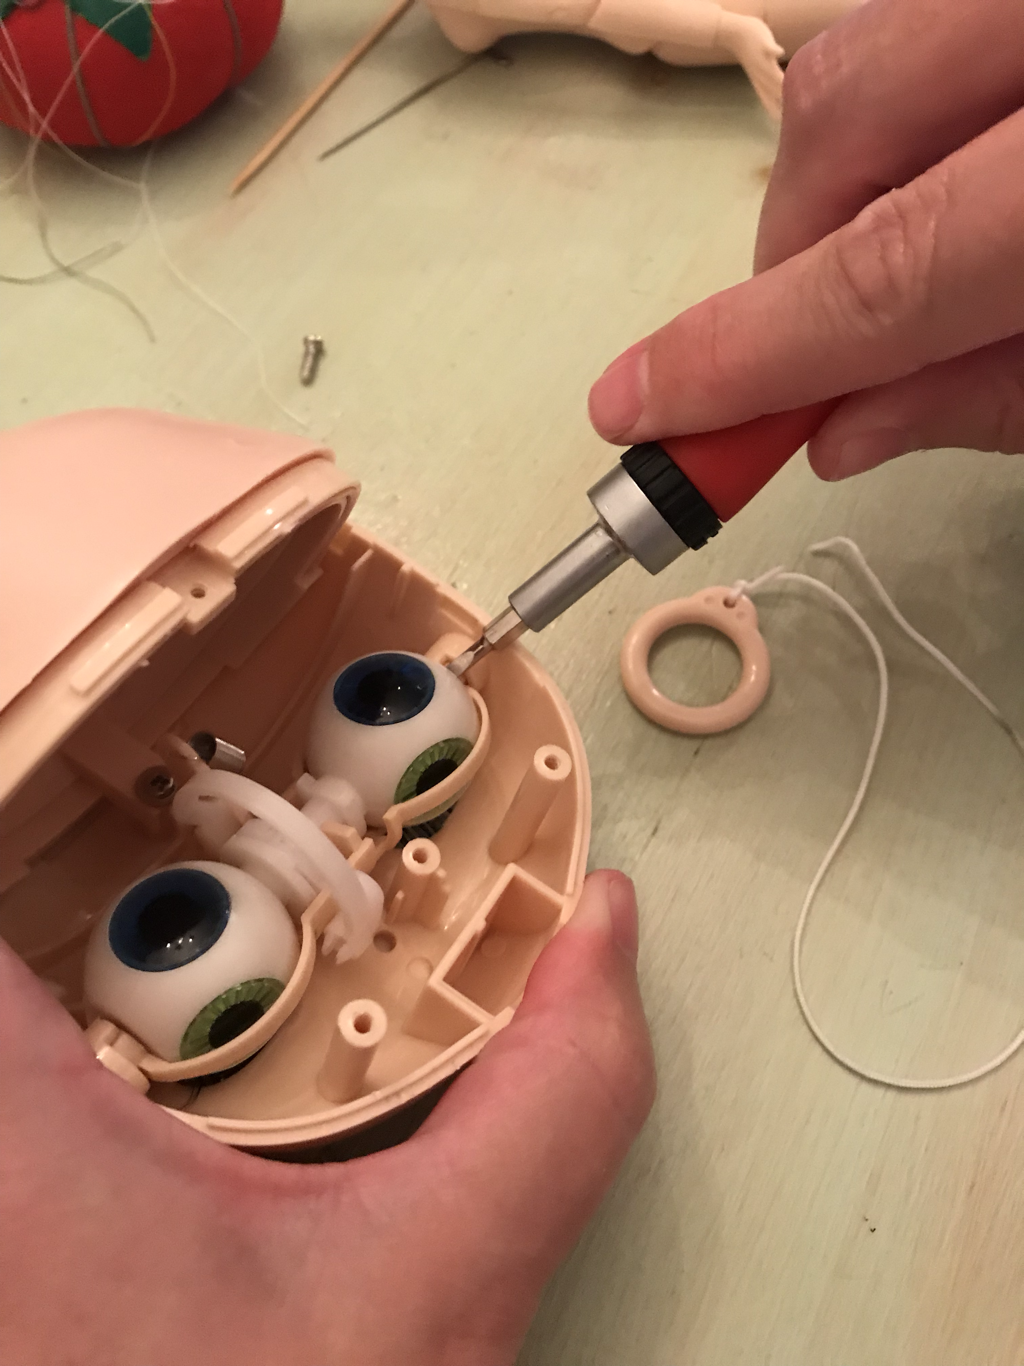 As gently as possible use a flathead screwdriver to pry the eye mechanism out of its slot. This can be quite difficult. Sometimes slightly heating the plastic with a hair dryer can ease this process. Remove the eye mechanism. If you have a factory or Tomy Blythe you will need to remove the screw to take off the scalp. Save any pieces you remove in a baggie or somewhere they won't get lost. To remove the eye chips heat the ends of the glue sticks so they melt slightly but don't drip. 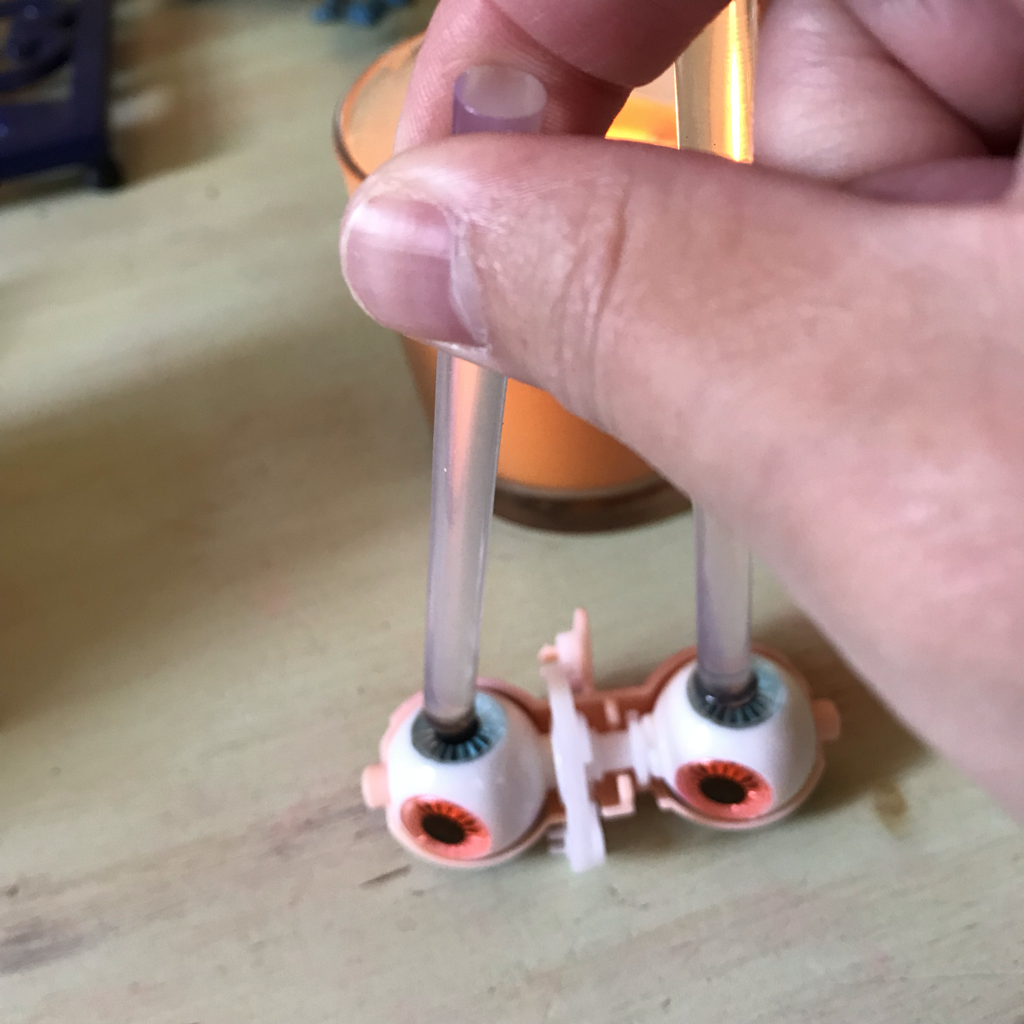 Adhere the glue sticks to the eye chips. 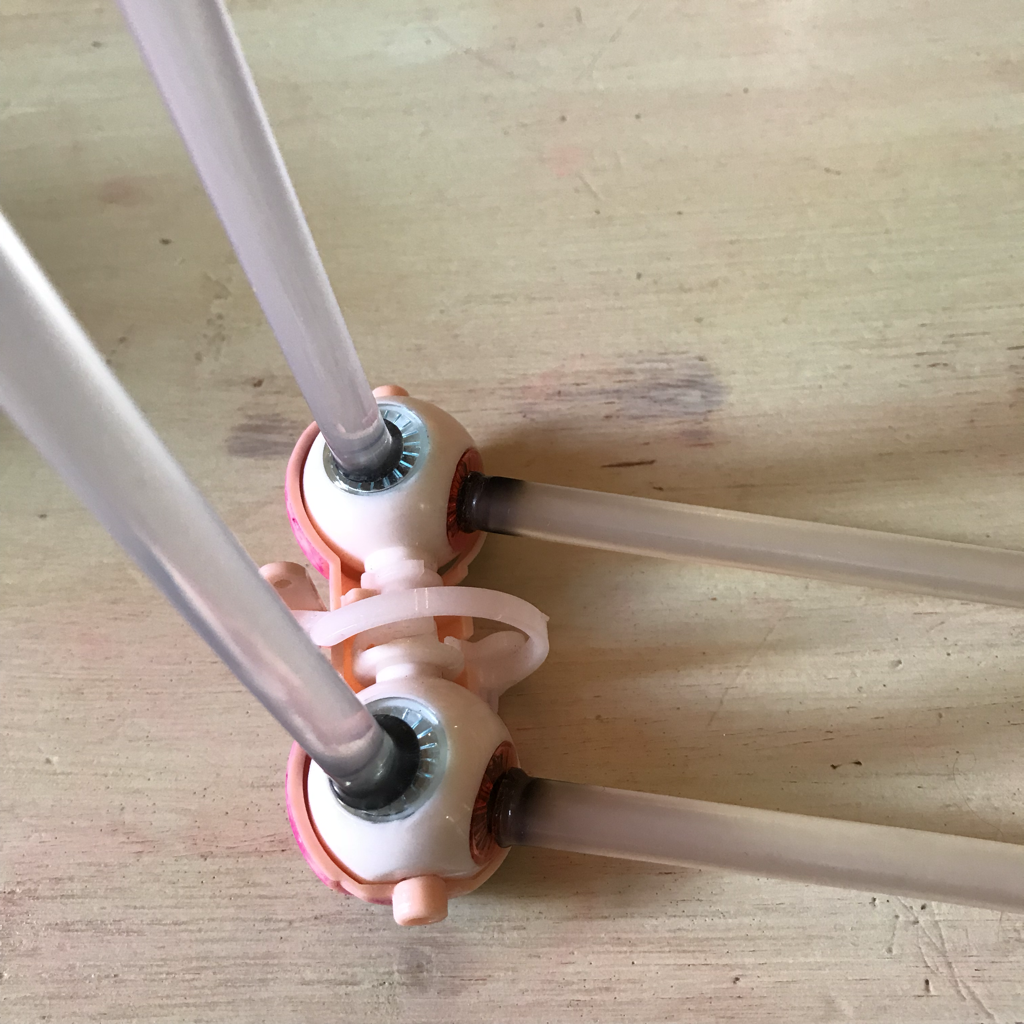 To speed the process you can do four eye chips at a time. Leave the glue sticks in place until they cool. 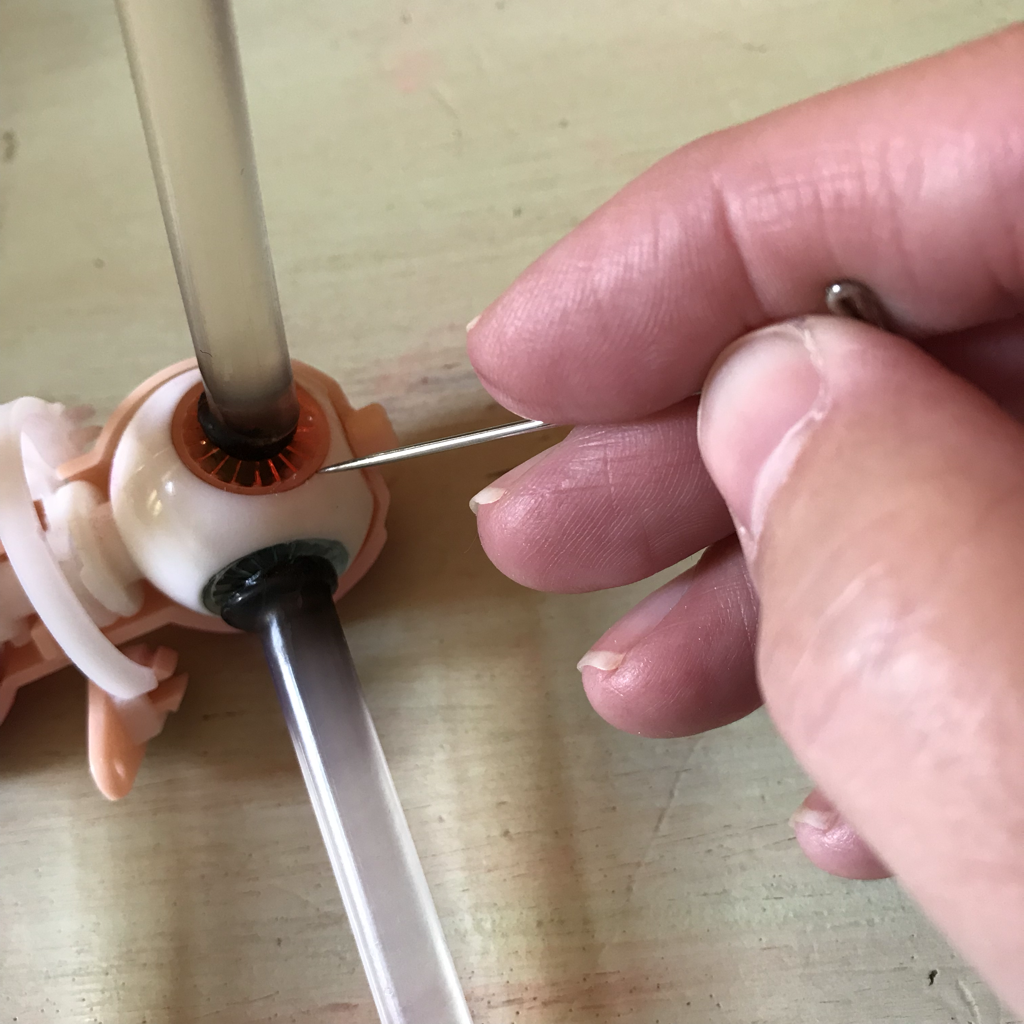 Draw a straight pin or knife blade around the edges of the eye chips to loosen them. 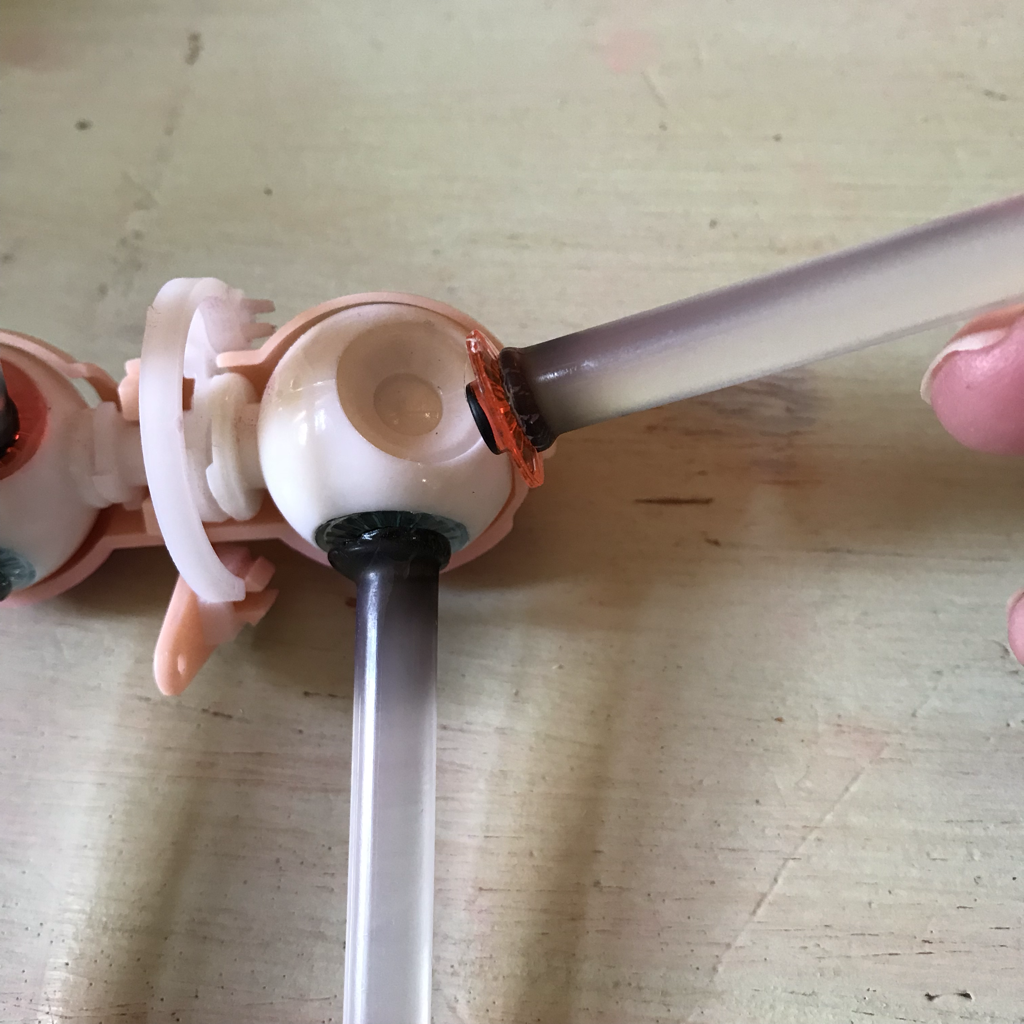 Then pull the glue stick off and the eye chip should come with it. Often the eye chips will stick and you will have to repeat the process two or three times before it comes out. 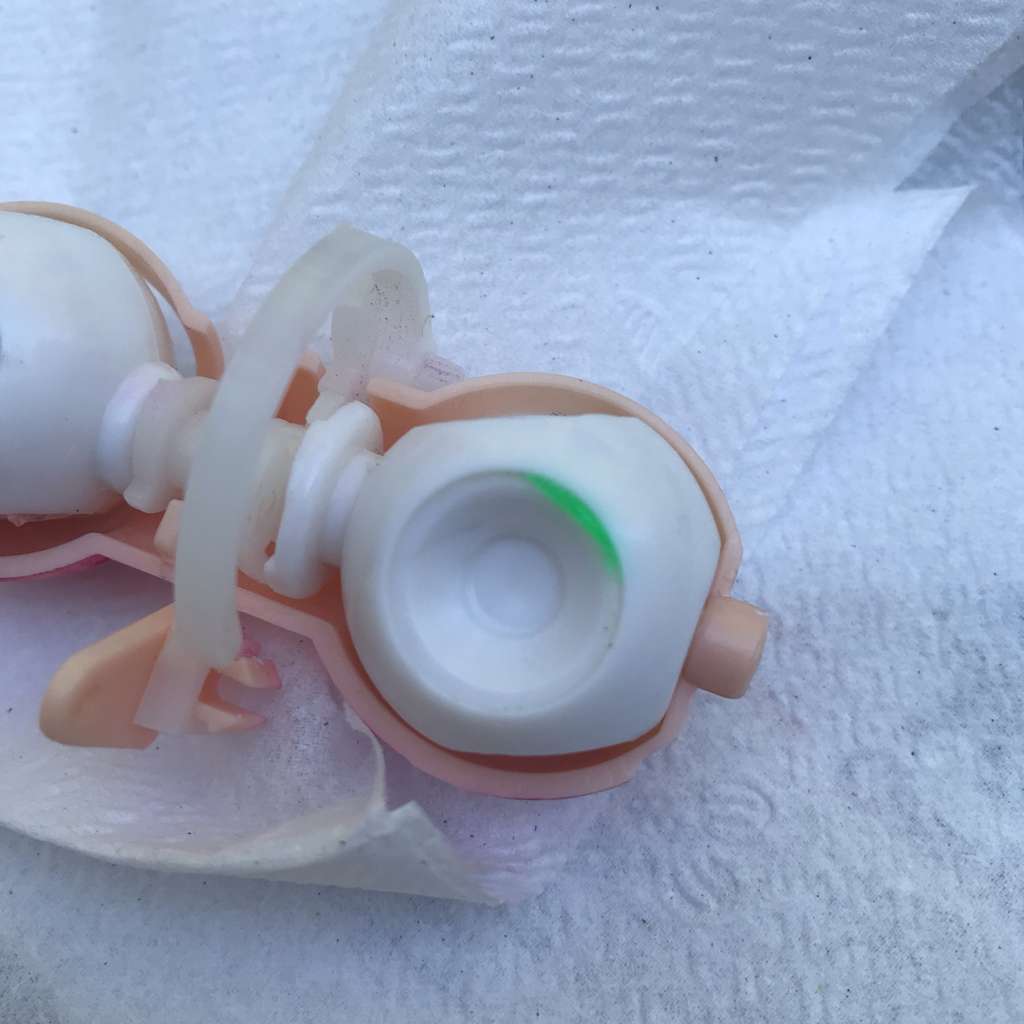 The doll I'm working with here is a Basaak Blythe and the eye chips were extremely tight. Some of them broke when I removed them and I had to cut and sand out the pieces before I could proceed. I've never seen this happen on another tutorial, so I don't know if it was a fluke or if this is a specific problem with the Basaak dolls, but if this does happen be prepared to remove the broken pieces fully or the new eye chips will not adhere. You can actually purchase blank Blythe dolls without eye chips and I think in the future this may be what I do as it will save a great deal of time! 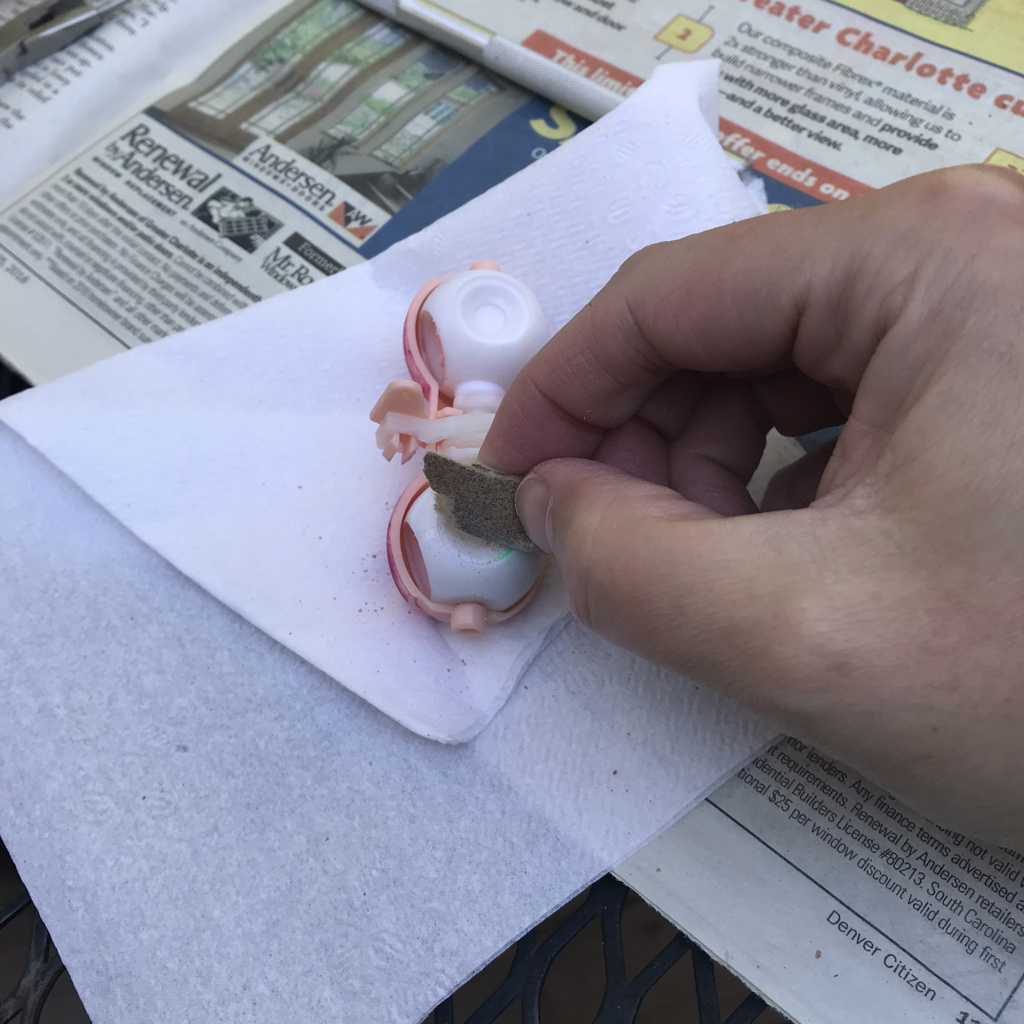 I used an X-Acto knife and sandpaper to remove the broken eye chip pieces. Supposedly all you have to do most of the time is just wash out the white glue with warm water, but that didn't work at all with the Basaak Blythe. They obviously used super glue to fix the eye chips in place! 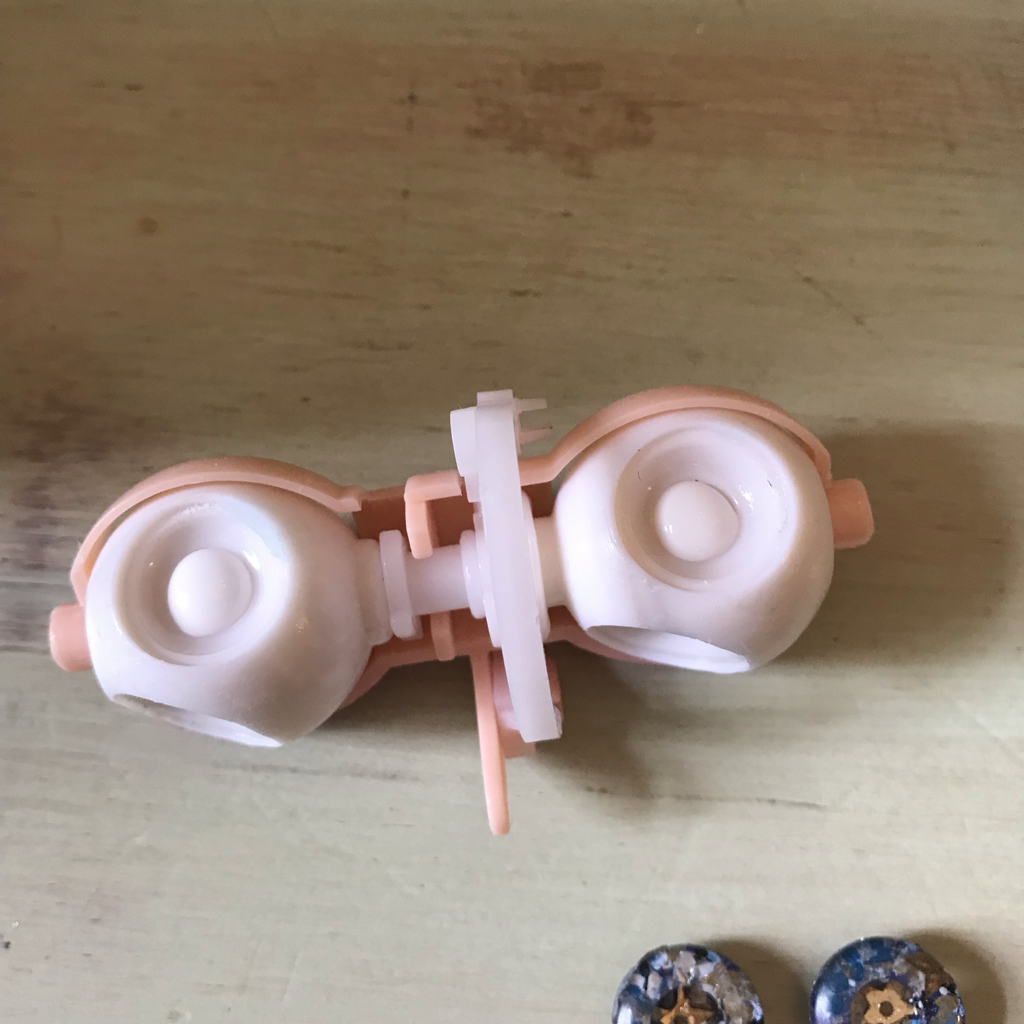 When the eye channels are completely clear you are ready to insert new eye chips. 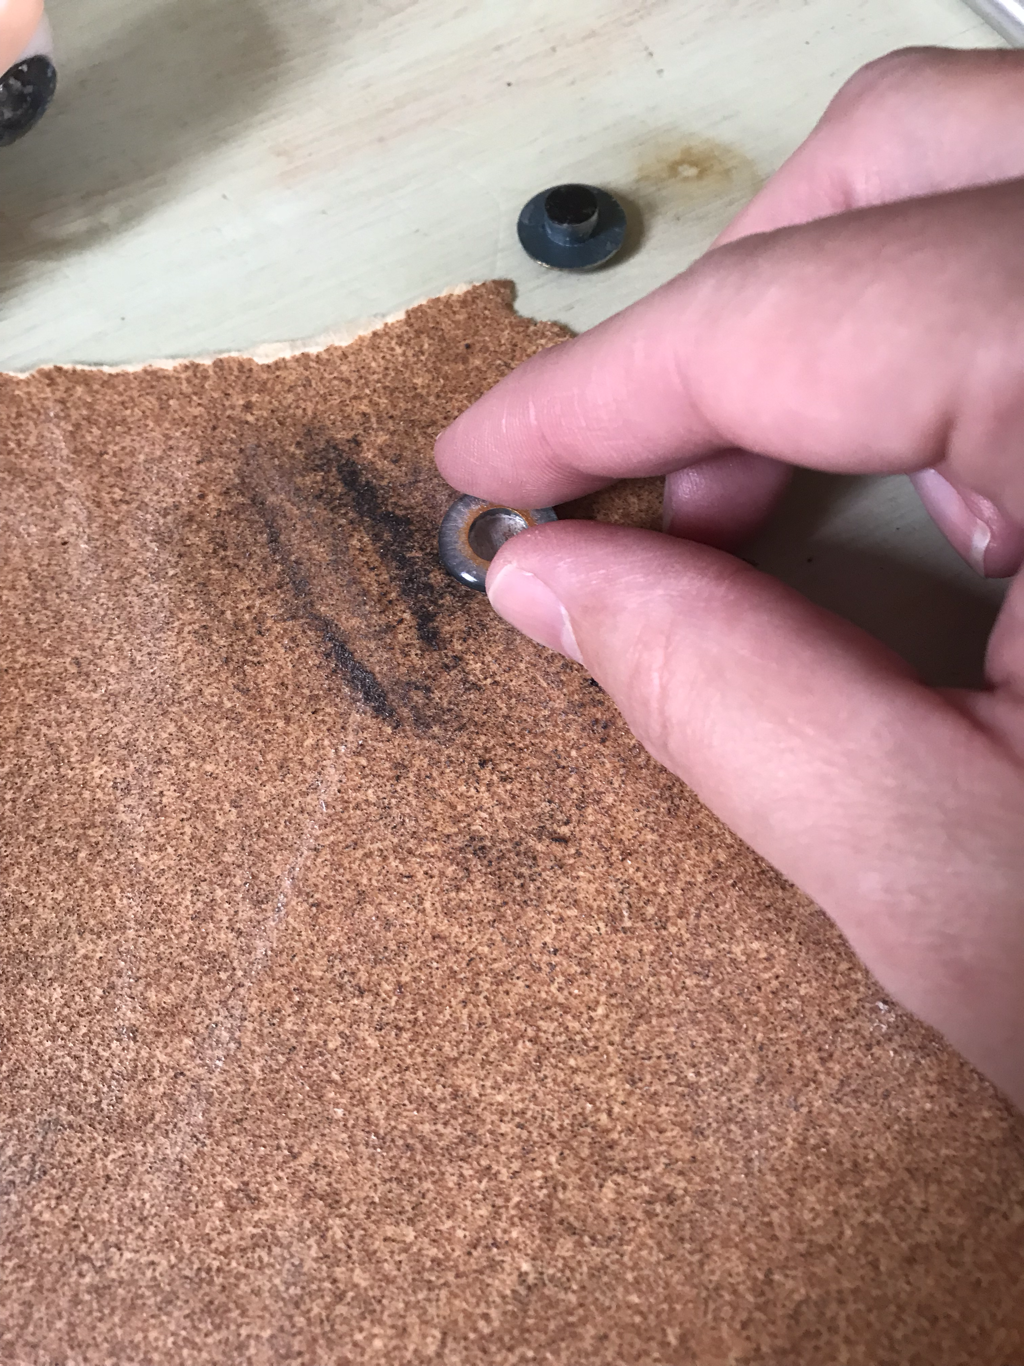 I ordered custom eye chips and they were too tall to fit in the Basaak Blythe eye sockets so I had to sand down the posts and repaint the pupils. Sometimes you will have to sand the sides as well to get them to fit, especially with custom eye chips. 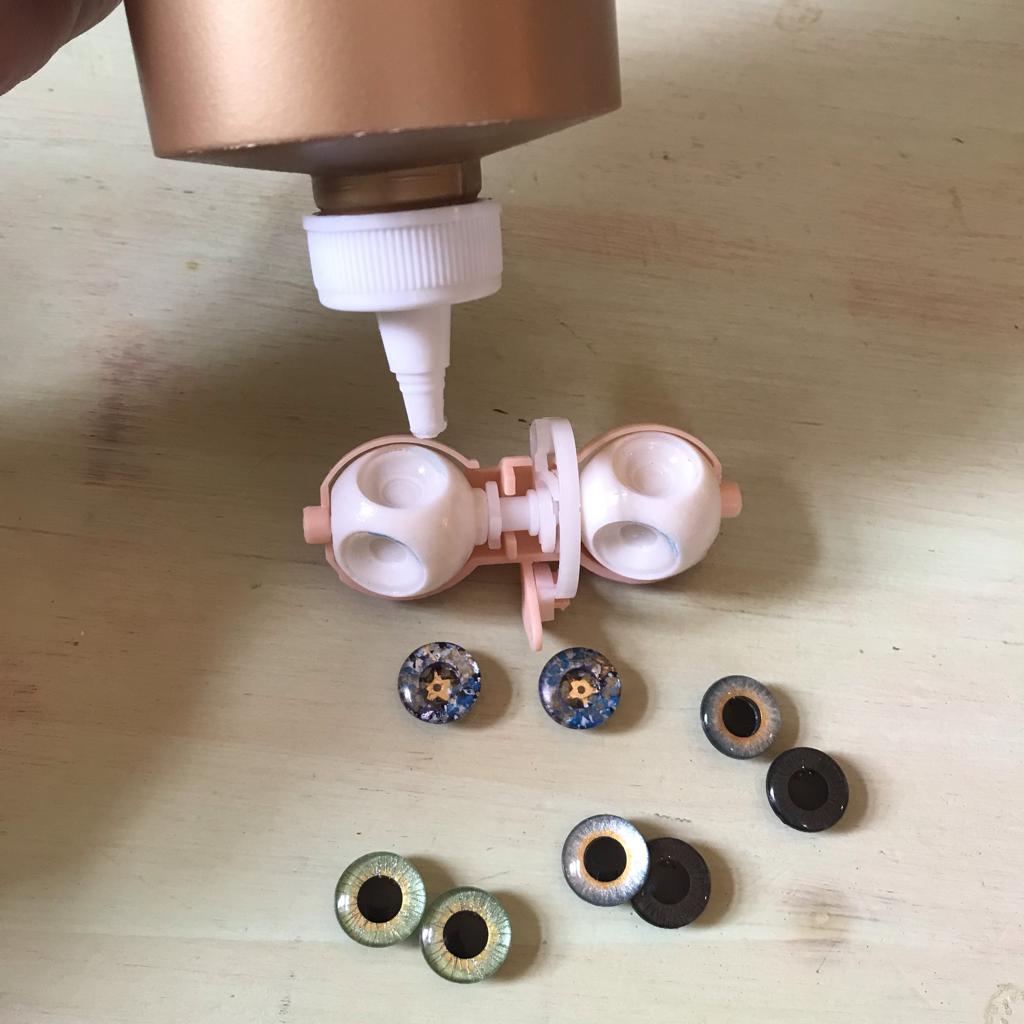 When your eye chips are sanded and painted, if necessary, use white water-soluble glue to insert them. That way you can easily remove them later if you want to change them out. If they are stuck you can soak the eye mechanism in warm water and the glue will dissolve. 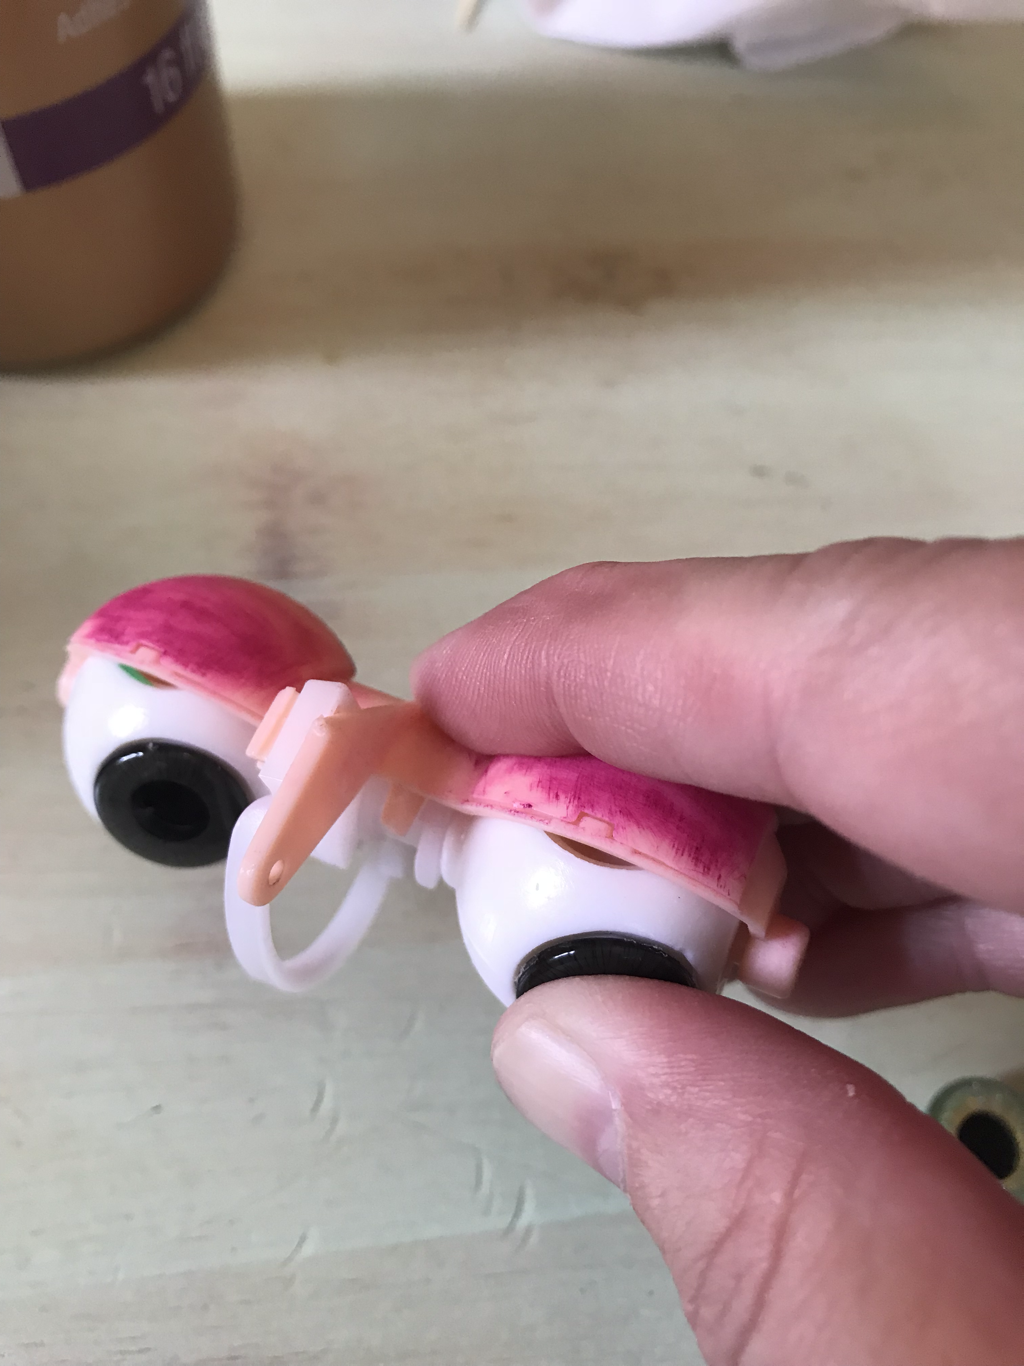 Press the eye chips in place. Sometimes they snap right in and other times you have to hold them until the glue sets.  Once you've inserted all the eye chips and let them dry you can insert new eyelashes and color the eyeshadow if you desire. After I re-inserted the eyes I had to touch up the face paint where it was smudged. Then I re-inserted all the components I removed earlier. Look at the photo below to see how the gaze changed after I sanded down the gaze bar paddle. You can purchase eye chips and other Blythe parts and even ready-made Blythe dolls from the links to my shops on the Home page. Stay tuned for more Blythe tutorials as my son's recovery advances.
2 Comments
As many of you know, I am self-employed largely as a result of our adoption of two children with special needs. I feel incredibly blessed to live in an age when I can work from home, create my own career, and communicate with people all over the world. The Internet changed my life and has given me more opportunity than I ever imagined it could. That does not, however, mean it's made this life terribly easy. The fourth quarter of the year is a notoriously busy time for anyone in retail, and for a solo momtrepreneur like myself it's just insanity.
This year, more than ever, I'm feeling the pressure of trying to be a mother as well as run a successful business. Our youngest son has a major surgery scheduled this Monday. He will be getting a bone graft and some facial revision to help correct his cleft lip and palate. We've always known he would need this surgery and his team of specialists have been working together for years to get him ready. This particular surgery is time-sensitive and must absolutely be performed during the optimal window of his dental development. We hoped to have it done during one of the school breaks but it just didn't work out that way. So now, right at the height of the sales season and my busiest professional time of the year, we have the surgery, and last month we learned our cleft team had gone out of network with our insurance company. Facing a $10,000 bill, we applied for Gap Coverage so we could pay in network, and thankfully it was granted. That process, however, required extensive phone calling and paperwork-filling for myself and my husband, and my son has visited almost his entire network of doctors in the past month to get all his pre-surgery check-ups and procedures finished. If you watch my social media on Instagram and Facebook you also know we discovered a rotten support post on our house that spread mold and decay into the interior walls and floor and then we had yet another water heater leak, so besides all the doctor visits we've had to work around contractor and plumber schedules. We performed much of the interior renovation ourselves. My husband has become a champ at installing drywall and I helped out with the painting. Add to that all the cooking and cleaning and entertaining of the holiday season, and you'll understand why I haven't written a blog post or newsletter for ages. I sincerely apologize. I have been working hard to get new things made and posted for sale and the slideshow above shows a few of these. I know how much people love trunk sets during the holidays so I managed to finish a few, as well as one doll and book set, and some single dolls. I was honored to create an adorable matryoshka birth announcement set, and my daughter and I collaborated to design some cozy winter poncho wraps. We are trying to fit an early birthday celebration into the weekend since it will be so long until our son can eat solid food and run around again, so I have my stores either on vacation or set for really long handling times. You can still place orders but I am not guaranteeing new custom order deliveries for Christmas and anything paid after 9PM on Sunday will likely not ship until Friday at the earliest. I truly hope you will still place orders because to be honest I need the money! As soon as I know how long we will be in the hospital and how well my son recovers I will update my handling time and get everything out as soon as I possibly can. Please keep us in your thoughts and please know as soon as I am able I will get back to writing tutorials and posting new projects. This is my "why". I am so grateful to all of you for supporting me, reading my blog, shopping with me, emailing me , over all these years. You made my little family possible. You gave me the ability to drop everything and step away from my career when it's necessary for me to be just Mom. I'll be spending the day and night in the hospital on Monday, at the very least, and possibly longer. There may be a delay in my response to messages and questions during that time. Many blessings on you fall, until I can write again, Amanda |
AuthorMy name is Amanda, but my childhood nickname was "Mandaline". I am a mother of three turning my passion for creating into a full-time business. Archives
April 2024
Categories |
 RSS Feed