
   Well, almost three weeks ago I promised to give you the recipes for my latest Keto creations and then I never posted them! I do apologize; I joined a new weight loss group and have been fasting for extended periods and writing about food was just more than I could handle. The kids' track and soccer seasons are also underway and that doesn't leave me with much time for writing about anything! But back to the recipes... a couple weeks ago our son was home for Spring Break and I made him a special meal every night. Since he has Type 1 Diabetes it's hard for him to find foods in the cafeteria he can eat and he's stuck with little diversity in his diet. I try to make sure he gets a lot of variety when he comes home. This time I introduced my Pork Belly Burgers, shown above. These are pretty easy to make. You can buy pre-made raw hamburger patties to save time and make it even easier. Pork Belly Burgers Serves 4 Burgers: 8 Pre-Made Hamburger Patties or 2 lb Ground Beef 1/4 Cup Dijon Mustard 1/2 Tsp Salt 1/4 Tsp Black Pepper Pork Belly: 1 lb Pork Belly 1/8 Cup Lakanto Maple-Flavored Syrup 1/8 Cup Bragg's Liquid Aminos 1/2 Tsp Salt 1/4 Tsp Black Pepper 1/2 Tsp Asian Five Spice Powder Chipotle Ranch Salad Dressing, for drizzling. To prepare the pork belly, lay out the slabs of belly in a 13x9 inch pan. Sprinkle each side with the salt, pepper, and Asian spices. Cover with the Lakanto syrup and Liquid Aminos and turn to coat completely. Cover and marinate in the refrigerator at least 2 hours or overnight. After marination, remove the cover and transfer the pan to an oven heated to 350 degrees. Cook 1 hour or until meltingly tender but still holding together enough to pick up with a fork or chopsticks (see second photo above). Remove from the pan, reserving the drippings for later use. Cut into bite-sized pieces. At this point, cook the burger patties as instructed on the label or mix all ingredients, form into 8 patties, and fry, grill, or bake as desired (if baking I cook at 350 degrees about 8 minutes per side or until fully-cooked). While the burgers are cooking pour the pan drippings into a frying pan. I prefer cast iron. Heat the grease over medium-high heat until a drop of water will sizzle when you flick it into the grease. Add the pork belly to the grease and fry 4-7 minutes per side or until a crispy crust forms on each piece. Remove to a bowl lined with paper towels and keep warm. When the burgers and pork belly are done plate the burgers, top with pork belly, and drizzle with the Chipotle Ranch dressing. This easy recipe is sweet, salty, and mildly spicy all at once! We prefer the Lakanto maple-flavored monkfruit syrup and the Walden Farms Chipotle Ranch Calorie Free dressing. The Braggs Liquid Aminos are a traditionally-prepared soy sauce free of the artificial chemicals and commercial sodium added to most bottled soy sauce.  Browned Butter Shortbread Cookies Makes 1 Dozen Cookies 2 Cups Almond Flour 6-8 Tablespoons Browned Butter (see recipe to prepare) 1/2 Tsp Salt 1 Tsp Vanilla Extract 6 TBSP Golden Monkfruit Sweetener (We prefer Lakanto) 1/4 Cup Unsweetened Dried Cranberries (optional) Preheat the oven to 325 degrees. Begin by browning the butter. Add butter to a saucepan and melt. Simmer over medium-low heat until the edges of the pan begin to collect tiny brown flecks and the butter fragrance intensifies. Watch carefully to make sure you don't burn the butter! Set aside. Blend all ingredients except the butter and cranberries in a mixer or mixing bowl. Gradually add butter until the mixture is the texture of play dough and you can easily squeeze or roll it into a ball. Add cranberries if desired. Refrigerate at least 30 minutes. Roll the dough into balls about the size of a chestnut. Place on a parchment paper-lined baking pan. Press each ball flat with your fingers or the back of a spoon. Bake 15 minutes or until the edges are golden brown. Allow to cool almost completely on the pan. Then lift the entire sheet of paper with the cookies on it and place on a wire rack to cool completely. These are very fragile before they are cooled. These crumbly, buttery cookies really hit the spot! I adapted a recipe from @ketochix on Instagram to get them as close to the shortbread I remembered from my youth. Browning the butter adds the depth of flavor that provides the richness I wanted. I prefer these without the fruit but everyone else in the family likes them with the cranberries.  I know you're probably curious about my new weight loss group and the extended fasting. As you know, since September of 2017 we've switched to the ketogenic diet and I started testing with keto sticks to see how various foods affect my blood sugar. This works a lot better for me than counting carbs because it turns out strange things knock me out of ketosis. For instance, I can eat a sushi roll and stay in ketosis but a sugar-free Propel water will take me out! Keto worked fairly well for me. I lost about 15 pounds pretty quickly and then stalled out, with my weight just going up and back down within a 5 pound range for several months. Around July of 2018 I added intermittent fasting after reading Dr. Fung's books, The Obesity Code and The Complete Guide to Fasting. I joined Dr. Fung's approved Facebook fasting support group. A moderator runs this group; Dr. Fung is not personally involved. I lost another 5-10 more pounds with the fasting but got stuck again. I will say, ketogenic weight loss is not like weight loss I've experienced in the past. My body composition has definitely changed and I look as if I've lost a lot more than I have. My clothing size went from a tight 2X to a Large and even a Medium in some brands. I can wear clothes that haven't fit in years. Still, I want and need to lose a lot more. I was thrilled to see Dr. Wade Baskin formed a fasting group. Dr. Wade runs this group himself and teaches the techniques that helped him lose a significant amount of weight at age 50. You can find him on Instagram as @drwade_physio.
Basically the program is this: extended fasting plus a carnivore diet. Dr. Wade recommends you start with a 72 hour fast, then re-feed with 500-1000 calories of red meat if possible, although other meats and eggs are permitted. Then fast for 48 hours, and keep repeating this pattern until you are at your goal weight, at which time you can move to OMAD, or one meal per day, mainly eating meat. I've been on Dr. Wade's program for a week and a half and I've already lost 12 pounds! I'm extremely happy to have broken through my plateau. Dr. Wade broadcasts live once a week to give advice and the other group members are very helpful. During these fasts I drink an electrolyte solution of 4 tsp baking soda and 4 tsp No-Salt (potassium chloride) dissolved in 1 gallon of water. If necessary I also drink coffee with a small amount of heavy cream added and bone broth. I try to avoid the coffee and broth but I tend to get headaches and/or dizziness when fasting and if I do that's a sign I need to drink some coffee and broth. Exercise is not required on this plan although slow walking, preferably outdoors, or swimming or weight lifting may be added but you should take care not to over-exert yourself as this can lead to a rise in cortisol and stall out your weight loss. For me, personally, trying to start fasting, Keto, and exercise all at once is a recipe for disaster. I tried it in early 2017 and it was just too much and I ended up quitting. If you want to get started I recommend first eating a ketogenic diet for a few months, using the keto sticks to make sure you'e staying in ketosis and that you understand which foods take you out. In general, to stay in ketosis you will need to avoid carbohydrates like sugar, grains, and starches as well as artificial flavors and sweeteners but you will need to test yourself to see what you can tolerate. After a few months you will find you are less and less hungry. Then you can add fasting to your regimen. At first I just made sure to have at least 12 hours between eating or drinking anything caloric at night and breakfast in the morning and I worked up from there. At this point I am able to fast at least 72 hours (3 days) without much trouble. The first extended fasts were really hard for me. Autophagy, the process through which your body removes and replaces damaged cells and toxins trapped within your fat cells (one purpose of your fat cells is to trap toxic substances and insulate them from the rest of your body), kicked in hard and I experienced bad GI issues as well as insomnia and weird skin sores. As I eliminated fat cells they released the toxins they had stored into my body, which quickly pushed them out in every way possible, including right through the skin. The more processed junk and chemicals you've been ingesting, the more you'll experience this as you fast, so you'll want to clean up your diet as much as possible before beginning the extended fasts. If you experience these symptoms, just break your fast and try again later. I had to try several times to get past 50 hours of fasting but I finally accomplished it, and now I'm to the point I can write about food and look at recipes without really craving food. It's Thursday evening and I've been fasting since Monday and I'm not hungry right now or even thinking about food at all. You can follow me on Instagram to see me progress. As always, please remember I'm not a medical professional of any kind. I'm just recording my journey. Always talk to your doctor before embarking on any health or weight loss plan. If you are already lean, and especially if you have 4% body fat or less, you do not need to be fasting for extended periods.
0 Comments
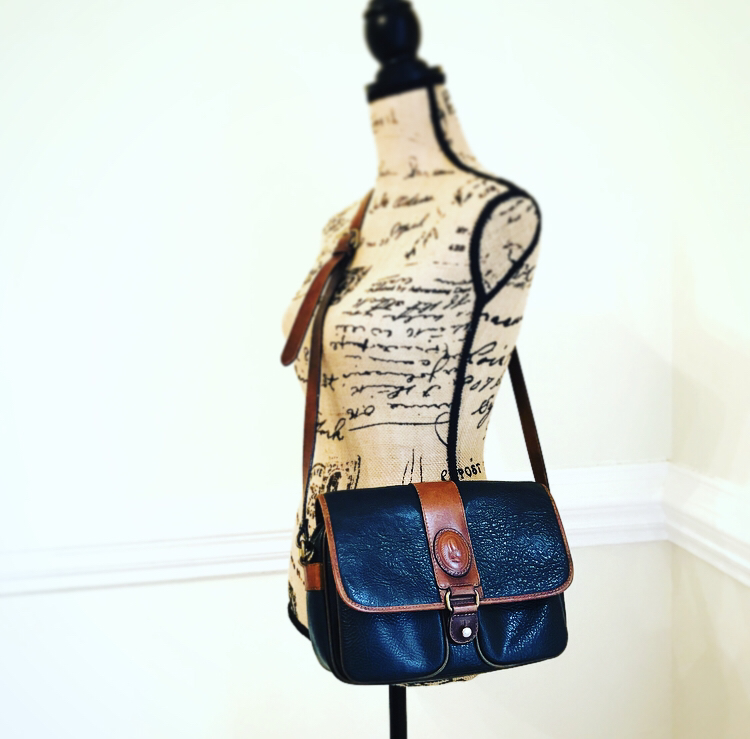 Recently I came across a new-to-me brand at the thrift store: Saint Jack. I noticed a messenger or saddlebag style leather pocketbook that looked like vintage Dooney & Burke. When I picked it up I saw it was marked Saint Jack in several places so I looked up the brand. I found out Saint Jack was a fine leather maker in London and their pieces are worth a great deal of money. So much money, I lost my head and grabbed the bag and headed home to polish the leather, which is all the bag seemed to need. Let's just say, this will be a lesson to me that I should curb my enthusiasm the next time I go thrifting! 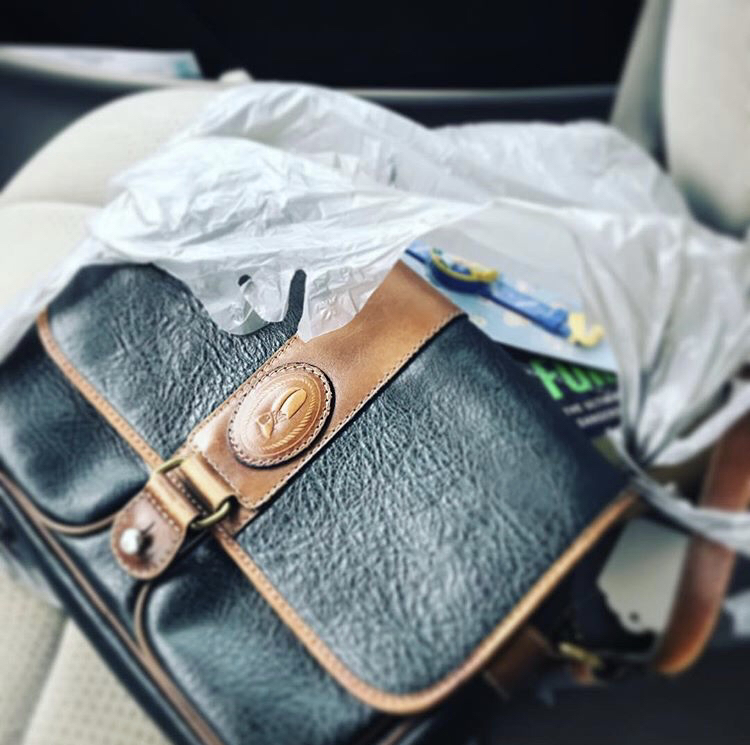 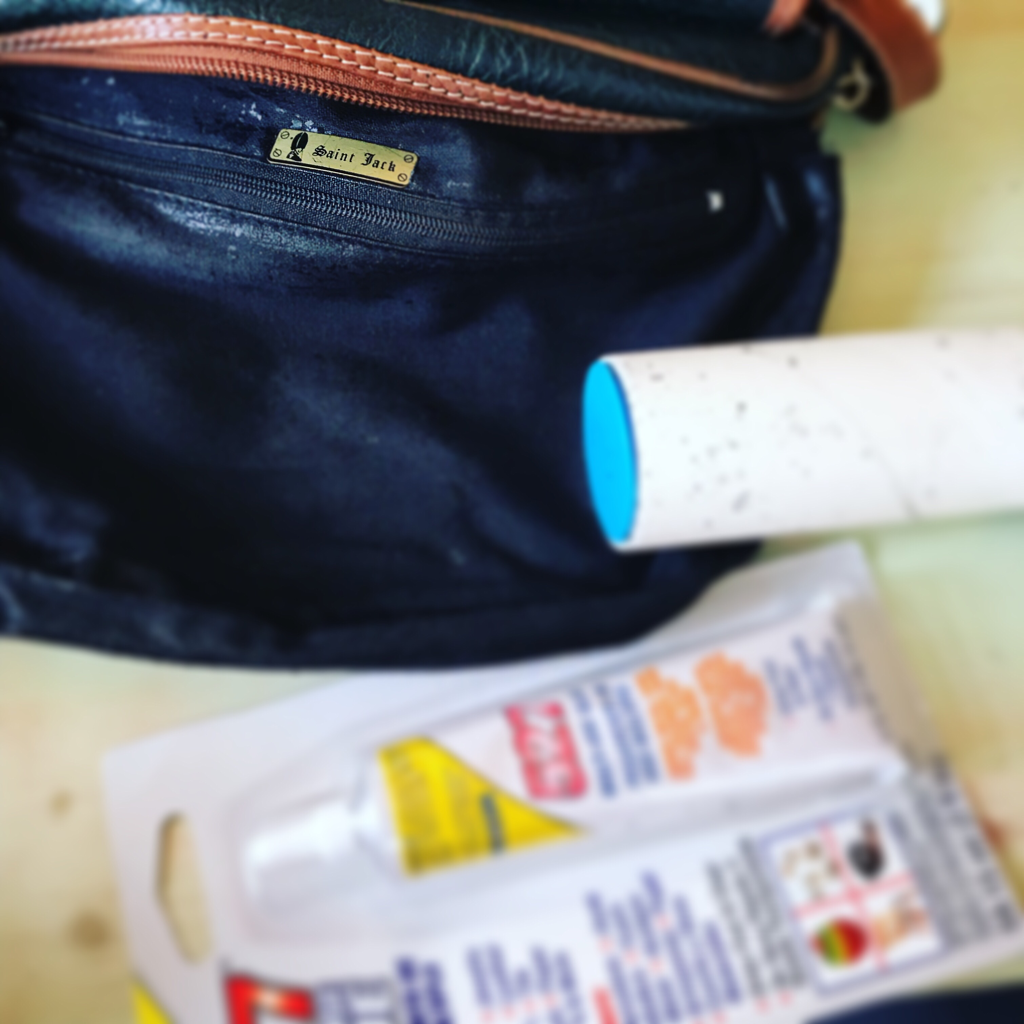 Although the bag looked used but presentable in the shop, when I got it home I noticed every time I handled it I would get sticky flakes of black plastic or something on my hands. When I investigated I realized that although the bag is made of leather the lining was made of a vinyl-coated "wipe clean" fabric. The style and color of the leather looks to me like it's from the late 1980s or early 1990s and after 30 years the vinyl coating was peeling off the fabric. I tried scrubbing off the vinyl and peeling it off with a lint roller, but I couldn't get it all. The plastic flakes stuck like glue to everything they touched and after a few days I was finding little flecks all over the house. Whenever I thought I'd gotten it all out of the purse I would reach in and get more little black flakes on my hands. There's no way I would ever sell this to someone else to use when it was driving me so crazy. I decided I would have to put in a new lining.  I looked through my fabric stash and found a sueded cotton paisley called Kashmir by Hoffman California, most like from the exact same era as the bag and a perfect match! I carefully removed the original lining by picking out the seams with a seam ripper. Then I took apart the pieces and used them as a pattern for the new lining. 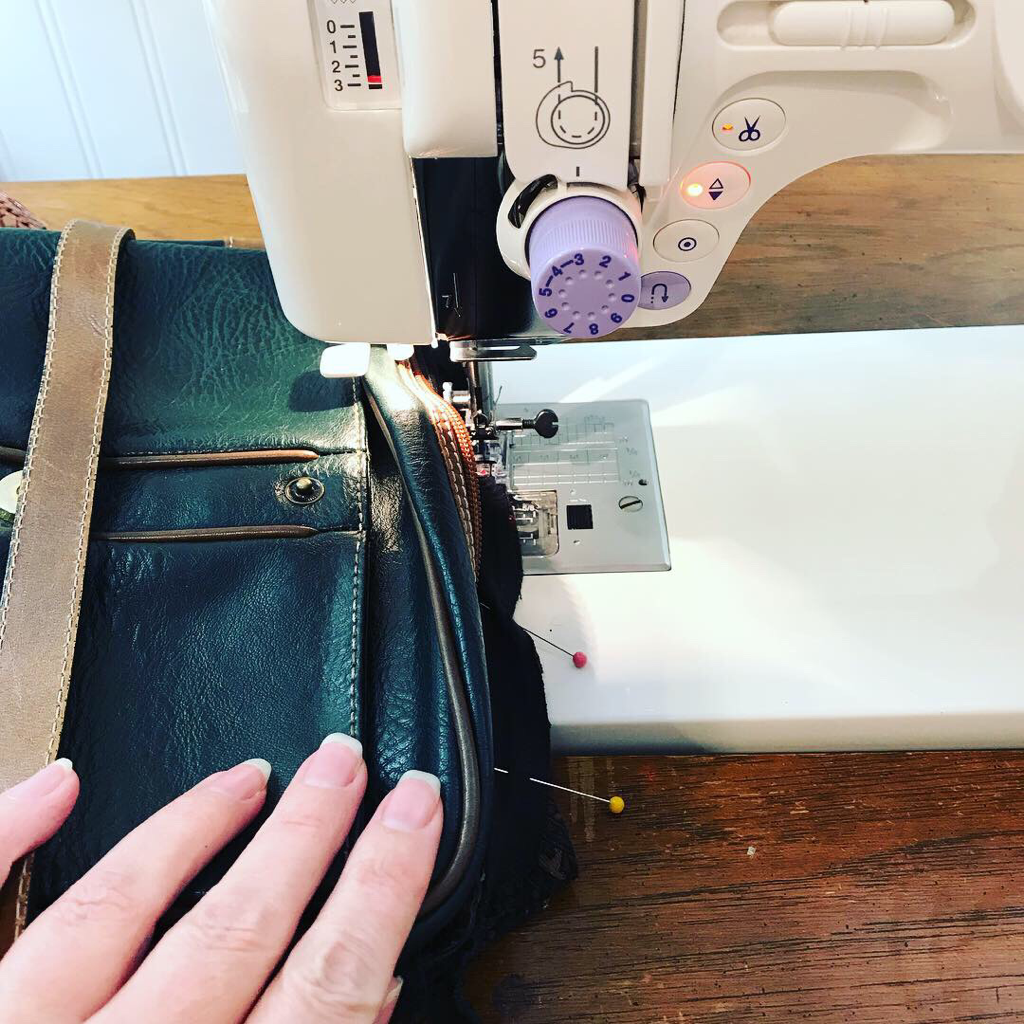 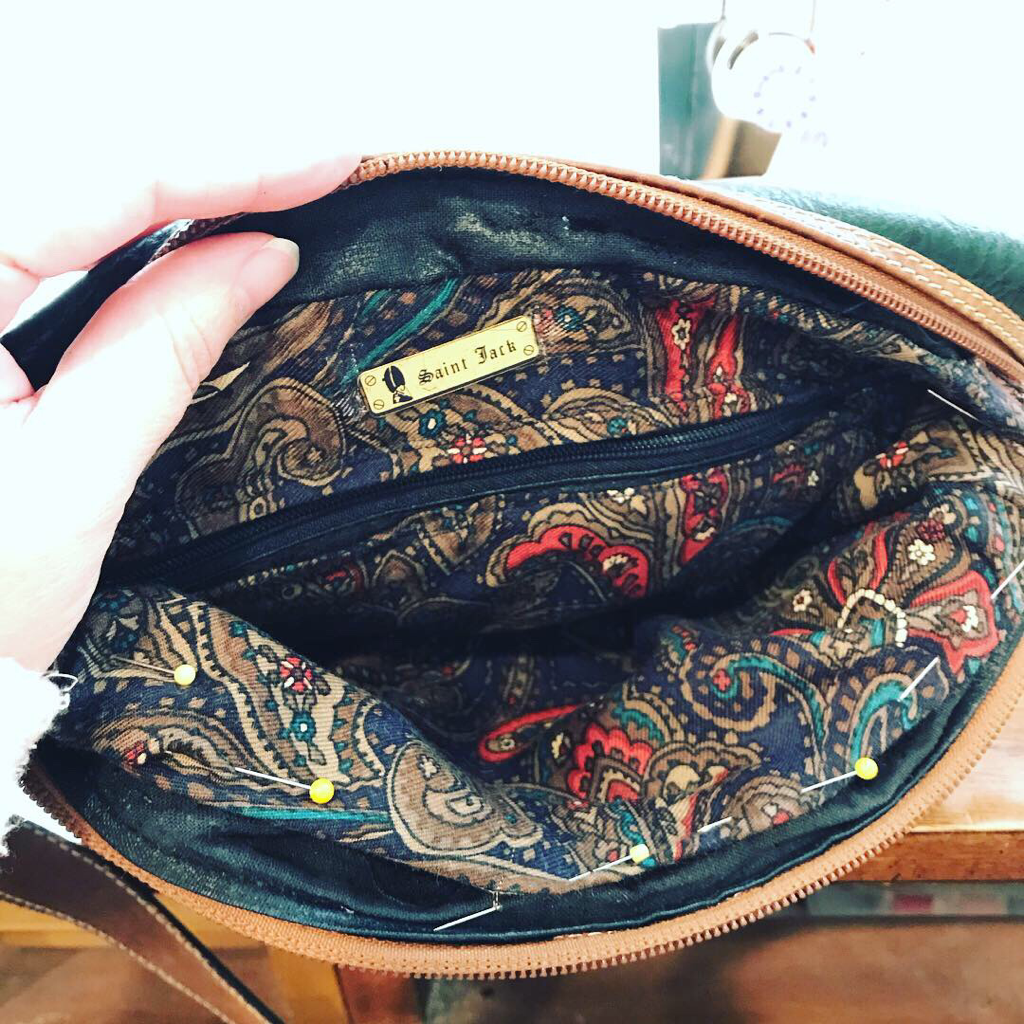 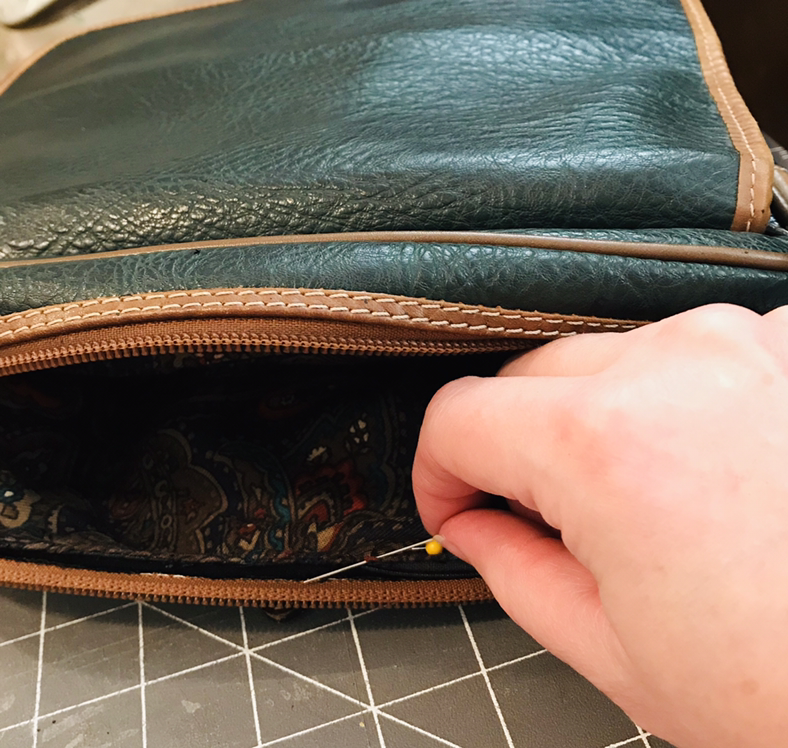 I sewed in the new lining by machine and hand and was even able to move the Saint Jack logo plate to the new lining. I re-lined both the main and front pockets of the bag. The paisley peeks out a little when you open the bag and I think it adds a lot of style compared to the plain black of the original! 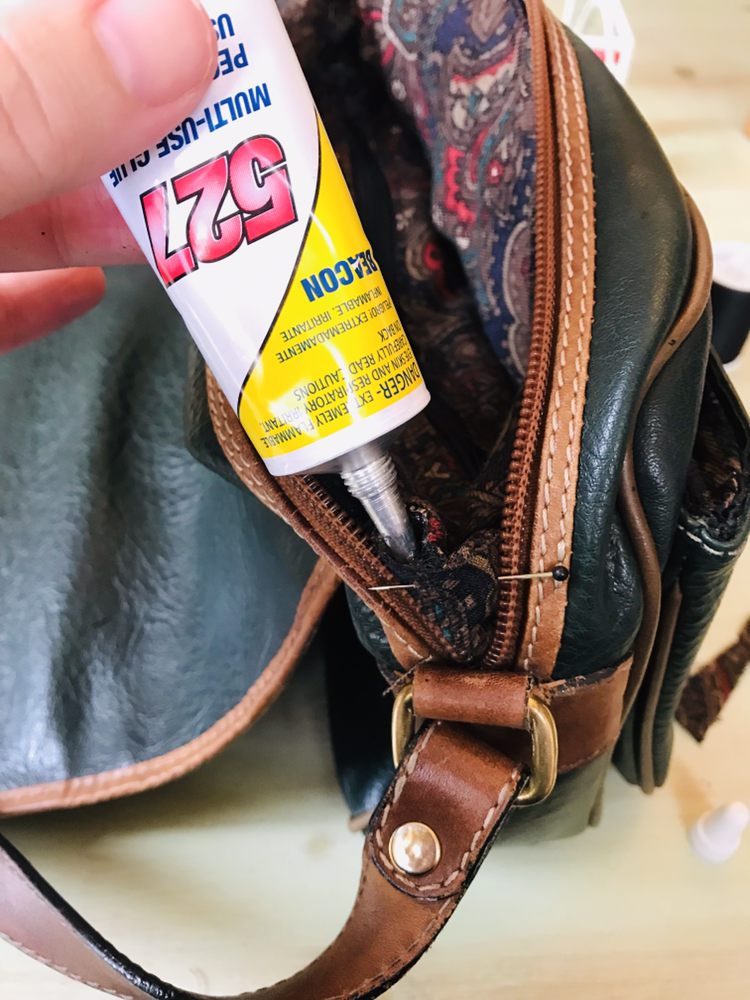 When I removed the original lining I was careful to make note of the construction and I saw the lining was both sewn in and glued to tabs on the sides. I used my go-to glue, Beacon 527, to glue the sides. My inspection of the bag turned up a couple splits in the leather binding of the flap, so I used the Beacon glue to re-attach those as well. It's such a great repair you can't even see it! 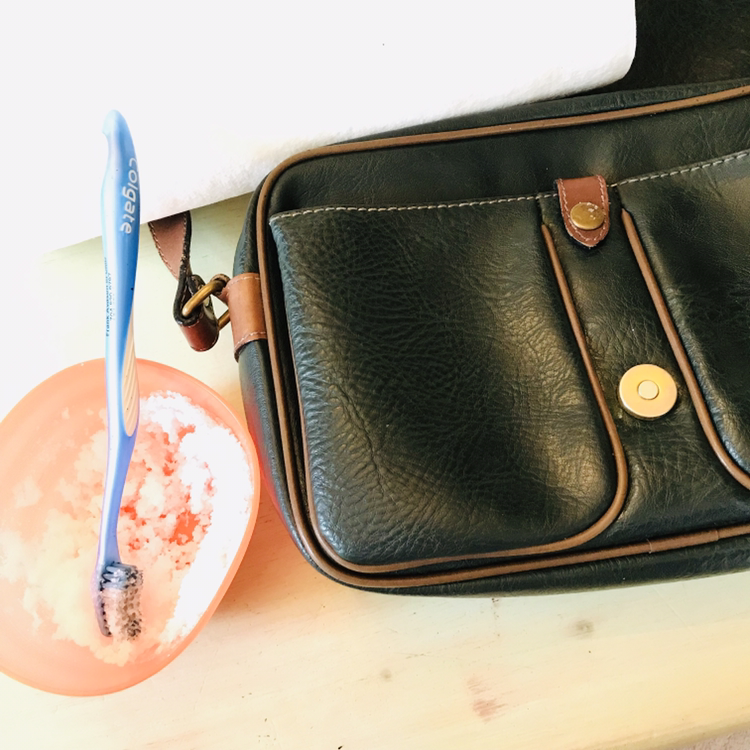 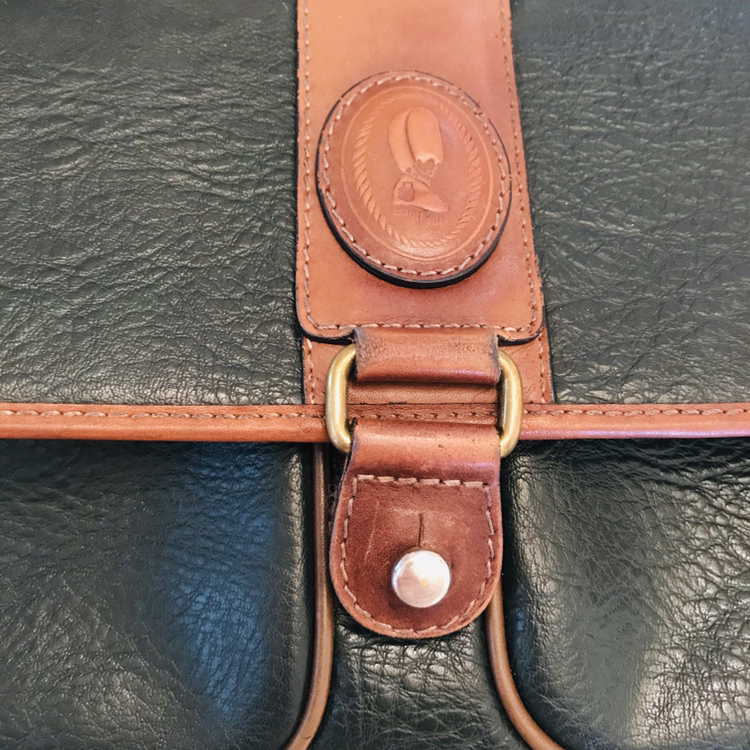 The brass hardware had some discoloration from age so I made a homemade brass polish and scrubbed it all. It makes sense to do this before you clean the rest of the bag, but unfortunately it didn't occur to me until after I'd done that, so I had to clean it again to remove the salt afterward. The scrub is kind of messy but it does work: mix salt, white vinegar, and lemon juice or essential oil to make a paste. Apply the paste to the brass, let it sit for while, scrub it with a toothbrush, and then buff off with a paper towel. I was fasting when I was doing this and it made me hungry because it smells like cocktail sauce and made me crave shrimp cocktail, so keep that in mind if you're dieting!  Another flaw I discovered when I got the bag home was the snap on the front flap was broken off. I converted the snap to a magnetic closure. I glued the magnet with Beacon 527 over the spot where the snap had been and then I covered it with wool felt on the inside. I both sewed and glued the felt in place. The felt helps keep the magnet in place and also prevents the metal from scratching the brass on the bag's front.  Finally, after all that work I was ready to remedy the dry and scuffed leather, all I thought I would have to repair originally! As I mentioned when I restored the WWII leather B6 bomber helmet, my homemade wood polish makes a terrific leather cleaner and restorer! You just use a soft cloth to rub it on and then buff it off to remove dirt and re-condition the leather at the same time! You can buy the Young Living essential oils I use from the link on the Home page.  After I cleaned and conditioned the leather I got out the shoeshine kit and used brown cream shoe polish on the brown trim. Then I brushed the entire bag to a gloss with a horsehair brush.  There was a small spot on the edge of the strap where the edge coating was worn away. I fixed this by dipping a toothpick in acrylic paint and dabbing it on the spot. You can't even see this repair, either!  I'm really thrilled with this restoration! This bag still shows enough vintage patina to communicate its authenticity but now the leather is supple and soft and the lining is beautiful. Everything feels sturdy, as only truly quality-constructed pieces feel. The bag was well-made to begin with and the hand-sewing of the restoration only supports and accentuates that. I can't find out much about Saint Jack, except they made fine leather pieces in London; I don't think they are still in business. Their pieces are extremely rare, especially in the USA. This one is one-of-a-kind. The classic style is timeless. This is a bag you will use forever, that will never go out of style. You can find it in my shops, along with many other restored vintage pieces, using the link from the Home page.
|
AuthorMy name is Amanda, but my childhood nickname was "Mandaline". I am a mother of three turning my passion for creating into a full-time business. Archives
April 2024
Categories |
 RSS Feed