
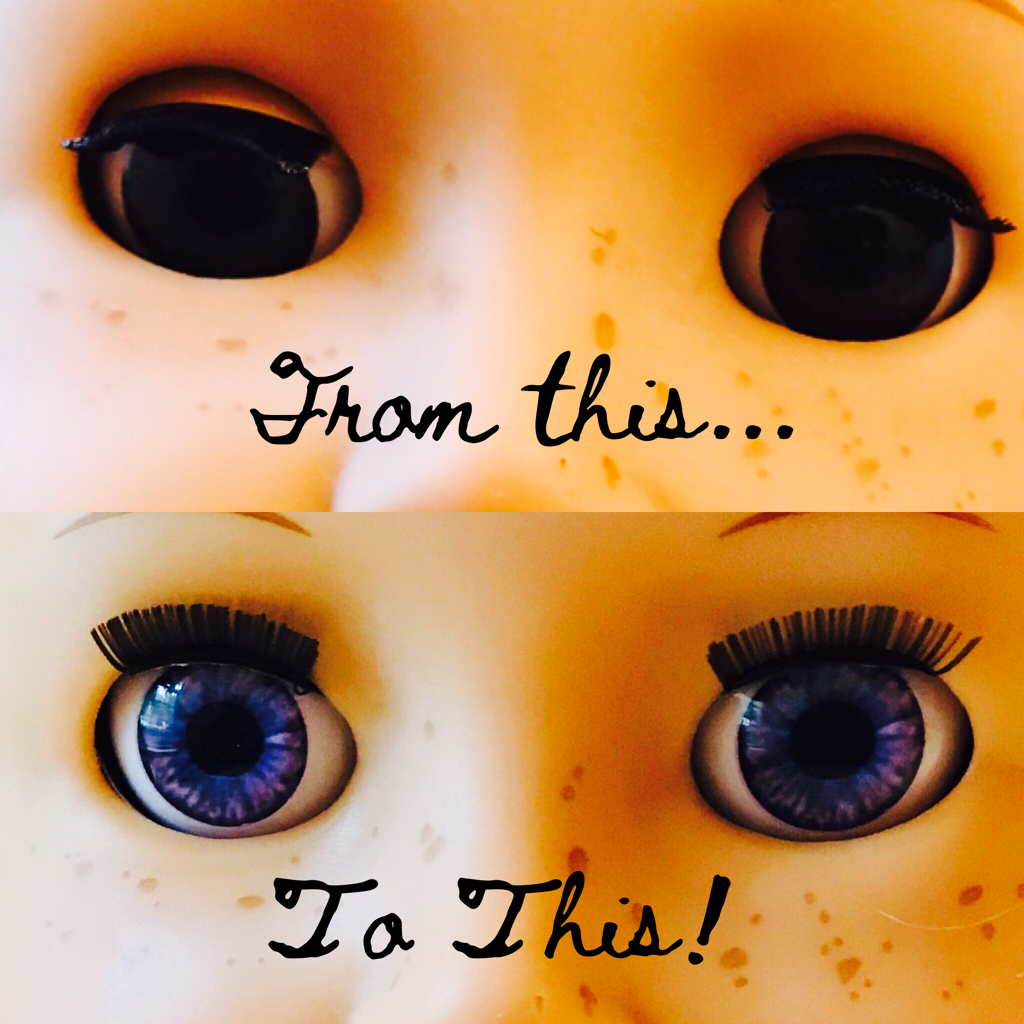
 I am beyond thrilled to announce the arrival of my custom-designed Atelier Mandaline Truly Fitting™️ doll eyes! I've been working since February to bring these eyes to you and I am not disappointed. I worked with a manufacturer to design eyes especially for dolls with shallow, wide, almond-shaped eye pockets such as American Girl and similar dolls and I am happy to announce these are a perfect fit. Now you can change out your doll's eyes for a different color or replace eyes that are stuck, damaged, or cloudy. I have four eye colors right now and plan to order more as I can afford it. You can buy them from my Etsy and eBay shops at the moment and I plan to add them to this site soon. You can link to all my shops from the Home page. Read on to find out exactly how to replace your doll's eyes. This method will work for any vinyl doll and it's perfect for dolls with a narrow neck opening. For another eye swapping method see my tutorial for dolls with wider neck openings.  The doll I am working on today is Tenney by American Girl. As you can see, Tenney has one sticky eye that no longer wants to open all the way as well as a little chunk bitten from her nose. I will replace the eyes in this tutorial and tackle the nose later. 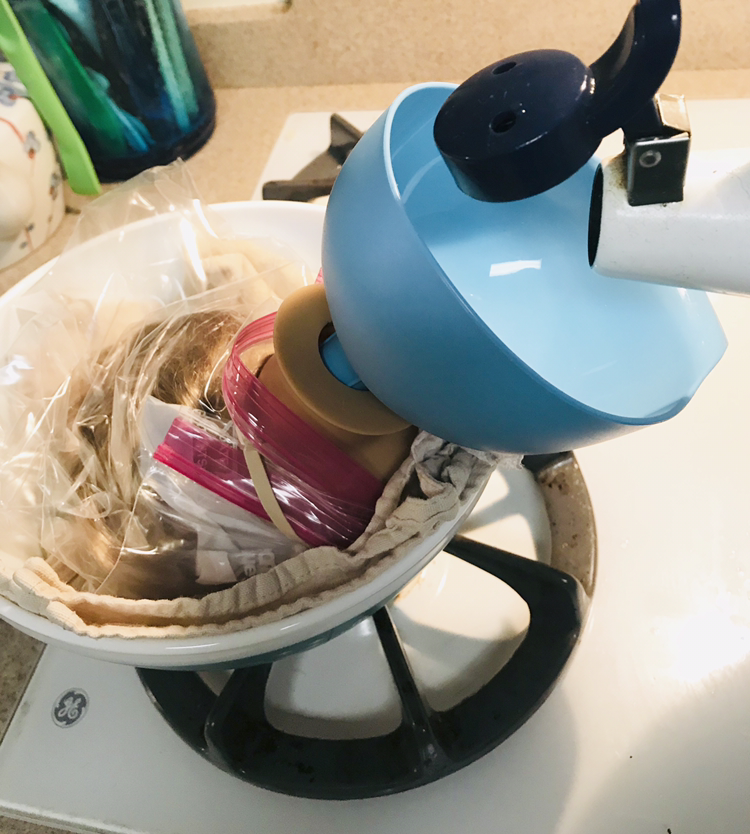 Step 1: Soften the head. In the case of American Girl you can untie the drawstring in the neck or cut the zip tie to remove the head and soften it. You need to heat up the vinyl to make it pliable. Cover the doll's hair and face paint if desired with a plastic bag to protect it in case it gets wet. Line a bowl with a towel and set the head in the bowl with the eyes facing downward. Boil water and pour the boiling water into the doll's neck opening. Use a flashlight to see inside the head and make sure you cover the little lumps inside the head with water. Those are the eye pockets and they need to be soft to remove the eyes. I used to boil the whole head to soften it, as I saw on You Tube, but Camille of Camille's Doll Spa in Chicago posted this genius method on Instagram and that's the only way I do it now. It is much easier on the hair and paint. Please note, if your doll has pierced ears or rooted hair you will need to line the inside of the head with an oven bag, like the kind you roast Thanksgiving turkeys in, before you pour in the water or the water will just all run out. I may or may not have learned that the hard way! 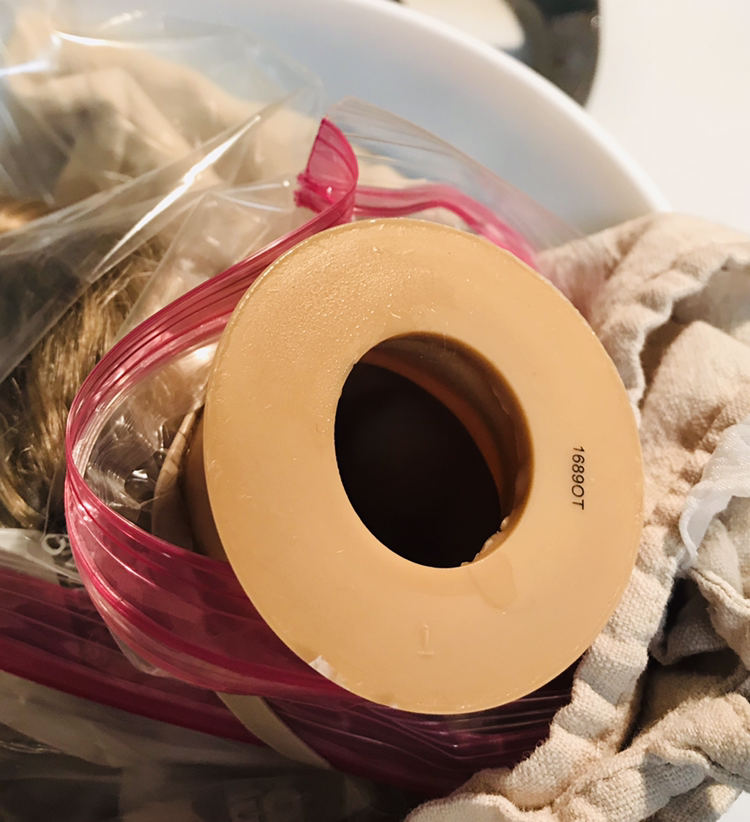 Let the water sit inside the head for 8-10 minutes or until the face is very pliable when you squeeze it. You can lift the head out of the bowl to test how squishy the vinyl has become. When you can easily change the shape of the face by squeezing it you are ready to remove the eyes. 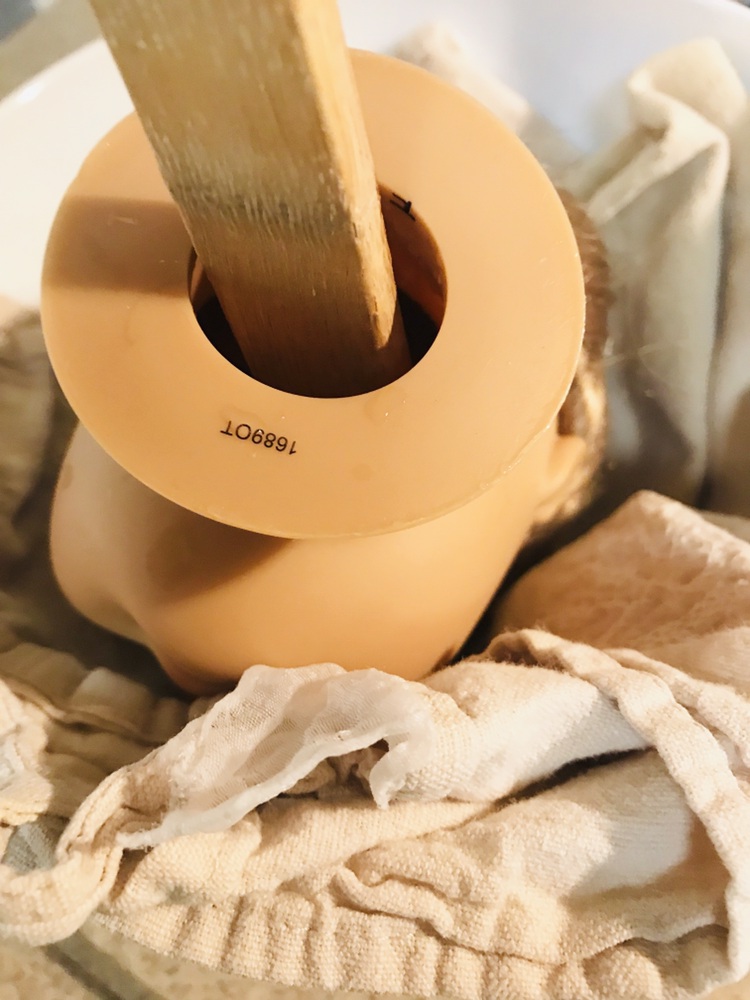 Step 2: Remove the eyes. Using a long implement like the handle of a wooden spoon, press on the backs of the eye pockets inside the head. Push on them to force the eyes out the front of the face. 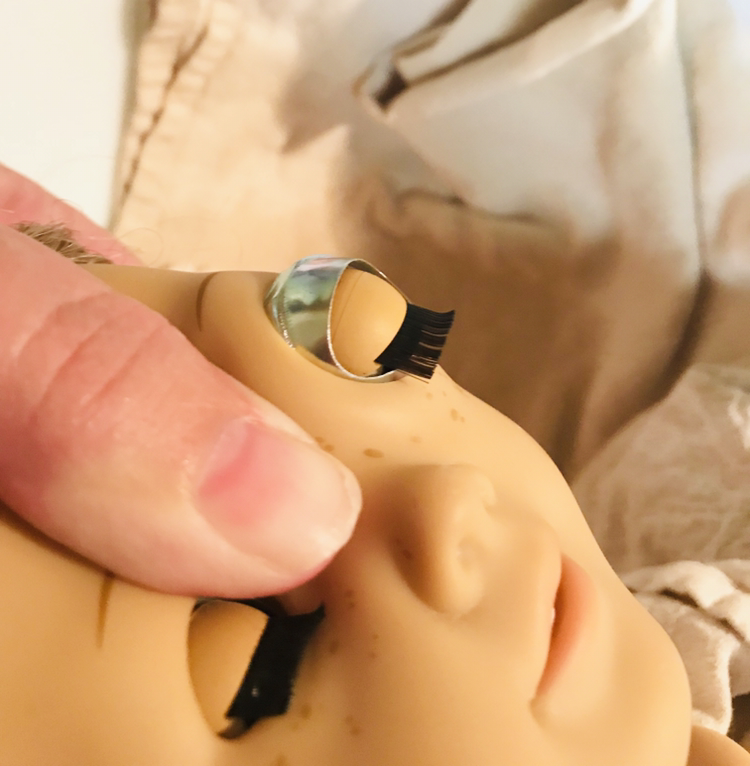 You will probably also have to squeeze the front of the doll's face around the eyes as well until you can pop them out. You may have to warm the head more than once if it takes you a while to get the first eye out. If the face has become too cool to remove the second eye warm it up again before you proceed. 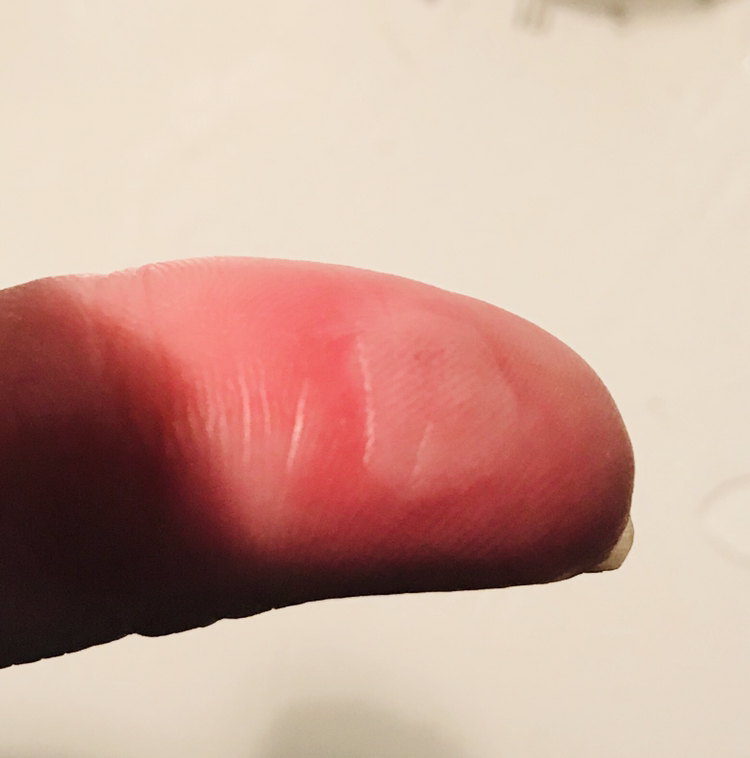 Do your best to keep the eyes straight in the sockets when you are trying to get them out or in. I got one of the eyes turned a little sideways and it became hopelessly stuck. I had to re-warm the head several times and ended up having to dig out the eye with a nut pick and gave myself a big blister! 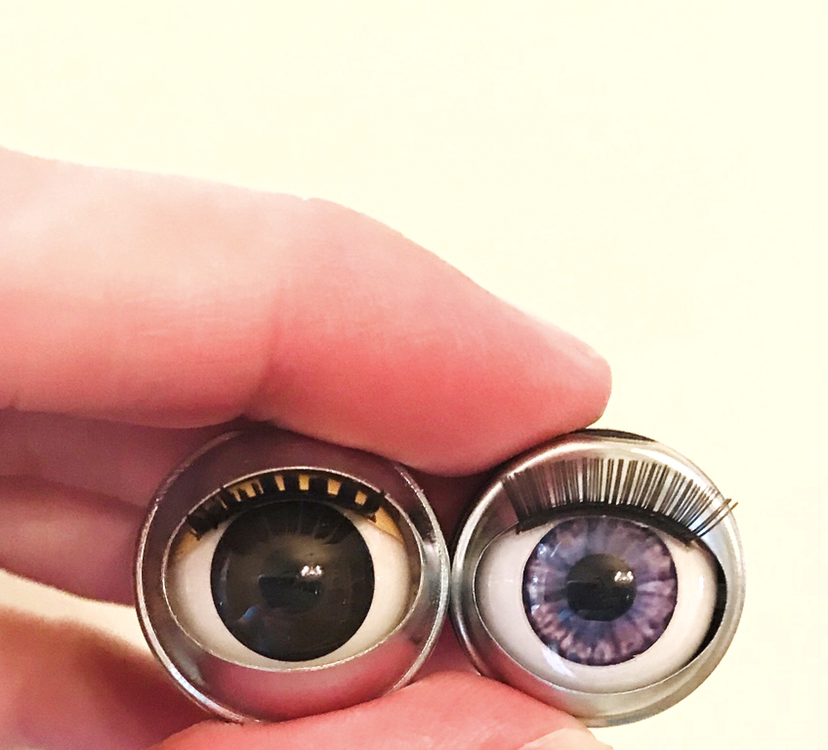 I chose my Variegated Violet eyes as a replacement for the originals. As you can see, these eyes are a near-perfect match for the originals, size wise, and in my opinion are even better because the silver rim around the eye is smaller. These are much easier to situate so the rim doesn't show when the eyes are inserted.  Step 3: Insert the new eyes. Soften the head again by filling it with water as before. While you wait for it to get soft go ahead and carefully rub baby oil on the back and sides of the eye casing. Make sure you don't get the oil into the eye casings. The baby oil makes it much easier to insert the eyes. If you feel like it's too runny you could also use petroleum jelly. You can apply the oil to the eyes or inside the eye sockets or both. I use a cotton swab to apply the oil. 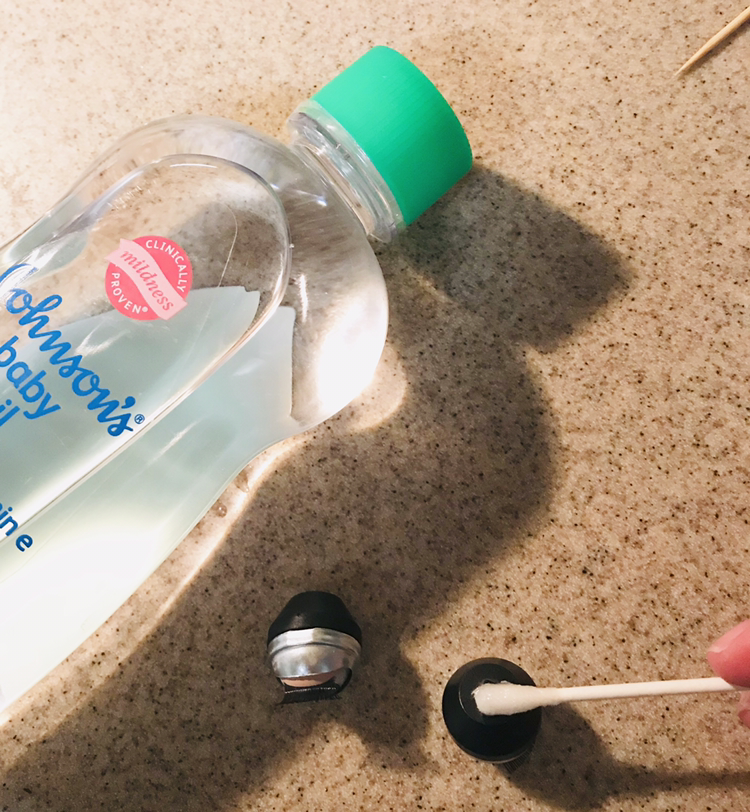 When the face is pliable and the eyes or sockets are oiled place one new eye directly over the eye socket. Make sure the eye is as straight as possible because if it gets turned sideways it will get stuck and could be damaged. These eyes are almost exactly the same size as the eye pocket. Press the eye into the eye pocket. You can squeeze the face around the eye with your other hand while you press the eye in to make it easier. The eye should pop right into the socket. Repeat with the other eye. If you work fast you can get them both inserted without softening the head in between. 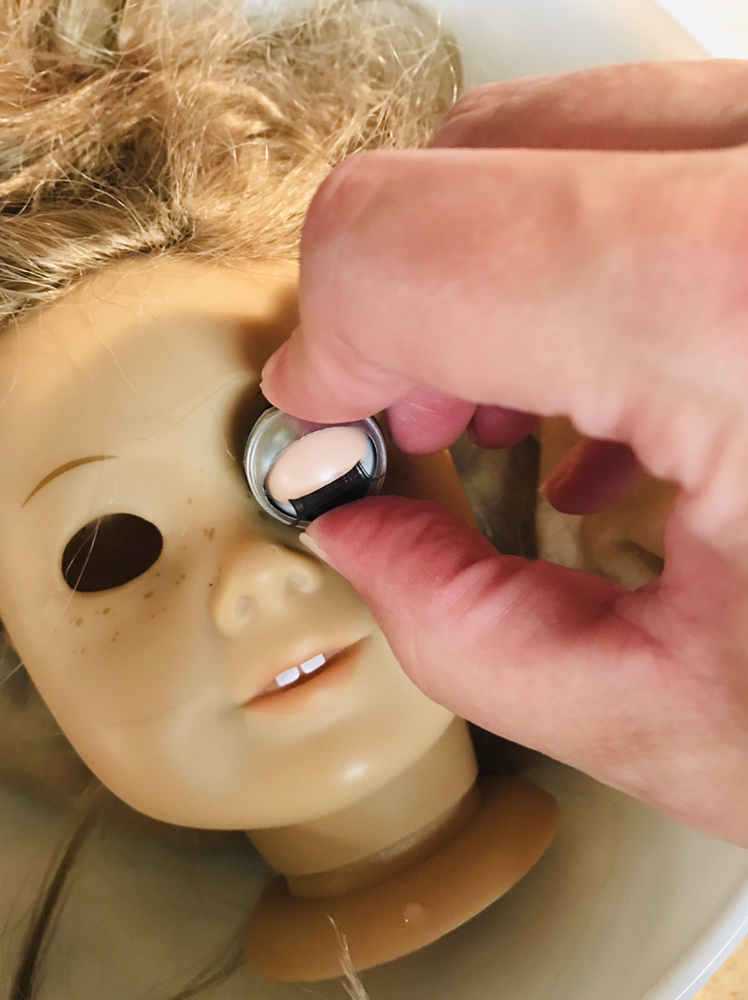 Step 4: Straighten the eyes. When you insert the eyes they are often a little wonky, gazing in slightly different directions or with the silver rim visible. Very gently press on the frames of the eyes with a nut pick or bamboo skewer to straighten them up. Make sure they are looking in the same direction and the rim isn't showing. 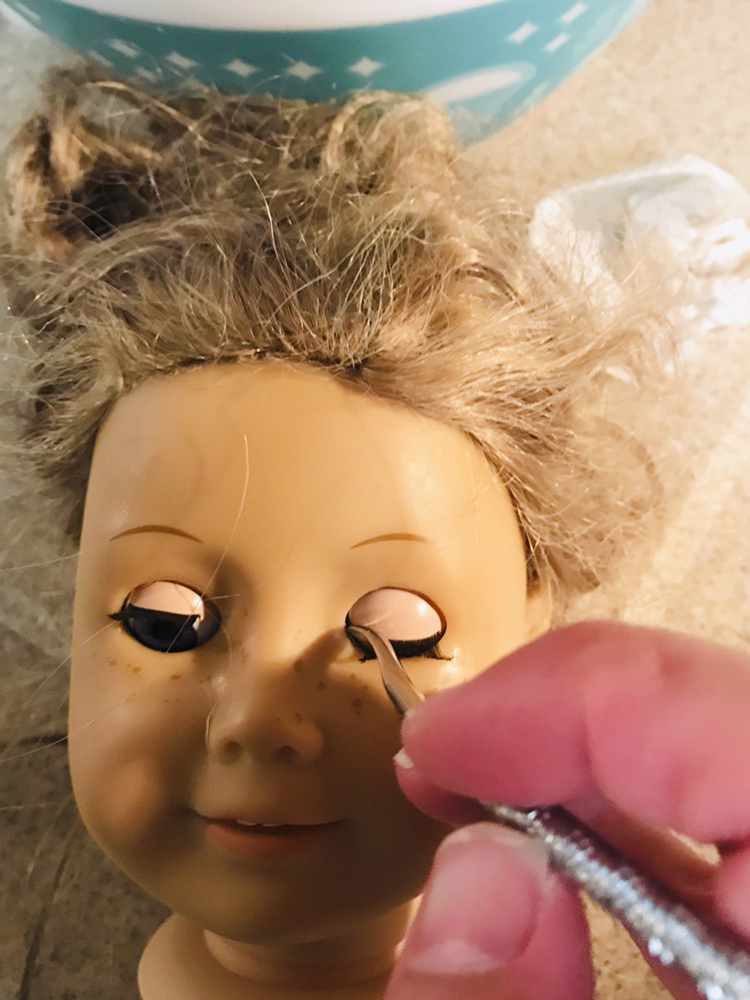 Voila! Look at those gorgeous eyes! I am even more pleased with these than I thought I would be! These new eyes just popped right in for me, far more easily than the last eyes I replaced using actual American Girl eyes. Now you can make your doll look exactly as you want or repair your doll without having to pay the pricey American Girl Hospital fees!  My eyes come in four colors: the classic Blue Pinwheel similar to the originals used in vintage American Girl dolls, jade green with a hint of aqua called Sea Jade, Root Beer Brown, and Variegated Violet, which range from lavender to dark purple. These are my most popular and requested shades but as they sell I hope to offer even more colors. I do offer custom-painted eyes in my Etsy shop. I've created everything from glow-in-the-dark reptile eyes to zombie eyes to just ordinary hazel eyes and I'm happy to work with you to bring your vision to life! As always, please take a look at my shops using the links from the Home page. 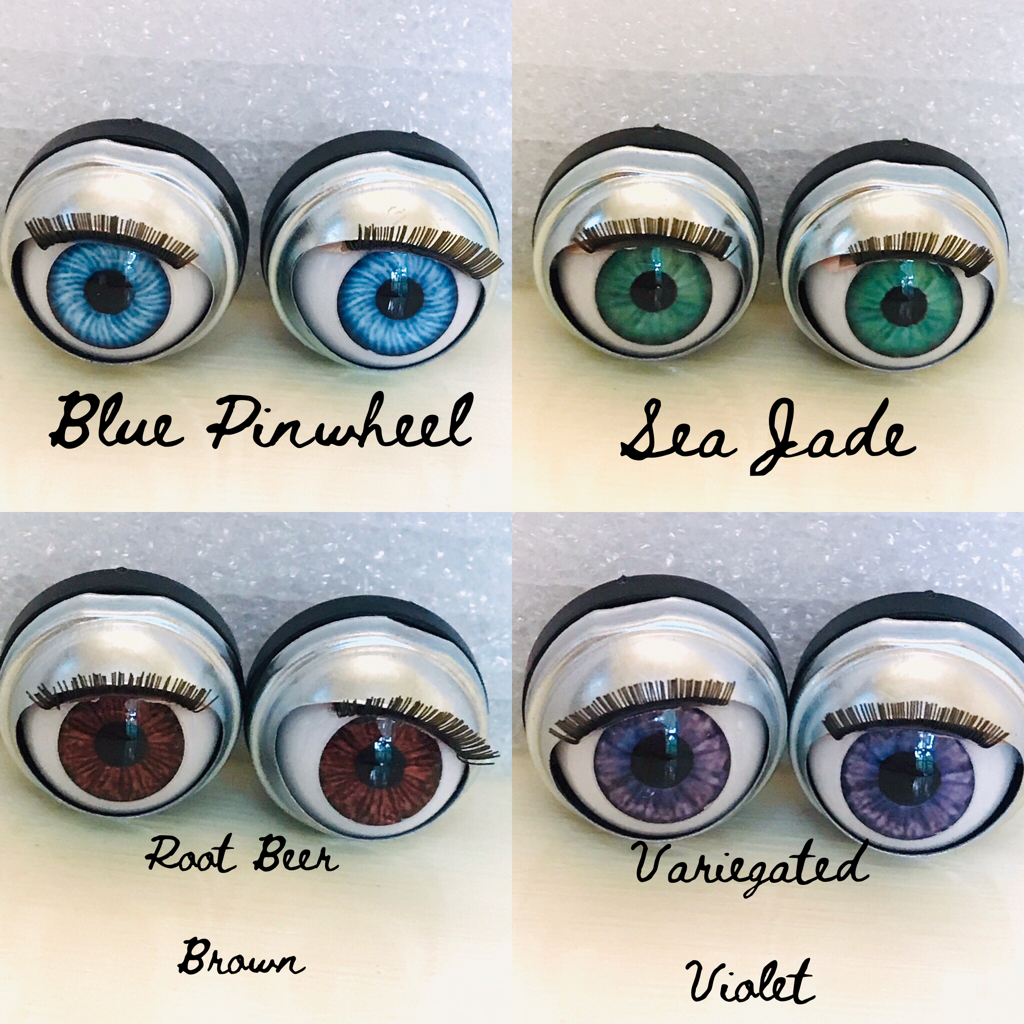
10 Comments
 I'm happy to announce all Atelier Mandaline shops are open! Hurricane Florence finally arrived and has been steadily soaking us for two days, but we are doing fine. We will have a lot of leaves and sticks to clean up and the kids and dogs are stir-crazy, but we have been extremely fortunate, for which we are grateful. I also want to thank all those who called and sent texts and reached out here on the blog and Facebook page to make sure I'm okay. You are truly a treasure and I'm so happy to have you in my life!
Please consider helping those in the Eastern part of our state in any way you can; many have been devastated and it will only get worse when all this rain falling up here in the foothills flows back down to the coast. I will most likely be doing a fundraiser in the near future; please stay tuned for that. In the meantime, to make up for the inconvenience and loss of income from nearly a week's closure, I am running a sale on eBay and Etsy. You can link to all my shops from the Home page.  Well, almost a week after I closed my stores we are still waiting for Hurricane Florence to show up. It truly is a terrible thing for the Eastern portion of North Carolina; it's just sitting, dumping rain, a slow motion disaster. Here in the Lake Norman area, which is about an hour northwest of Charlotte, we are getting the steady, slow rain we really need, plus some gusts of wind we don't. Knock on wood, this is all our area will get. The kids were off school yesterday, my stores have been closed since Wednesday, my husband has been at work day and night all week and weekend, and I'm getting seriously bored! I've finished cataloging inventory numbers for my newest pieces and photographed and pre-listed a bunch of new stuff, including several Jamberry nail wraps, cleaned the house until my dust allergy forced a suspension, read two novels... what else to do? My son has been begging for garlic knot rolls and we still have power, so I decided to try a new Keto recipe.  I adapted the popular Fathead dough recipe to create these Cheesy Garlic Biscuits. The texture is definitely more of a biscuit or muffin texture. I'll have to keep trying to get a yeast bread texture in future recipes, but this dough could be adapted to create all kinds of baked goods and has the soft, fluffy loft that's so difficult to create while staying Keto. I make my dough in the food processor. If you don't have a very large or powerful machine make this dough in two or three batches. I tried to do mine all at once and the blade got stuck and I got a nasty cut on my thumb trying to remove it.  Keto Cheesy Garlic Biscuits Makes 12 Biscuits: 3 cups colby/jack or cheddar cheese, shredded 4 ounces cream cheese 2 large eggs 2 1/2 cups almond flour 2 TBSP coconut flour 2 tsp baking soda 6 ice cubes 1 recipe Garlic Herb Butter Garlic Herb Butter: 1/4 cup salted butter 1/4 tsp garlic powder 1 tsp dried Italian Seasoning Preheat oven to 400 degrees. Make the Garlic Herb Butter by melting the butter together with the seasonings and set aside, keeping warm. Soften the shredded and cream cheese by heating in a pan or the microwave. Add all ingredients to a food processor and pulse until blended. Blend in batches if necessary. The dough should be the texture of modeling clay, somewhat, but not too sticky. Line a muffin tin with paper or silicone baking cups. Divide the dough into 12 pieces. Roll each piece into a ball and place in the muffin cups. Place the muffin tin on the top rack of the oven. Underneath it, place another pan with about 6 ice cubes. The ice cubes help the dough rise. Bake 13-15 minutes or until the tops are golden brown. Remove from the oven and brush the tops of the muffins with melted Garlic Herb Butter. You can make extra butter for serving by combining the same ingredients but just softening and not melting the butter. Per biscuit these have 327 calories, 28.7 grams Fat, 7.3 grams Carbohydrate, 2.9 grams Fiber, and 13.8 grams Protein This is a great dough to make use for anything with a traditionally fluffy texture, such as biscuits, muffins, quick breads, or even cake. You can change the seasoning to suit your taste. Try adding sweetener or flavored extracts such as lemon or vanilla or Young Living Vitality Essential Oils for cooking. If you add an extract just be careful to keep the texture the same; you may want to replace a little of the cream cheese with a different wet ingredient or add a little more coconut flour to keep the clay-like texture of the dough. If you don't want any cheese flavor use part skim mozzarella cheese in place of the colby or cheddar. Any pan will need to be lined with silicone or parchment, as this is a sticky dough. If it's still raining tomorrow I might have more recipes for you!
 Unless you live under a rock you have no doubt heard about Hurricane Florence, currently barreling straight toward the Carolinas. You might think, since I live in the Appalachian foothills of Western N. C., I am safe from the storm, but it's increasingly looking as if that's not the case. Therefore, all Atelier Mandaline shops will close tonight until further notice.
I hate to close up shop because honestly, I need the money and I am just starting to see the typical fall sales increase. However, I am all too well aware of the danger we're in. I'm trying not to panic, but the continual resurrection of Fran and Hugo by meteorologists has me scared. In 1996 I experienced the longest night of my life, the time I drove through Hurricane Fran. I was attending university in Greenville (considered part of NC's "Inner Coast") and Fran was supposed to hit us directly. We were told we would be without water or electricity for at least a month. My younger sister was also at ECU and my parents were making me share my car with her (even though I bought the car with my own money, incredibly unfair in my opinion... but that's a story for another day!) and the day Fran came ashore was her day to have the car. I wanted to go inland to our parents' house near Raleigh but she refused to leave and she also refused to bring the car to me. She had all the vast confidence in her knowledge of the typical college freshman and she had determined the storm wouldn't hit her. Besides that, she lived on campus and would have far more access to supplies than I. Finally around 4PM I convinced her to bring the car and I got out of town. By the time I made it to Wilson, about 45 minutes away back then, it was apparent I waited too late to leave. The sky was pitch black, as though it were midnight and not 5 PM. Trees were bent nearly prone across Highway 64 and I had to drive in the center of the road. Rain lashed the windshield in sheets and branches and leaves and even several frogs blew into my windshield and the wipers were as nothing. I was rolling along, blindly, wondering what on earth I could do. Back then the highway between Wilson and Raleigh was a straight, empty stretch of road through apparent wilderness. I didn't want to face the storm from my car but I couldn't see any gas stations or anywhere I could shelter. Suddenly, seemingly from nowhere, an 18 wheeler pulled onto the highway in front of me. I could see the truck's tail lights and I pulled up as close behind it as I dared and stuck right behind it, following it all the way to Raleigh (To this day my children love to hear the story of the time my guardian angel saved me in the form of a truck!). There, I had to part with the truck and cut through downtown Raleigh to the bedroom town of Garner. The trouble was so many roads were closed due to flooding I kept getting turned around by police. After three or four detours I was hopelessly lost. The street signs were unreadable, spinning like tops on their poles. I drove on desperately in what I hoped was the right direction when I saw the Rialto theater and realized I was heading the wrong way. I turned around and after a bit the tall facade of Shelton's Furniture became visible, guiding me. The rest of the drive was a straight shot and I eventually made it. The drive, typically a two hour drive, took more than six hours. Despite all that the storm hadn't reached its full potential yet. We spent a long and fearful night as it got increasingly worse. I slept in the basement, convinced the skylights in the roof were going to break open. Morning showed trees down everywhere and the entire back yard flooded. We were without power for several days and counted ourselves lucky, since we had water. Many in the area were without water or power for up to a month. It turned out the Fran forecast was completely wrong. It just brushed over the coast and hit Raleigh head-on. I had driven right under it the whole way. I ended up stuck in Garner, meeting the neighbors at our grill in the mornings for coffee, spending the days helping cut and clear fallen trees, taking cold showers at night. The worst part of it all was my sister's extremely annoying smugness for ages and ages afterward! Fran taught me respect for hurricanes and contempt for meteorological forecasts, and I'll never forget those lessons as long as I live. Now I'm responsible for my children and my house and my business and since my husband is in charge of the power grid for the Carolinas, he will be at work and I will be on my own. We are praying for the best but preparing for the worst. I hope I'll be able to reopen soon. |
AuthorMy name is Amanda, but my childhood nickname was "Mandaline". I am a mother of three turning my passion for creating into a full-time business. Archives
April 2024
Categories |
 RSS Feed