
|
Here is another tutorial showing my least favorite repair: doll body replacement. I keep making tutorials in the hopes everyone will learn to do this themselves! I'm currently charging $100 for a replacement but it will probably go up because people keep sending me dolls. It is just too labor-intensive; I don't make anywhere near my regular salary doing this repair and it hurts my hands. Besides that, there is a super-easy way to do this yourself. You can get on eBay or go to a thrift store and get a doll of the same size with a good body and just move your head to the better body. That way it's still "your" doll. When you get on eBay you will probably find you can buy a brand new version of your doll for way less than sending it to me. From what I can see, 95% of kids had the same baby doll during their childhood and they are plentiful. The doll in this video was owned by all the 80s and 90s kids (originally a Zapf Creation head mold). The late 50s-70s kids had the Madame Alexander Kathy Baby face mold doll. They were manufactured by different suppliers using the same molds and sold everywhere from gas stations to grocery stores to department stores and toy shops so the quality varies but they are pretty ubiquitous still. I know a lot of people don't want a new doll because they see their doll as a real person but moving the head solves that issue. However, if you still want to use the original head and limbs here is how to make a new body. You can watch the fast version in the video or follow these steps. 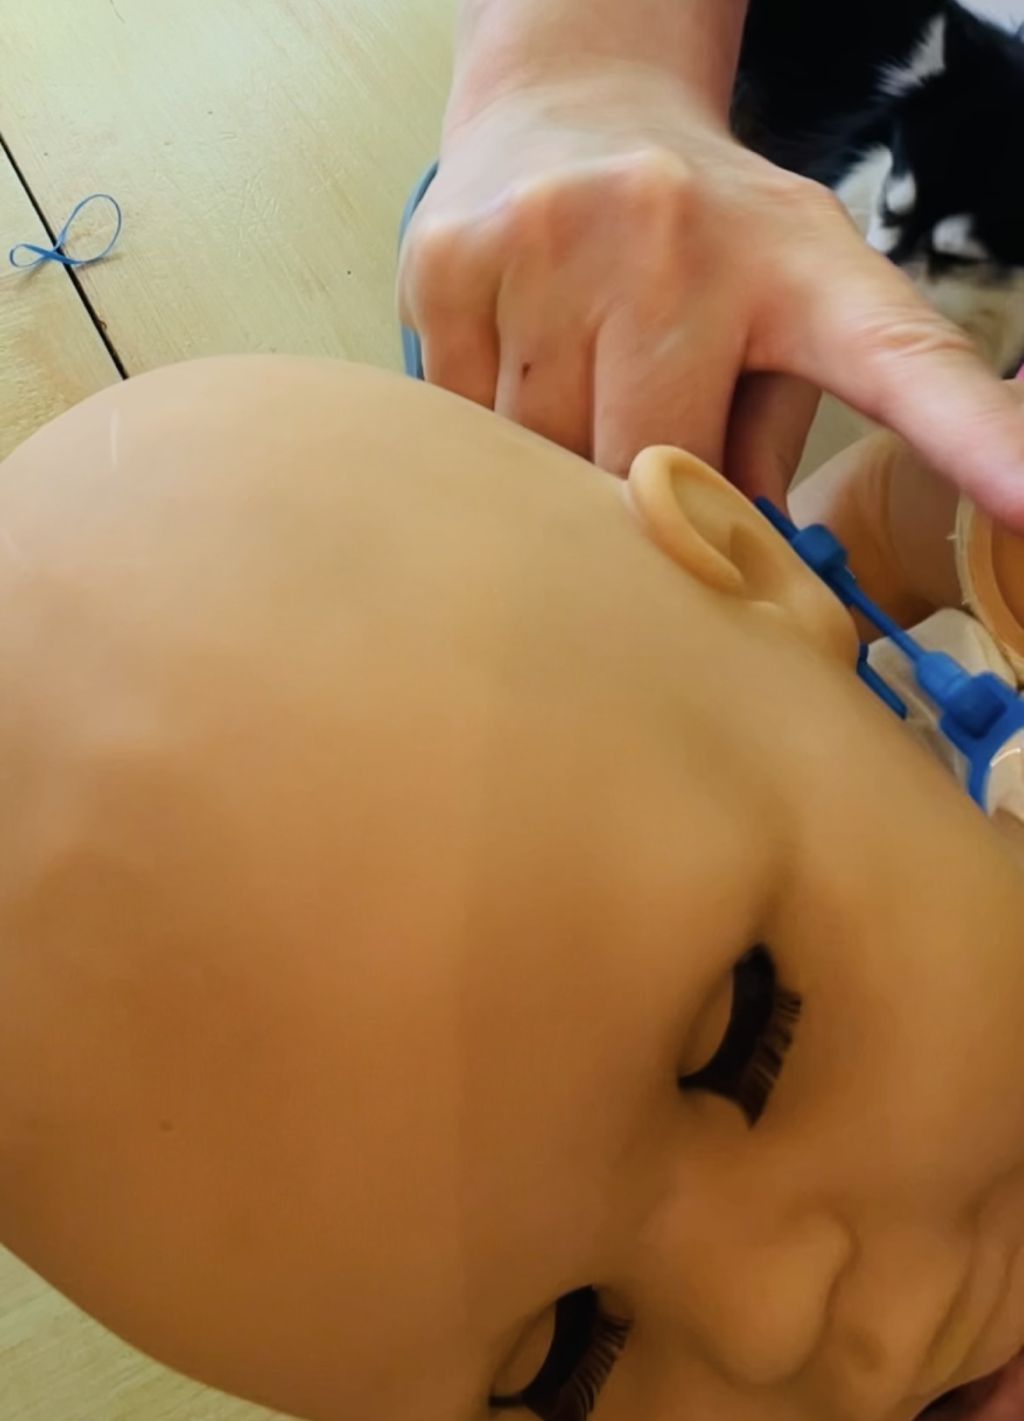 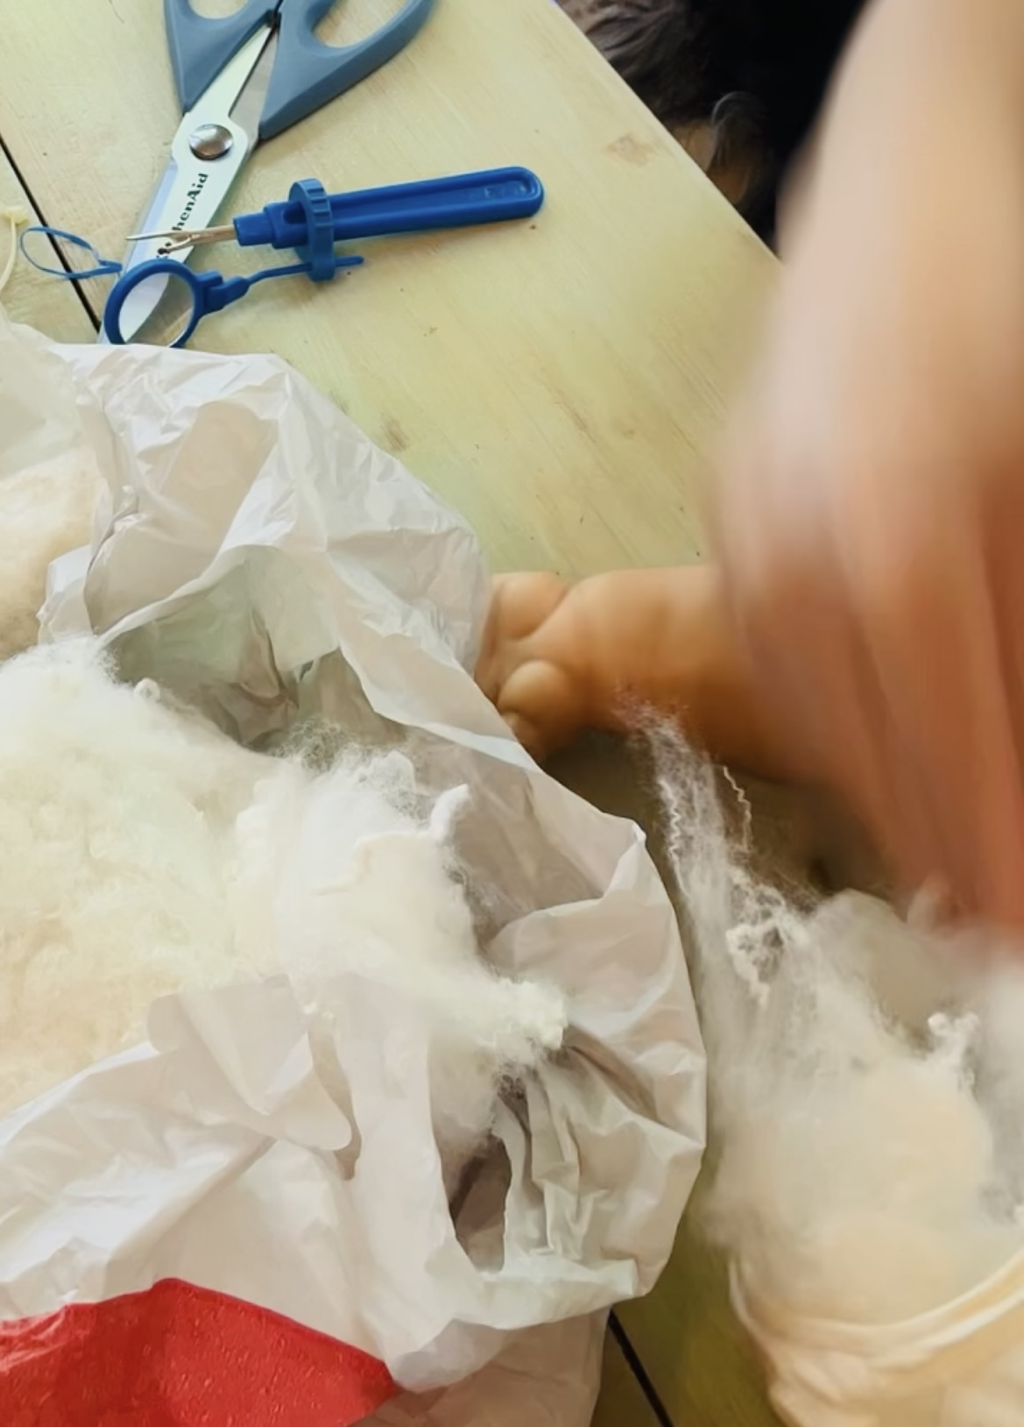 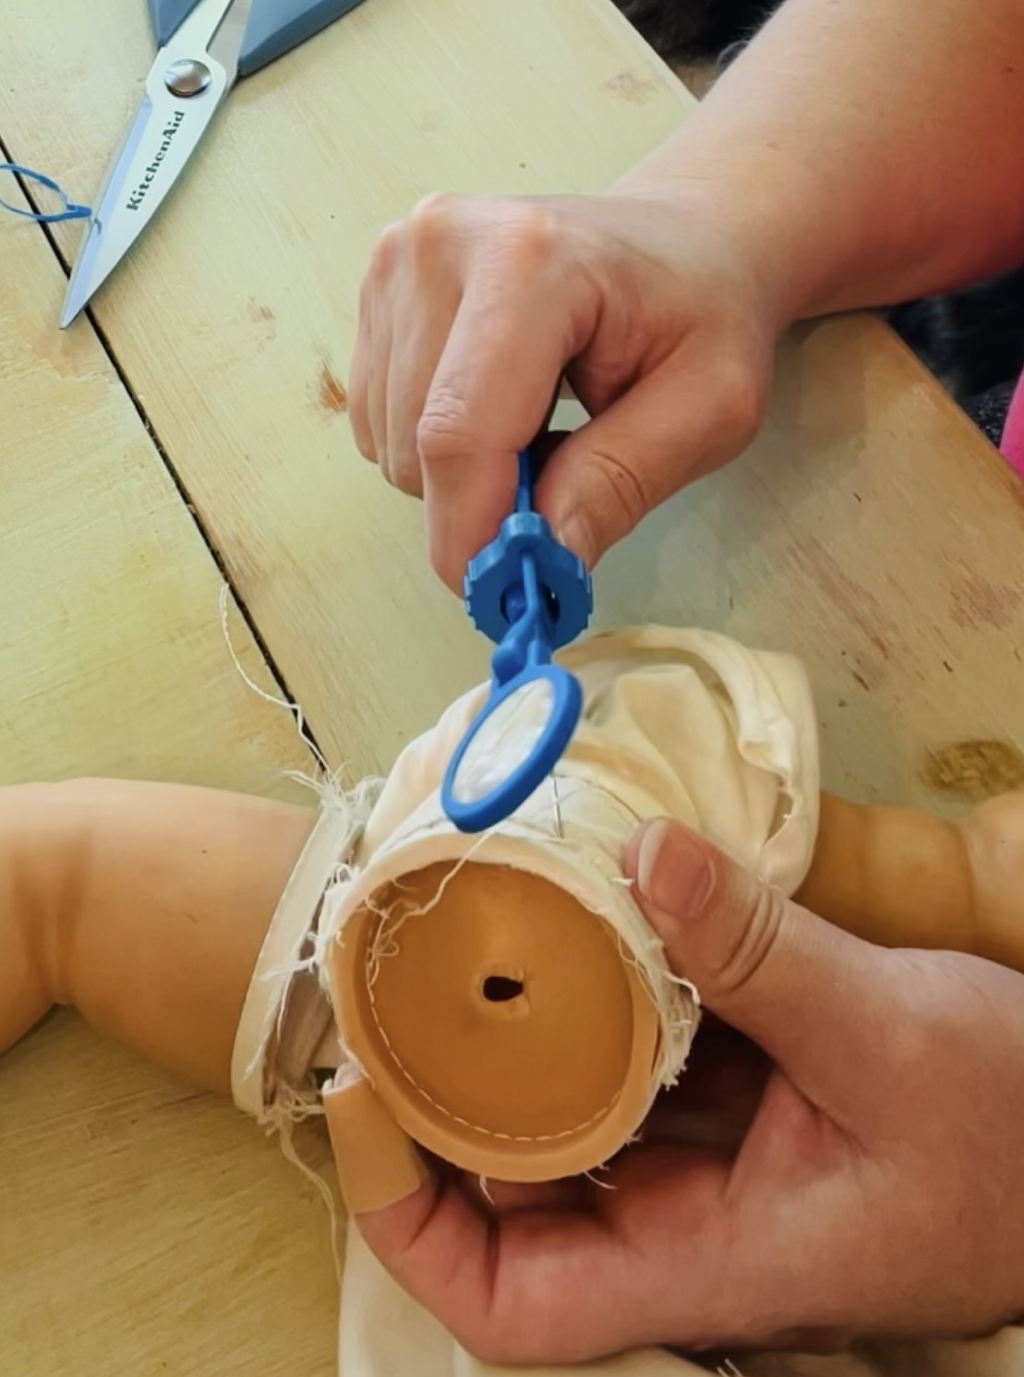 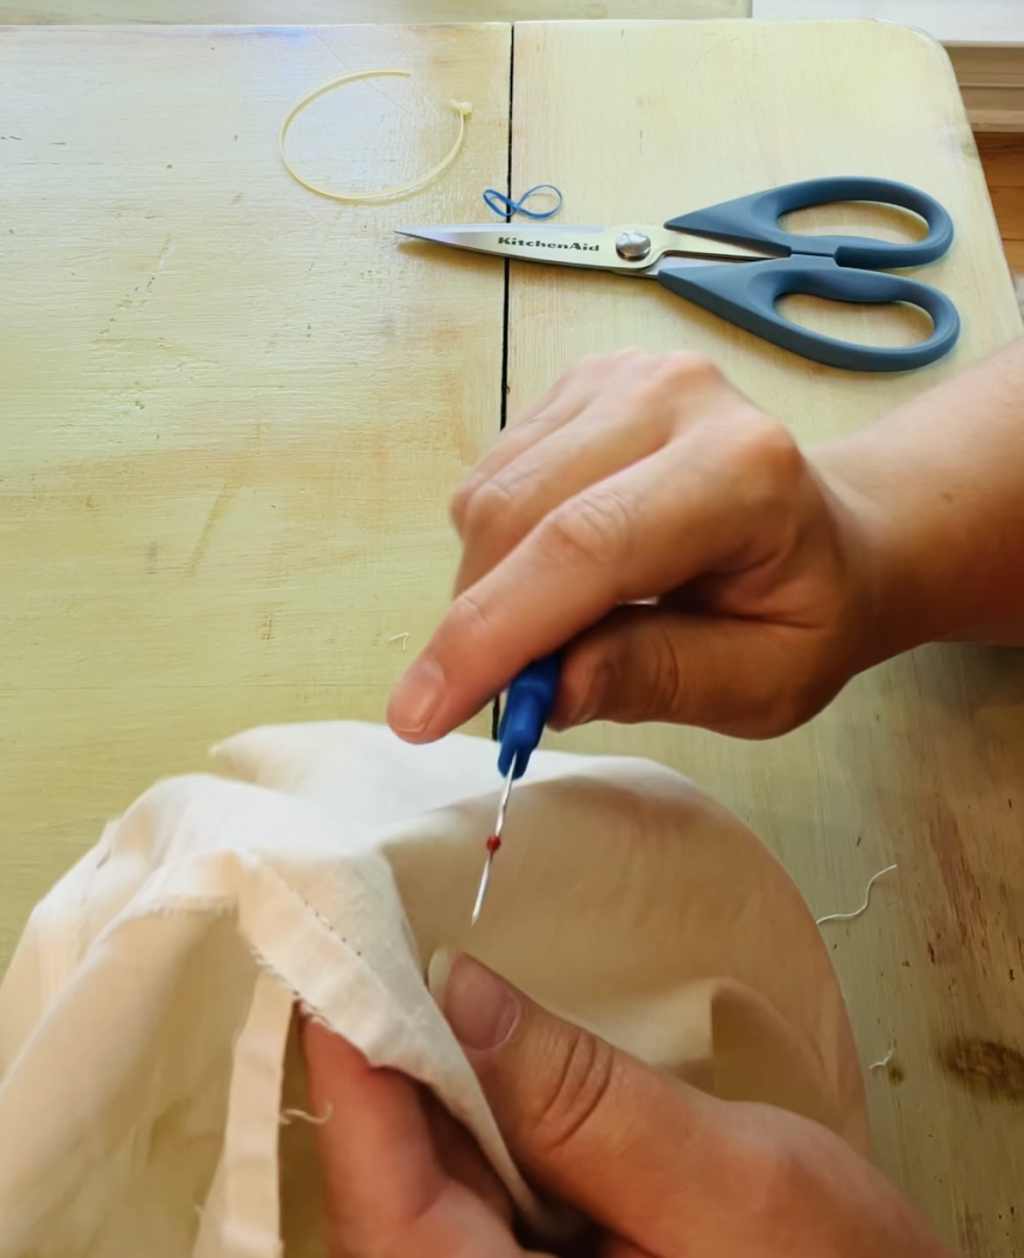 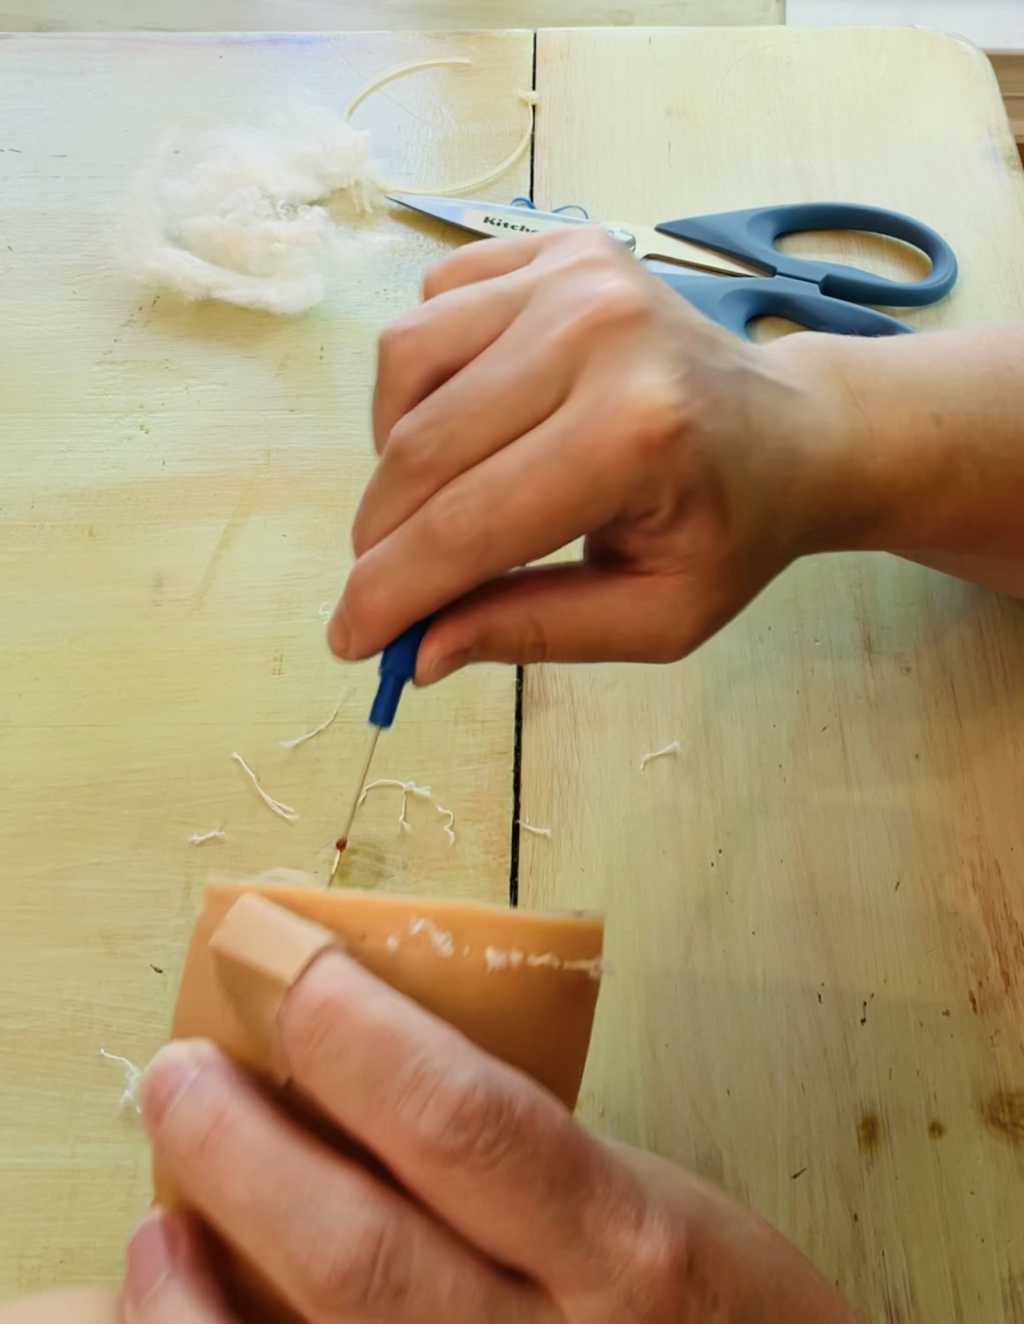 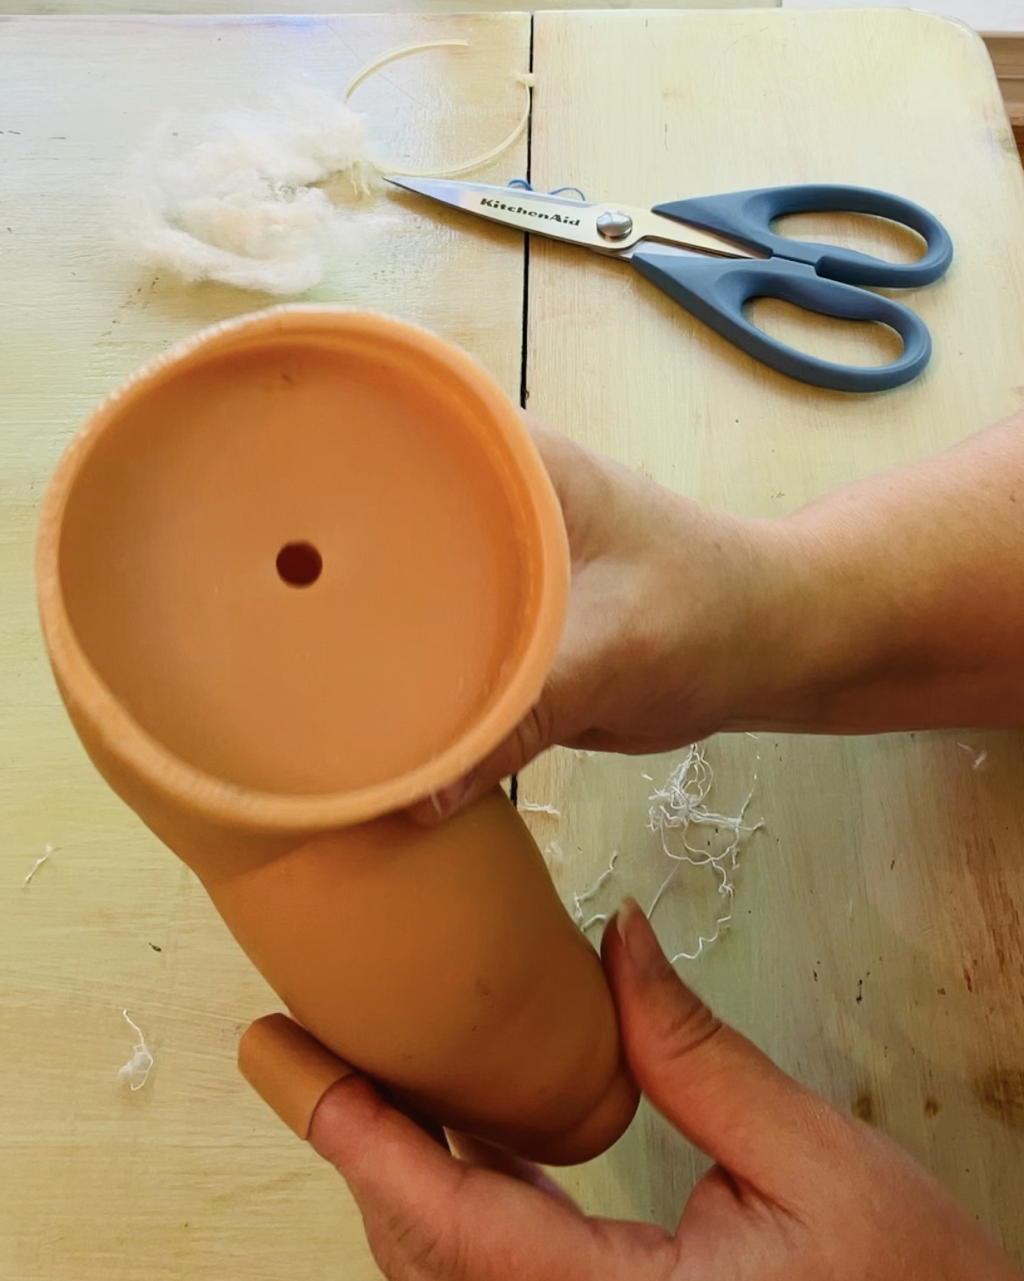 First, cut the zip tie or untie the drawstring attaching the head. Remove the head and set aside. Remove the stuffing from the body. If the stuffing isn't dirty you can save it to re-use. This stuffing wasn't dirty and it's unusually heavy and unlike what I can buy today so I saved it. Plus the owner said something about wanting the body to be the same and not "fat" and I wasn't sure what that meant so I elected to just use the original stuffing. I save the stuffing in a grocery bag until I'm ready to use it again. When you've removed the stuffing you will need to carefully remove the limbs. Use a seam ripper to cut each stitch until it detaches from the body. You might want to take photos of each stage as you work so you will remember how to put the new body together. Set aside the limbs and then carefully pick apart the body pieces. You are going to use the body pieces as a pattern to make a new body so it's important to keep the pieces as intact as possible. Use a seam ripper to take apart the pieces. You can get a seam ripper from fabric stores or sewing sections of stores like Walmart. Carefully pick each stitch to break it until the pieces are free from each other. Set the body pieces aside somewhere they won't get lost because you will need them. Once the body pieces and limbs are separate you will need to get every bit of thread out of the holes in the limbs so you can sew them to the new body. I use a seam ripper and sometimes even have to pull out bits of thread with pliers. The limb is done when it's completely free of thread. It's easiest to go ahead and scrub the head and limbs to clean them when they're all separate from the body. You can let them dry while you're making the new body. 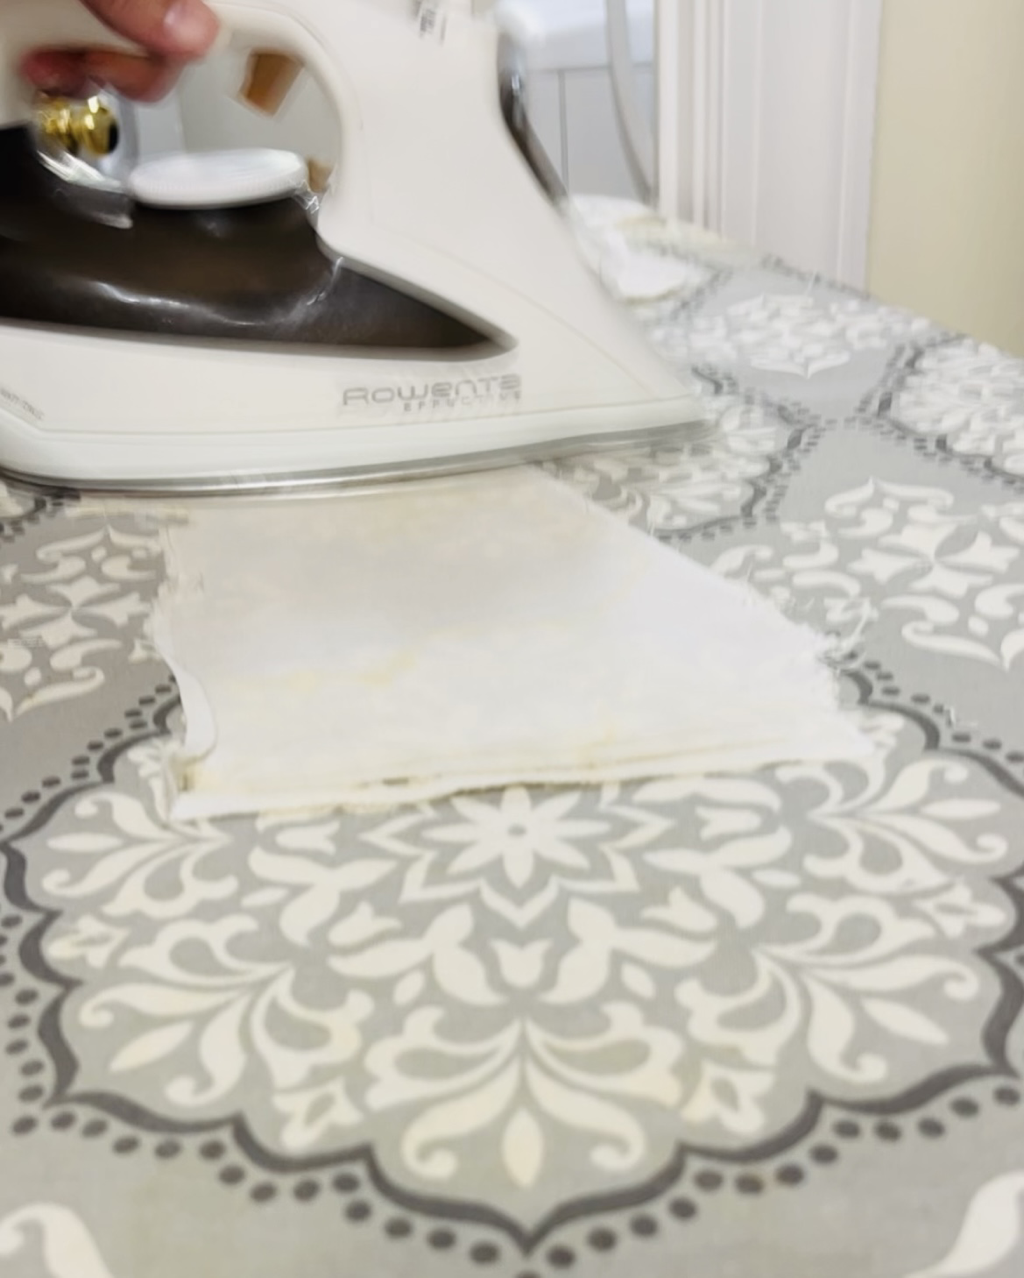 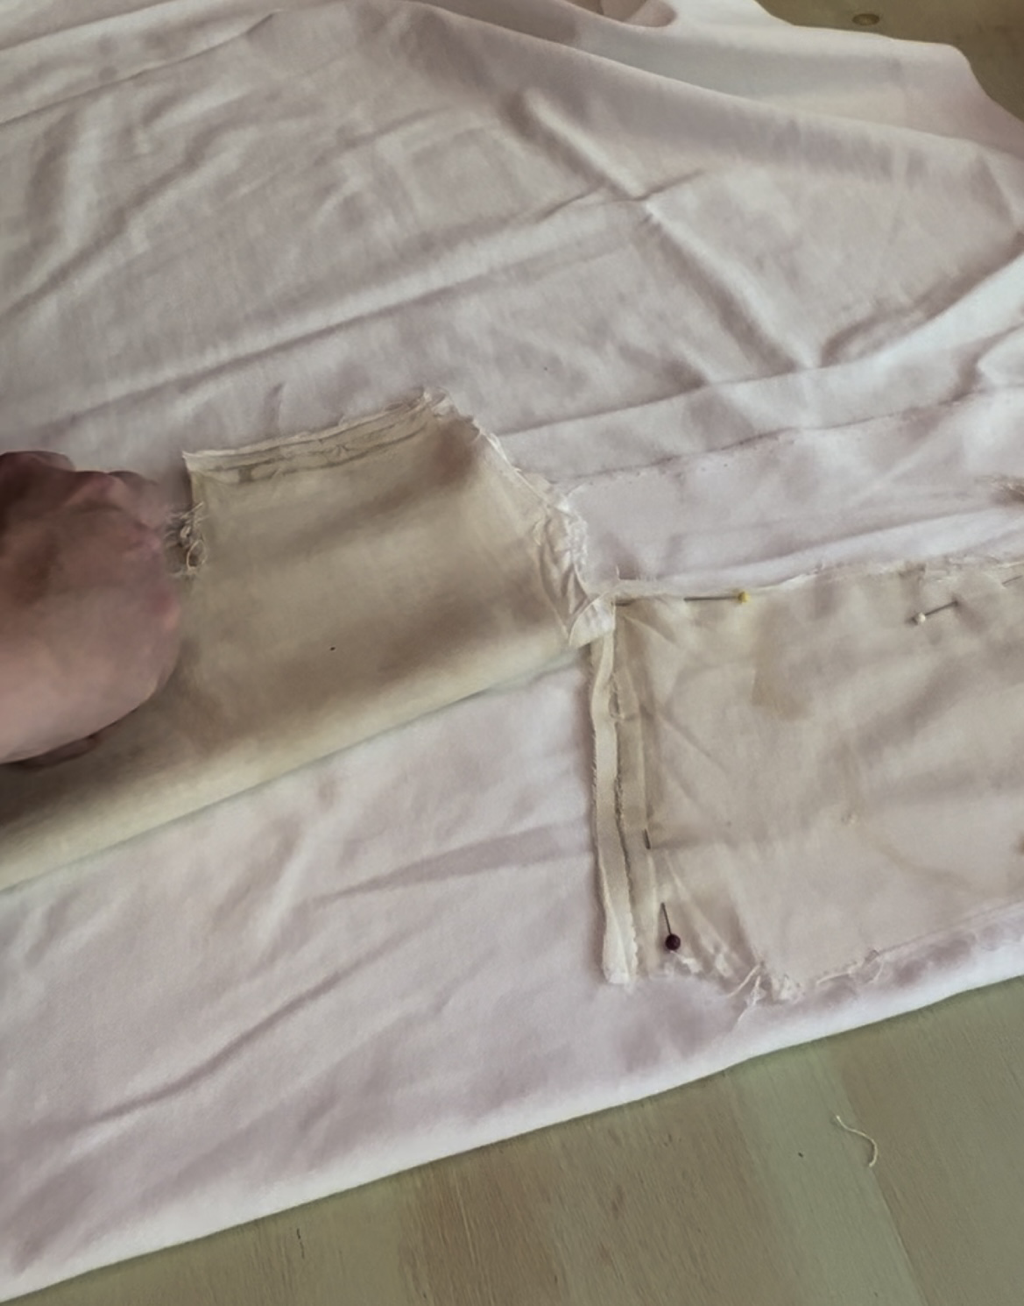 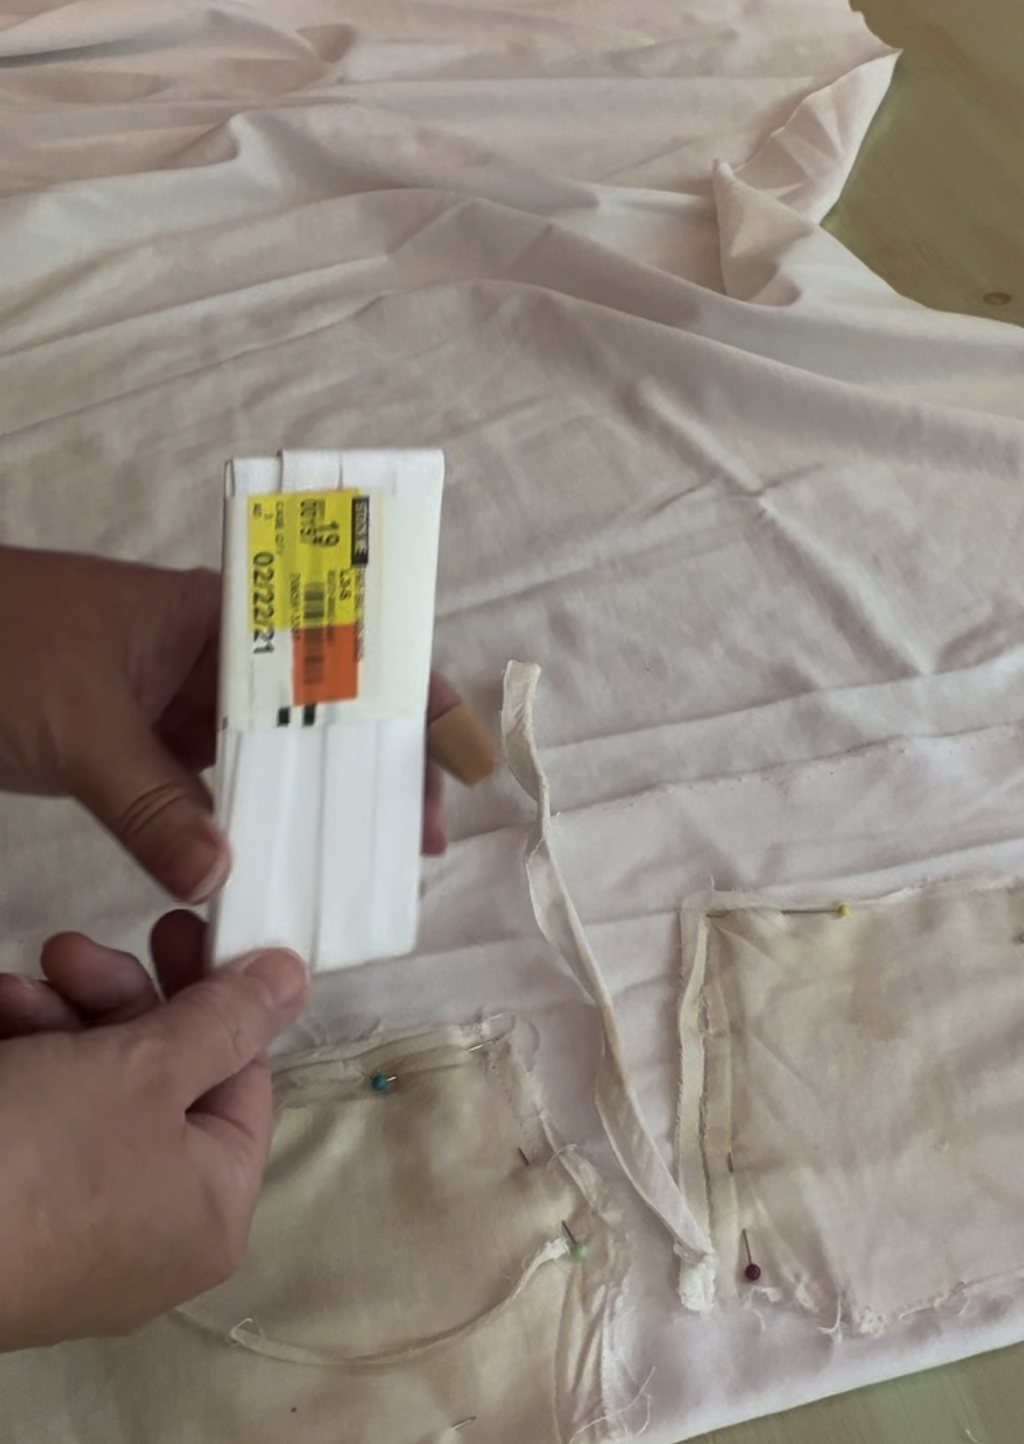 Examine the body pieces and figure out which ones are the most intact. People often wait so long to replace the body big sections will be missing or patched. In this case one arm was mostly gone so I had to trace the arm from a different piece to recreate it. Iron the original body pieces to get them flat. Make sure to measure the seam allowance used in the original body. That is the length between the cut edge of the fabric and the row of stitches. In this case it was 1/4". If you have to recreate part of the body make sure to add in the seam allowance. Lay out your new body fabric and pin the old body pieces to it to make a pattern. Cut the fabric. Whenever I can find it I like to use very thick stretch knit for the body. It's more durable for play and the stretch is forgiving if I have to make a new body part and it's not exactly the same as the original. For the neck casing I use wide double fold bias tape, even if the rest of the body is knit. I cut the bias tape an inch or two longer than the original so I can overlap it to cover the zip tie. 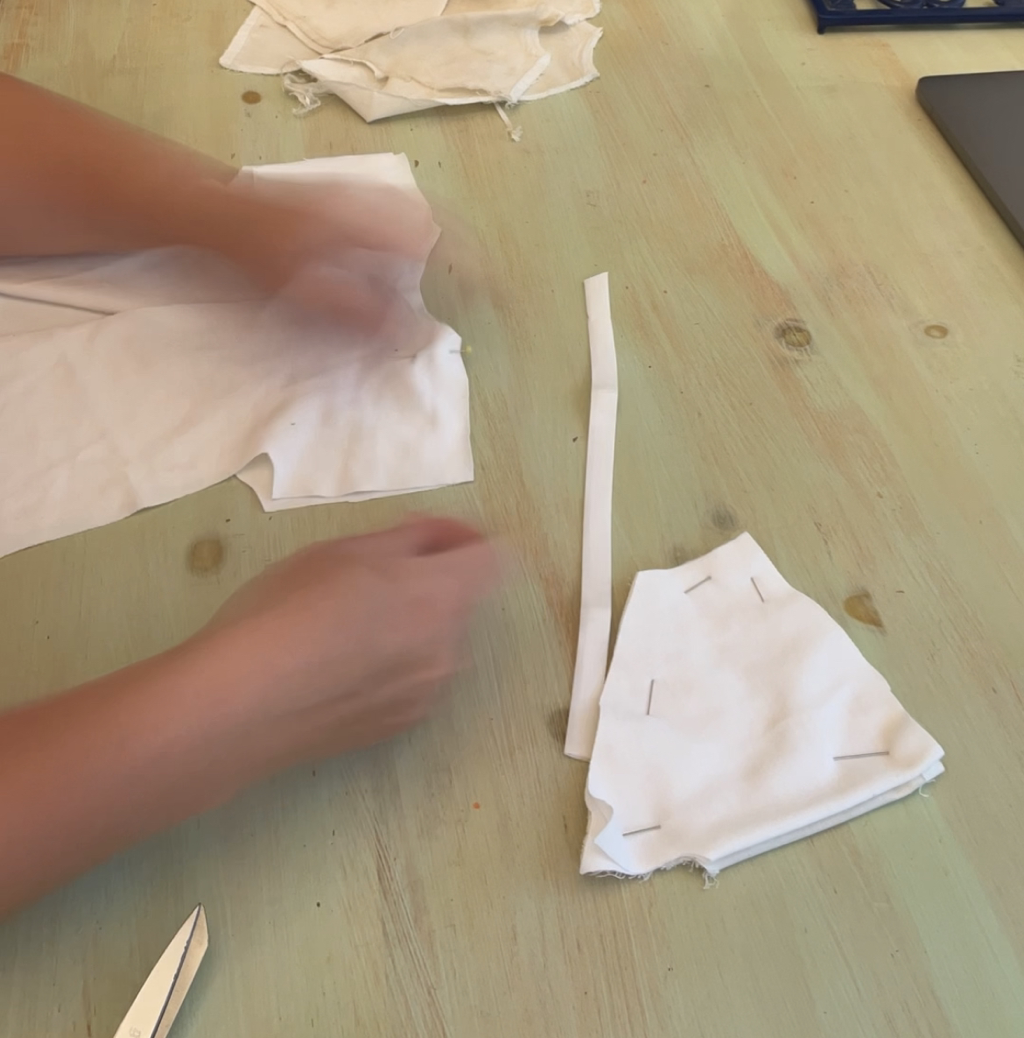 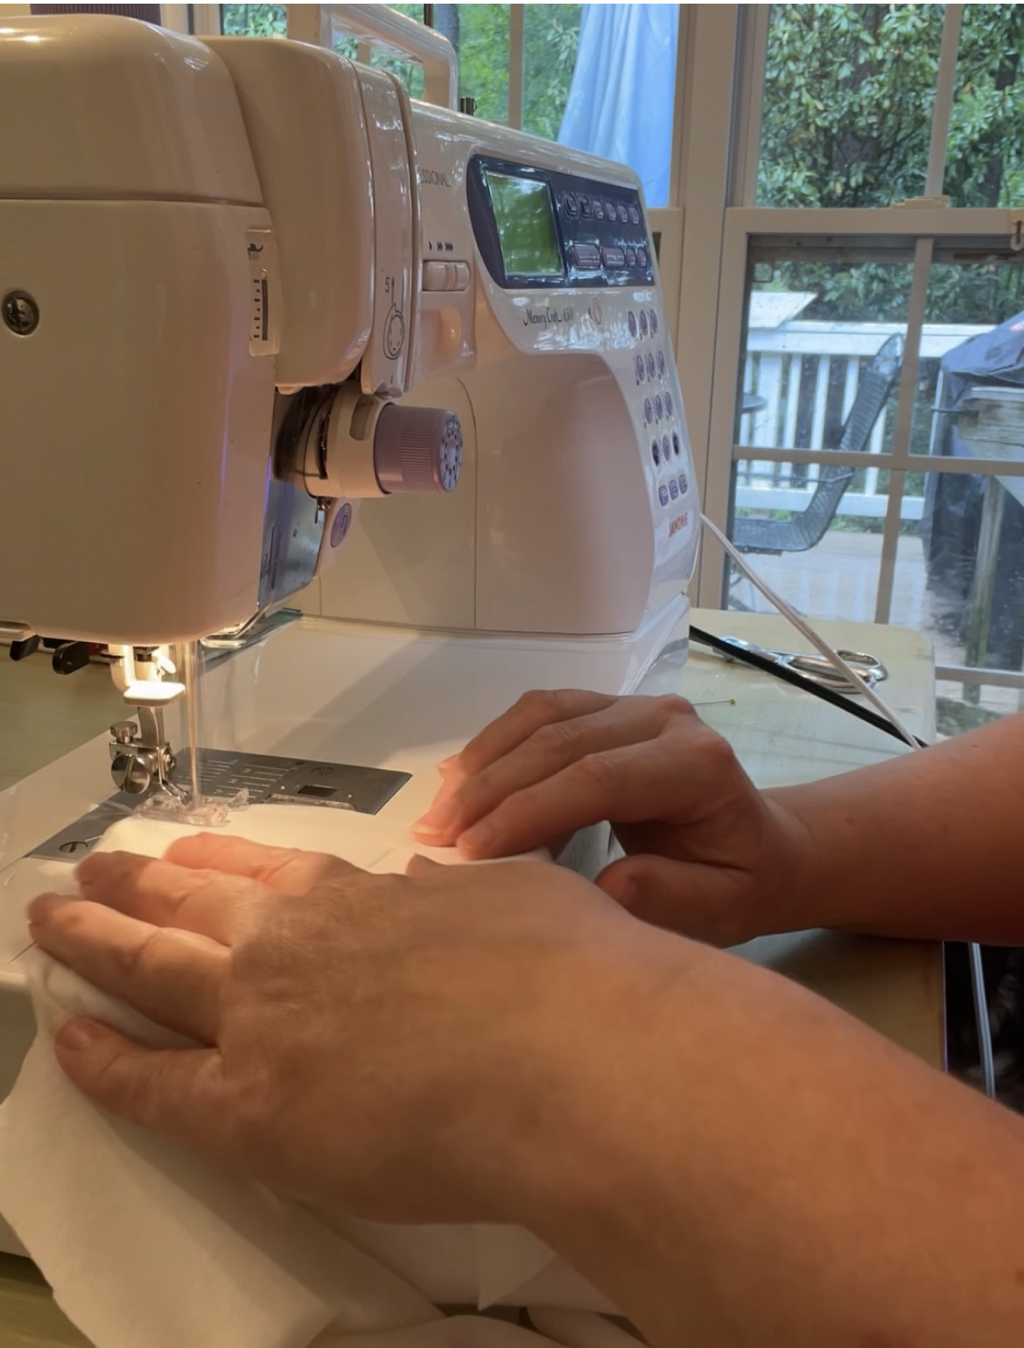 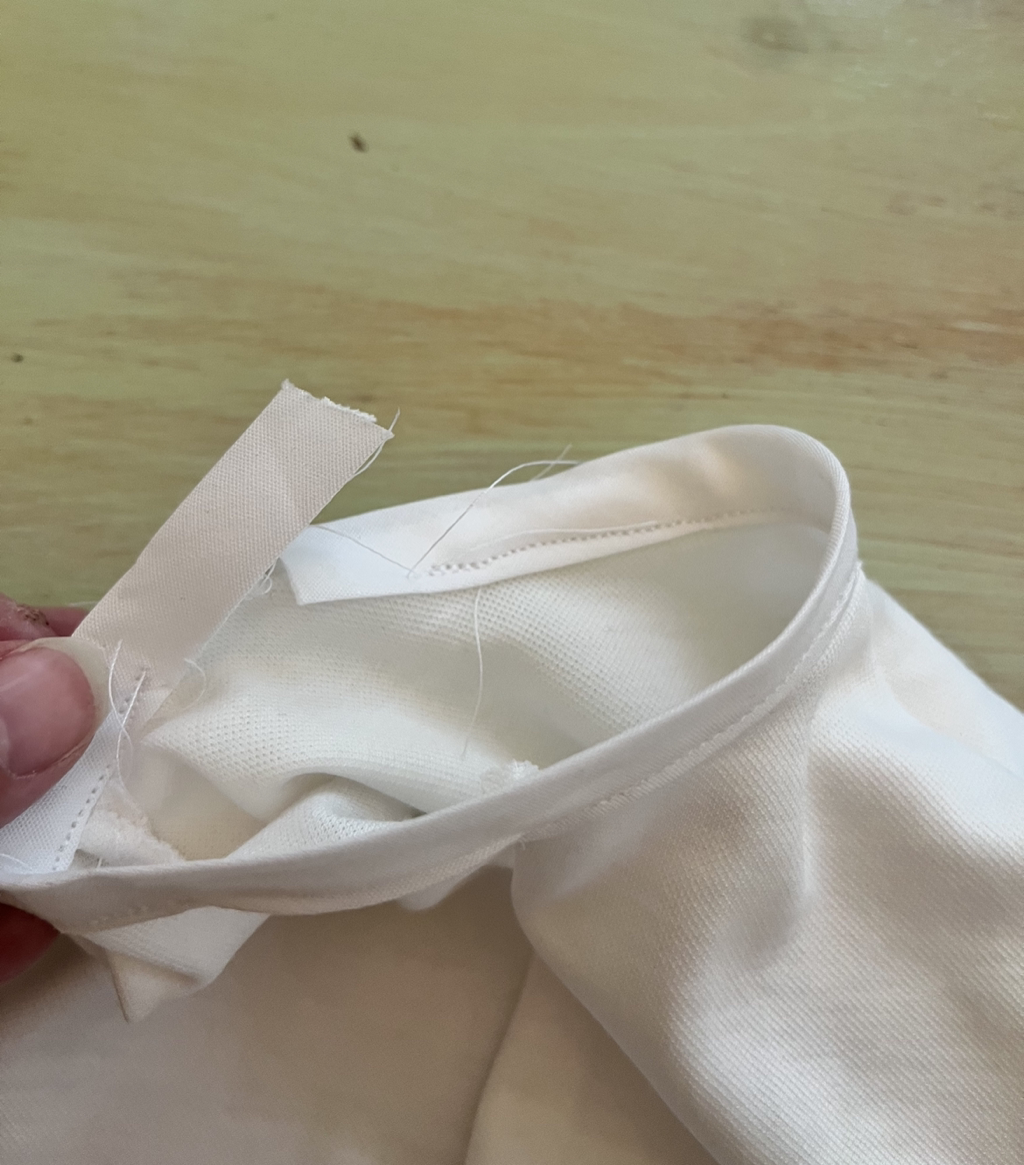 Pin the new body pieces with right sides together and make sure you understand how it all fits. Sew the body pieces together. When it is all sewn together add the bias tape for the neck casing. Make sure not to stretch the body fabric if it's knit when you sew on the bias tape. 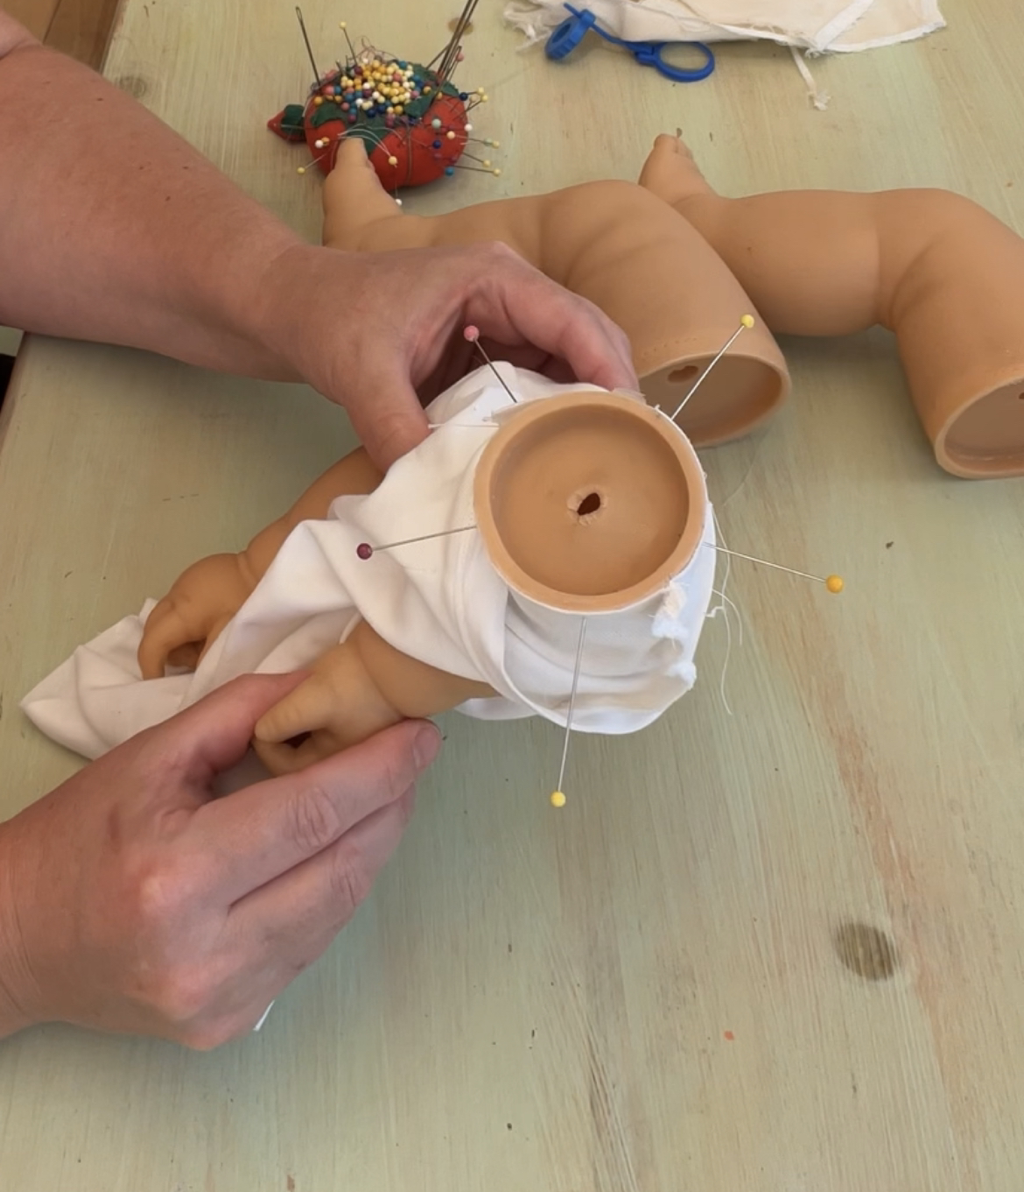 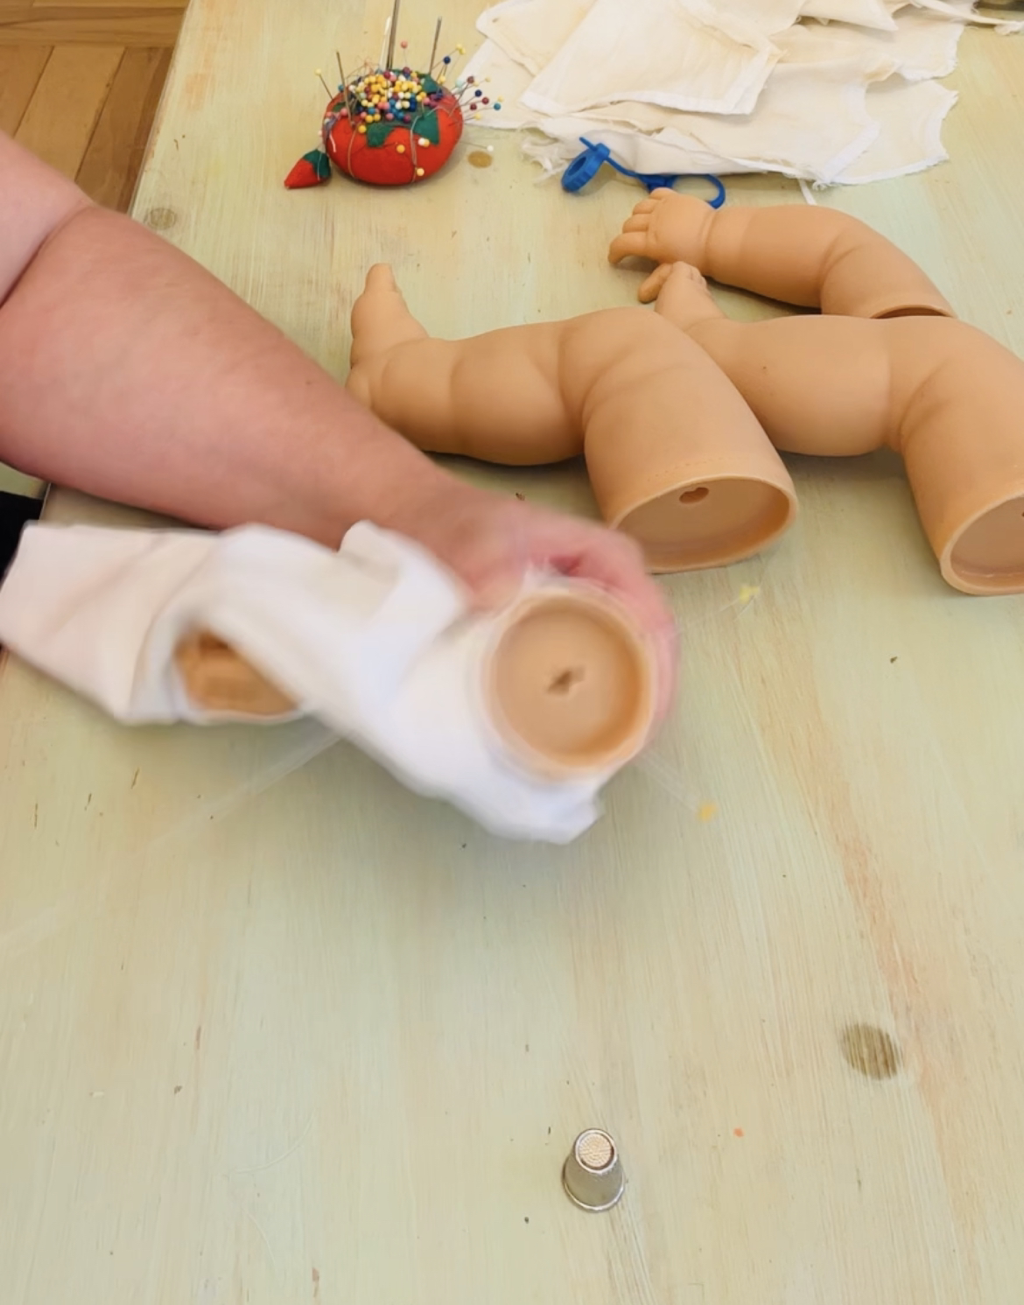 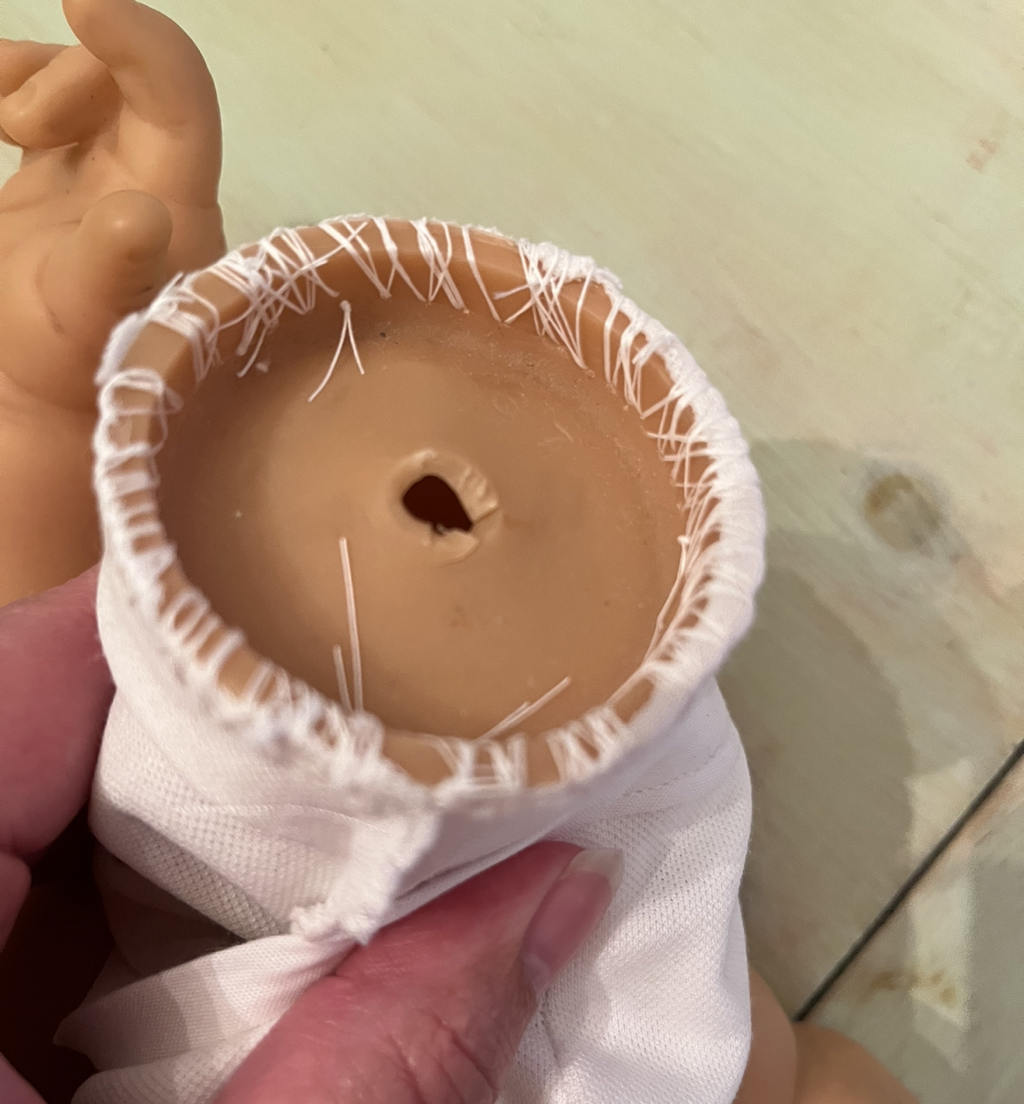 When the body is finished you can sew on the limbs. I started with an arm which was a mistake; start with the legs, as it's easier to sew them on without the arms in the way. Remember you are sewing the right side (outside) of the body facing the limb so the stitches are on the inside. Pin the limb in place before you sew it to make sure it's in the right spot. It's easy to accidentally put them on backwards. Use heavy duty thread like hand-quilting thread and a thimble to sew through the existing holes in the limb. I sew two or three layers of stitches to make sure the limbs are firmly attached. 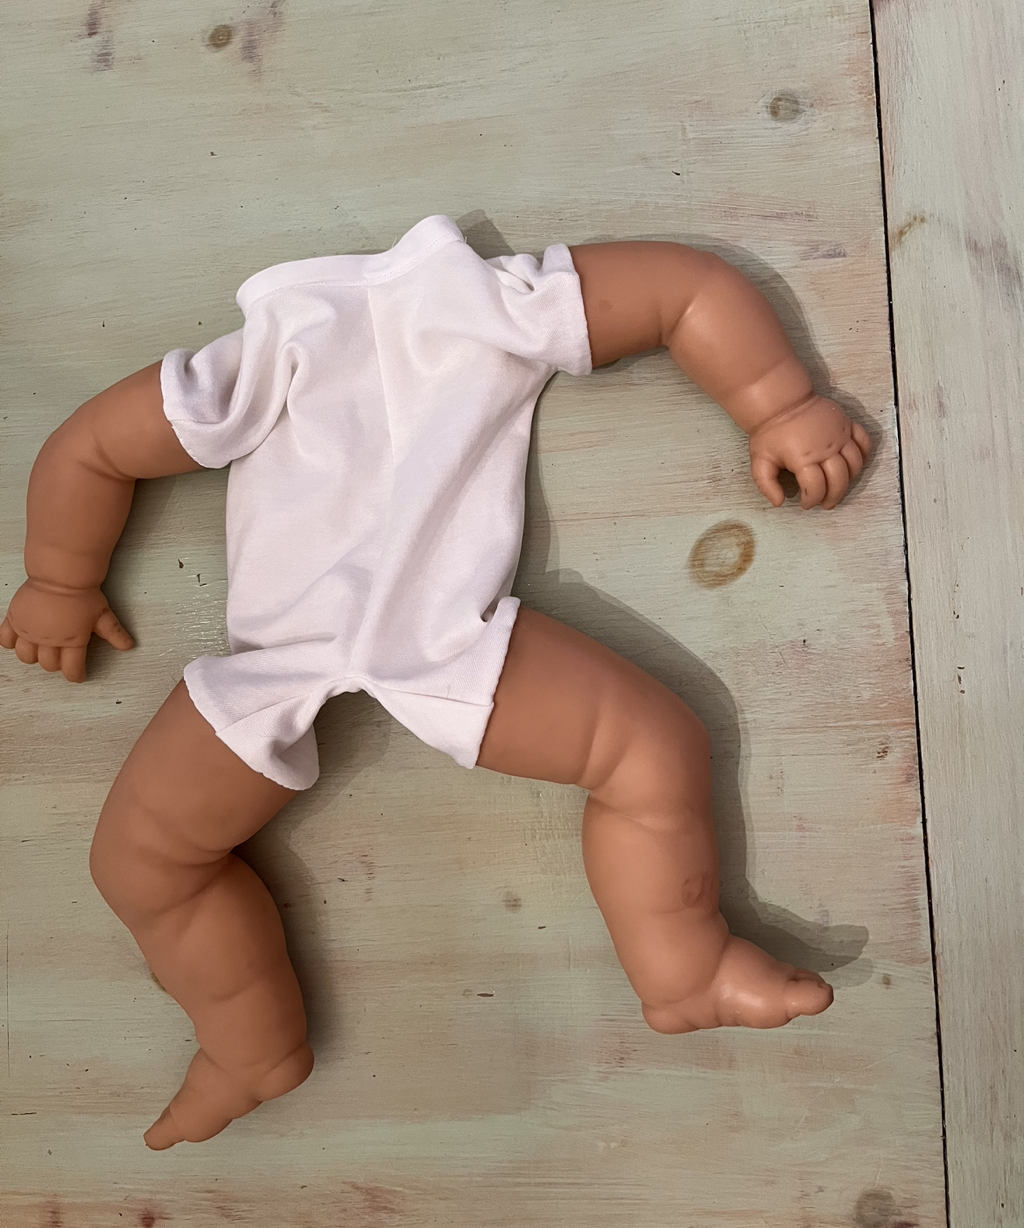 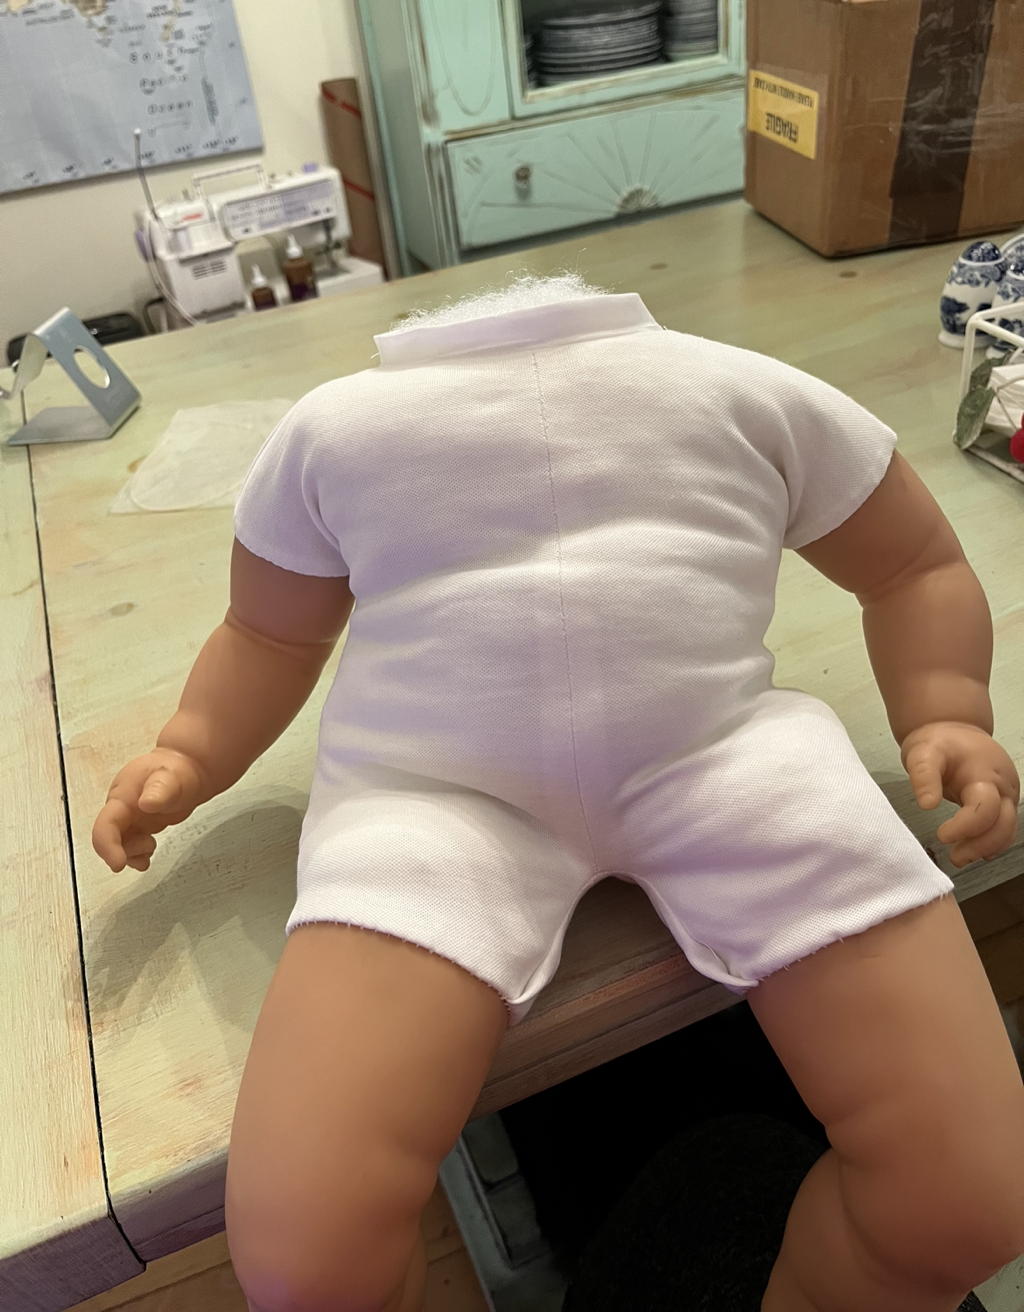 When the limbs are attached you can re-stuff the body. If you want the doll to be able to sit make sure to put less stuffing in the hip creases. You also want less stuffing under the arms so they can move freely. You want extra stuffing in the neck and shoulders to hold the head steady. I put extra stuffing in the bottom and tummy like a real baby would have. Shift the stuffing around and test posing the doll different ways to get it like you want it. 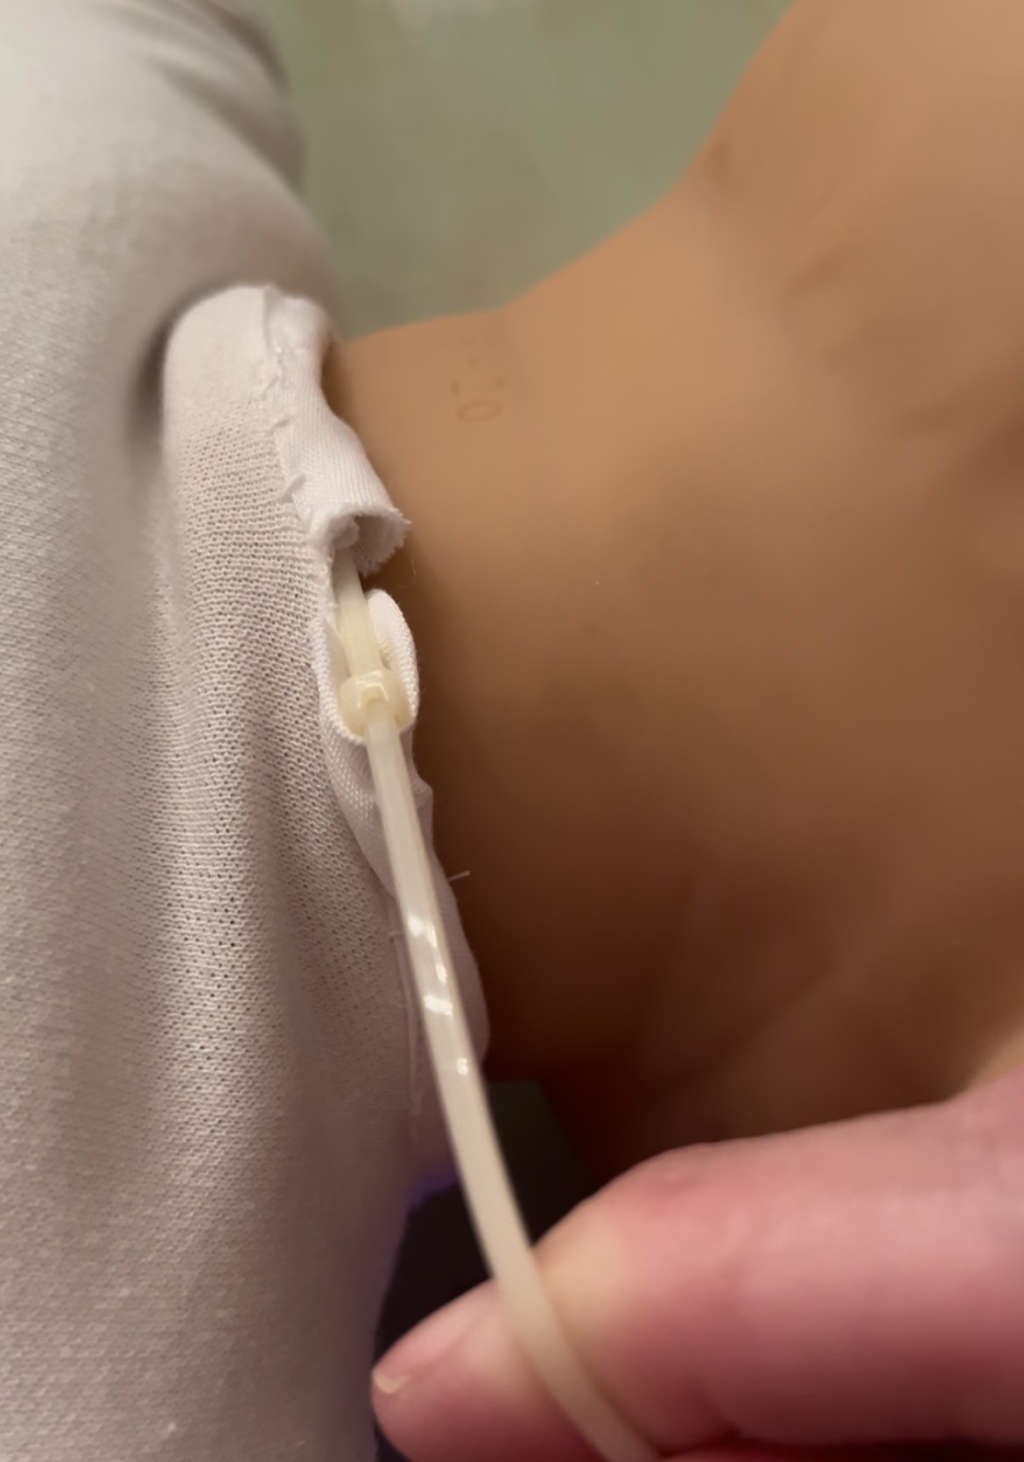 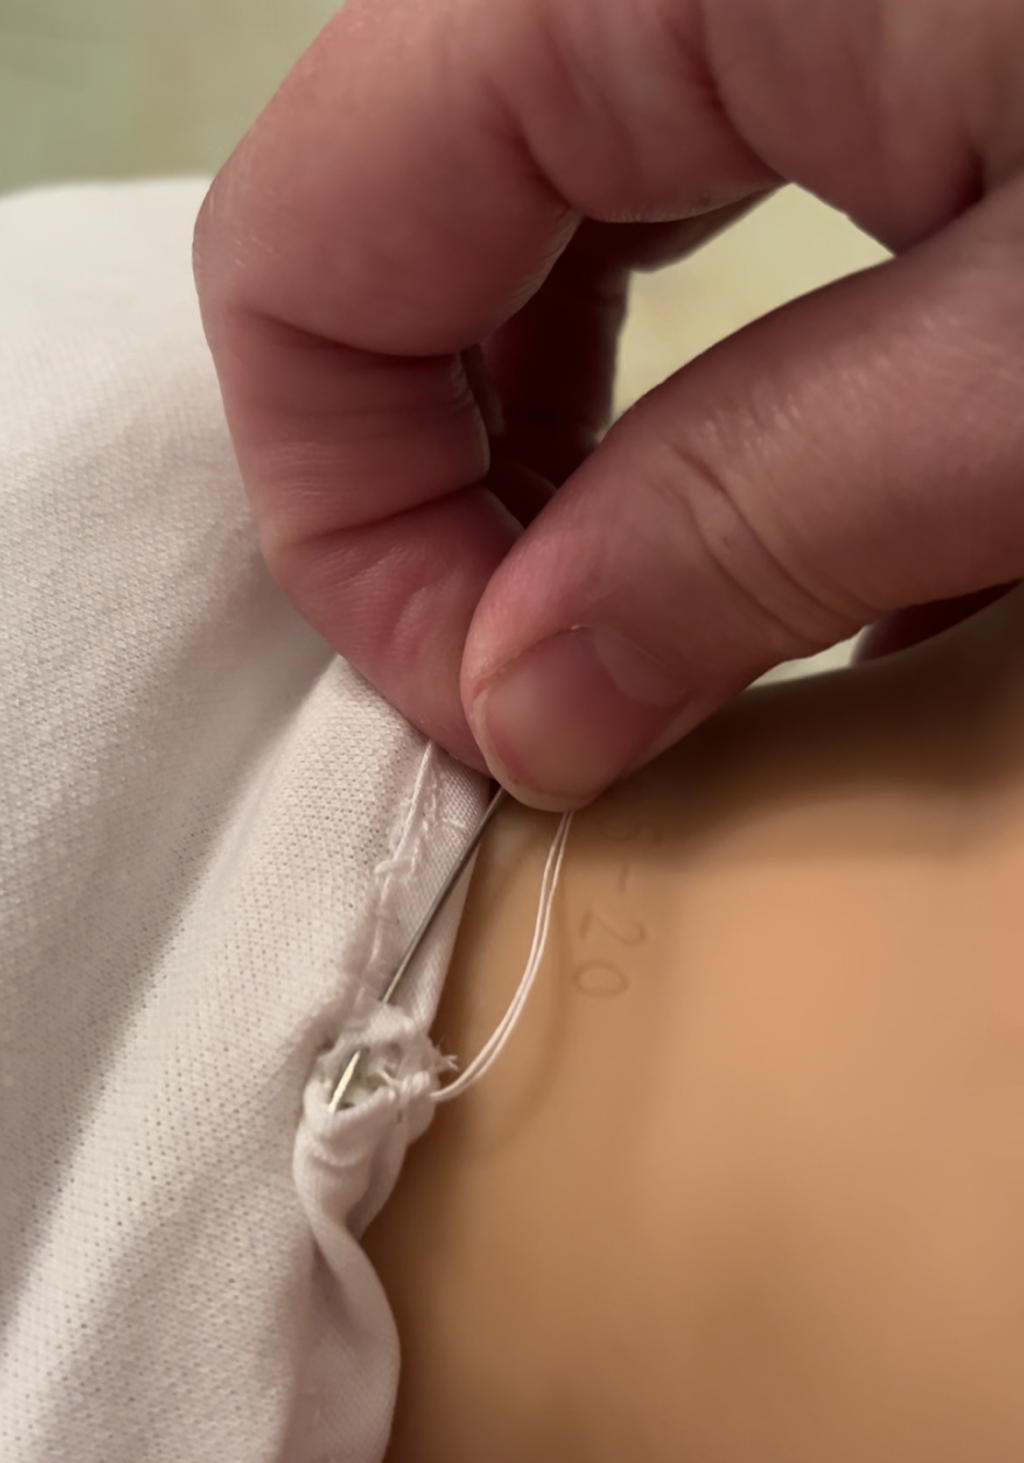 Once the stuffing is as you like it you can replace the head. Thread your drawstring or a new zip tie through the neck casing and insert the head into the neck. Make sure to get the zip tie or string into the groove in the neck and tighten it. Then overlap the neck casing and sew it in place to cover the zip tie. Now your doll should be ready for many more years of play! Learn all types of doll repair from my Doll University book. 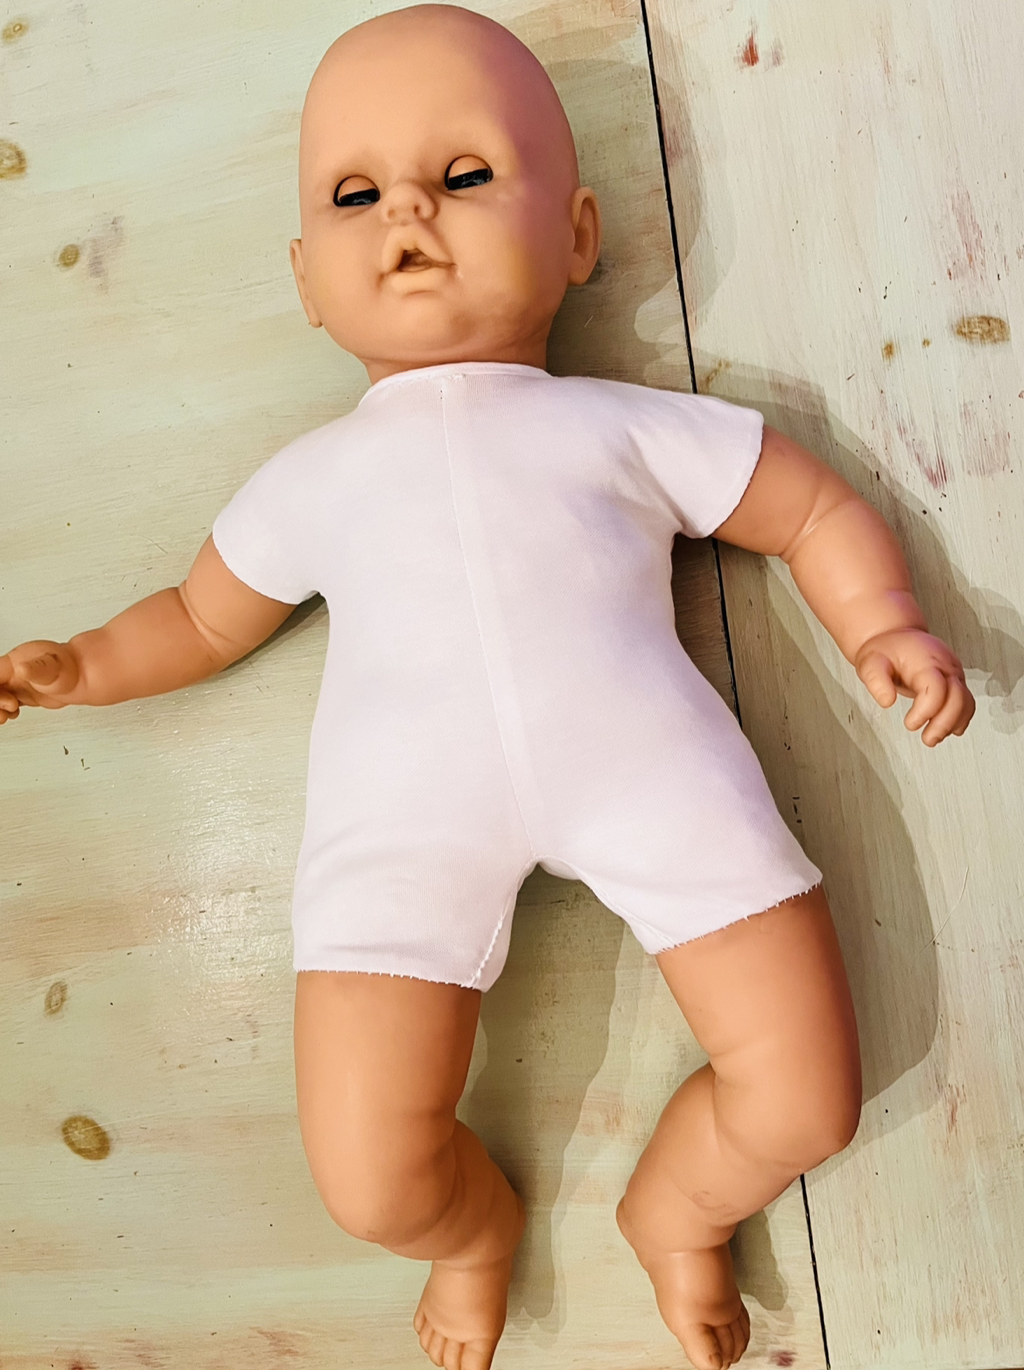 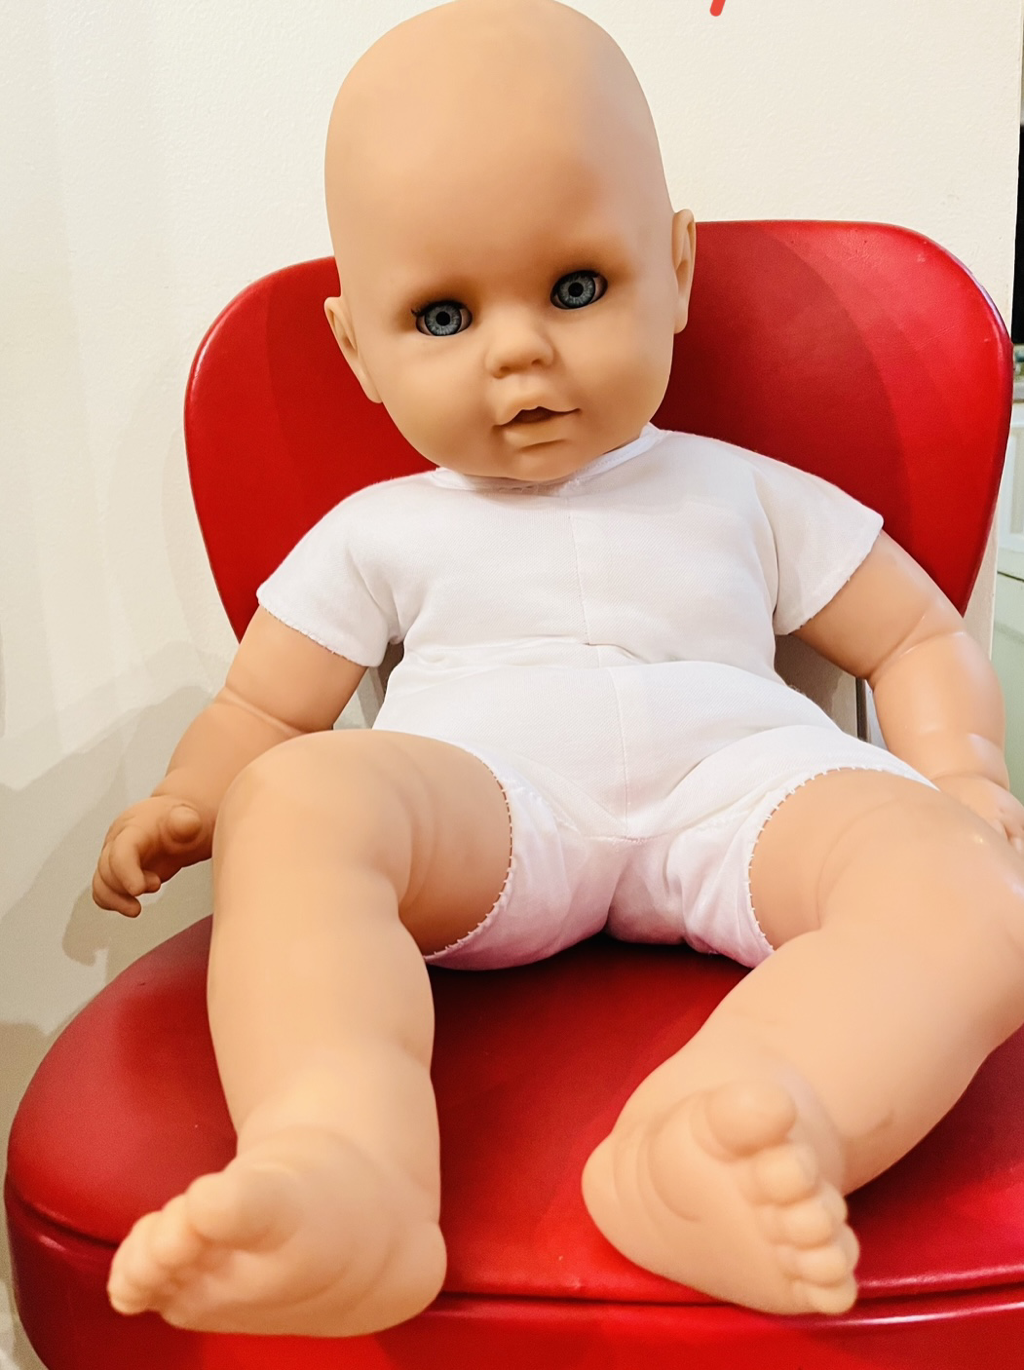
0 Comments
You might have heard we are remodeling our kitchen. It's needed it since we moved in over 10 years ago but with one thing and another we never had the money. We still aren't doing too much; we are finally replacing the cracked Corian counters and horrible old oven, mostly work we can do ourselves. We repainted the cabinets. I wanted to replace them but got outvoted. Years ago a pipe leaked and made new ceiling drywall necessary, so when we replaced the ceiling we also added much-needed recessed task lighting and got a new central light fixture. The old light was truly horrid: a weak, yellow 70s-style two bar florescent fixture surrounded with a fake wooden box. It was not only hideous but also didn't really work at all to illuminate the space. I fell in love with a fixture from IKEA: just a single bulb but surrounded by the most delicious shade, an oversized blue retro-style round punched all over with quatrefoil cutouts and lined inside with metallic gold. The new kitchen color scheme is taken from that shade.
The kitchen has two-toned cabinets, cream colored lower cabinets and natural maple upper cabinets. We left the upper cabinets as is and re-painted the lower ones the same color as they were. For the sink island we used the dark robin's egg blue of the IKEA shade (Mill Spring Blue by Benjamin Moore is a perfect match). The cabinetry, wall, and two bookcases that happen to fit perfectly under the counter are all re-painted blue to make them look like one big freestanding furniture piece. The island accent color leads into the family room, where it serves as a room divider. All the cabinet hardware is silver, as is the chandelier over the island. It's not a very common silver either; not brushed nickel and not chrome. It's almost like pewter. I wanted to bring in the gold from the IKEA shade but didn't want the expense of buying all new hardware and another light fixture. So I just added some gold using metallic furniture wax as shown in the video above. I'm doing all the hardware and the fixture over the island. That way no matter what color is in style these should work. And it brings in the gold I wanted to tie into the new light fixture. I used Rub & Buff, which I got from Walmart. Another brand is Treasure Wax. You can find it at craft and art supply stores. It's really easy to use: just rub it on a large area or use a paint brush on details and then buff it with a soft cloth or cotton swab to set it. I changed our dining room hardware from brass to silver using this stuff about eight years ago and it hasn't rubbed off. You can change metal colors or add metallic accents to furniture, like old fashioned "antiquing" French Provincial type kits. I have gold, silver, copper, and old gold tubes. I used the regular gold, called "gold leaf" on this hardware. So, there you have it: an easy and inexpensive way to update your light fixtures, cabinet pulls, door knobs, and pretty much anything else! It's made a big change in the look of the kitchen already and we don't even have the new countertops or re-painted doors installed yet. Real talk, y’all ~ I’m about at the end of my rope being Mom, owning a business, remodeling our kitchen. Today I realized my unfinished website has been live for a month because I somehow took it off “Draft”. Someday these will be the good ol’ days, right? 😂 But since my website is inadvertently live, please check it out and let me know what you think. Some links don’t work yet. Combining all my various businesses into one coherent spot is a job! I haven’t figured out how to edit the blog or add products yet but eventually this site, all my shops, and my blog will be in one spot. It’s mandaline.com. How do you like it so far? #ateliermandaline #momlife #kitchenremodel
 Change of plans! I decided to start my cabin weekend early. Orders will resume shipping on Monday (you may purchase items but shipping will be delayed). As always, digital products and print on demand items are available with no delays from the Shop page. #ateliermandalinetravels
A few years ago I decided to send all my fashion inventory to ThredUP for consignment. Fashion is time consuming to sell due to all the measuring and returns and the amount of money I make selling it isn’t usually worth the effort. ThredUP was perfect for a long time but they have been struggling ever since the pandemic. I started liquidating my fashion inventory a couple years ago and I’m finally getting everything I reclaimed from ThredUP listed in my eBay, Poshmark, and Mercari shops. This is all women’s fashion, new or like new, listed at least 50% below retail. I have all styles and sizes and will be adding many more pieces. If you need clothing I hope you’ll check out my shops (link from the Home page).
 Atelier Mandaline Spring Break Hours, Open 4/11-4/14. Link on the Home page! #ateliermandaline #storeopen
Today I am replacing a few of Kissy's lashes. Part of her eyelid got chipped and the lashes fell out from just that one spot. In the case of a partial replacement I just use little lash flares available from drug stores. If you need to replace all the lashes you can find doll-sized lashes in my eBay and Etsy shops (link on the Home page).
Kissy was sent to me at great cost by her owner. I tried to talk her mom into doing this herself to save the postage but she wasn't confident. I am going to show you how to do it so you won't have to spend so much to ship your doll. It is a tedious process but not really a difficult one. Most people just send the head for eyelash replacement but Kissy has complicated internal mechanisms allowing her to give kisses so the owner isn't want to risk removing the head. Normally I would remove the doll's clothing so as not to risk getting glue on it but in this case Kissy's dress is so tight I was worried I would damage it trying to get it off, so I covered it with a thick napkin. Please ignore my gnarly hand; first I bruised it during our kitchen demo and then I burned it turning a pan in the hot oven. When replacing lashes first take the point of a straight pin and scrape out the channel where the lashes will go. You want to clear out old glue so the lashes can be inserted into the channel. If you're doing a partial replacement be careful not to dislodge any remaining lashes. Clean off the pin with a napkin. Then insert the sticky top of the lashes or lash flares into the channel and push them in with the point of the straight pin. Clean off the pin and use it to brush the new lashes into place so they are going in the same direction. If your doll has thick layers of lashes like Kissy just do one layer first. Draw a bead of glue along the eyelid using the straight pin. Clean the pin off. When the glue is dry add another layer of lashes if necessary to match the originals. Repeat the process until the new lashes are as thick as the originals. When all the glue is dry trim the lashes to the correct length. I use Aleene's Tacky Glue, which dries clear. If there is any white glue residue I just tint it with a Sharpie marker to match the lash color. If you get ink on the eye or eyelid remove it with a cotton swab dipped in rubbing alcohol. I do have a photo tutorial rather than a video if you prefer. You can see that here. Homemade Skele-Gro: y’all know what a Harry Potter fan I am! Here’s my homemade bone-strengthening brew: Mix 1 scoop Inner Beauty vanilla collagen powder, 1/2 tsp Young Living Golden Turmeric Mango Rose powder, & 1 cup whole milk. Shake, blend, or stir until smooth. I’m having my son drink this daily for his broken wrists. It tastes like a creamsicle, not bad like the movie original! This would be a cute idea for a Harry Potter themed party. These are all sugar-free, sweetened naturally with the stevia herb, so this is a keto-friendly, super-healthy drink!
Collagen is great for bones and turmeric is believed to lower inflammation and help with pain relief. "Golden Milk" made from turmeric has been all the rage in the natural wellness community for the past few years. Making it used to be a big undertaking, involving finding esoteric ingredients and cooking the drink, but Young Living has taken away all the hassle. You just stir the golden powder into the liquid of your choice! They also make a turmeric tea that tastes like spiced chai if the golden milk powder or the mango flavor isn't your jam. You can trust Young Living's Seed to Seal pledge to ensure only the highest-quality ingredients & accurate labeling are used. Since the supplement market is not regulated it can be dangerous so I rely on Young Living. Get the turmeric from Young Living here. Sign up for the Young Living Loyalty subscription program to get free products and discounts. You order $50 worth of products per month and you decide what to purchase so you don't end up with too much of anything. Your monthly purchases earn points you can use like cash and free gifts. I know I don't talk about it enough but I am a Young Living Independent Distributor so when you purchase from me I do make a commission. I am also authorized to train others to start their own business as a Distributor. Please contact me for information about that or the Young Living subscription program. 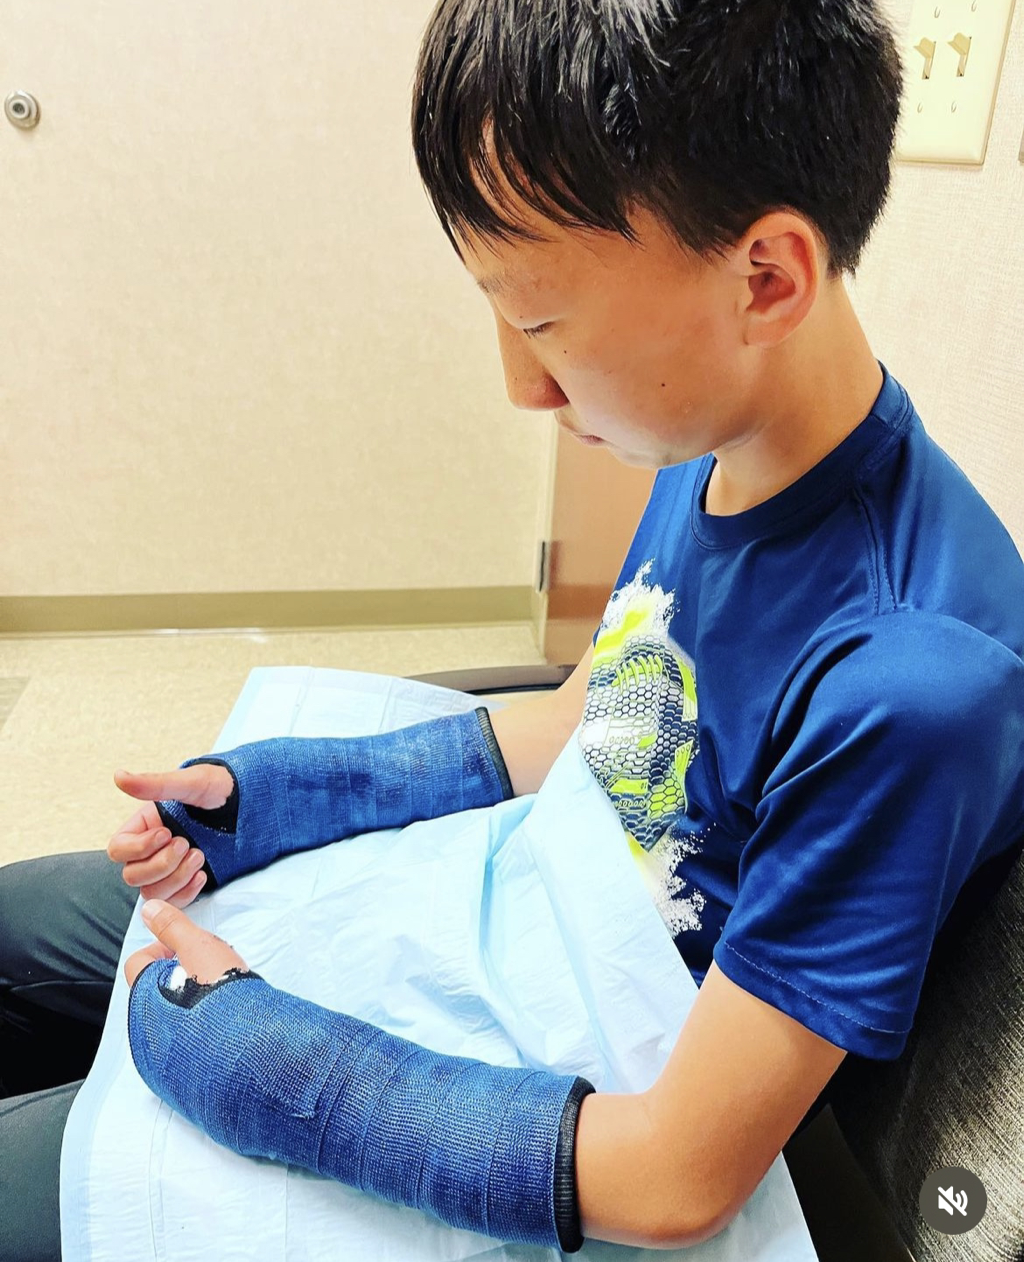 Bad news: my son broke both wrists last week. The past several days have been a blur of doctor appointments but at least he was finally able to see a sports medicine specialist to get the bones set and casts applied. It has put me behind schedule, so please be aware of that if you have dolls in or en route to my hospital or custom orders in progress. It doesn’t help this happened after we started remodeling our kitchen. The cabinets are dismantled and we are in the process of painting them and the contents of all the shelves are scattered around the house, so it’s hard to find things. I’m having to adjust to basically having a “baby” again since my son can’t do many things for himself. We will get through it. I just want you to understand if you experience any delays in service from my shops.
|
AuthorMy name is Amanda, but my childhood nickname was "Mandaline". I am a mother of three turning my passion for creating into a full-time business. Archives
April 2024
Categories |
 RSS Feed