
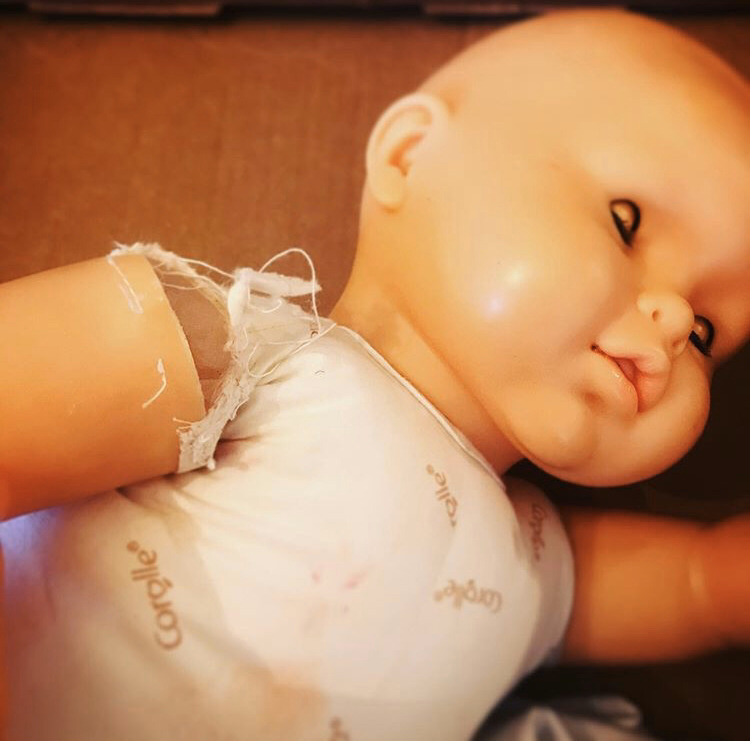
 Today I'm going to show you one of my least-favorite repairs in the hopes you will be able to fix your dolls yourself and not send them to me for this problem! While some cloth-body dolls have limbs that attach to the body using a channel and drawstring, most have vinyl limbs sewn to the body. Because play dolls tend to be carried by one arm or leg that particular limb will often tear away from the body. Today we have a doll named Ayla whose shoulder was almost completely torn away. In cases like these you should first determine whether you need to replace the entire body or if the one limb can be re-attached. Since Ayla is a play doll with a young mother and her body is made of logo-print cloth I decided to just re-attach the torn arm. The factory stitching is done with industrial machines and it is strong, whereas the re-attachment is hand-sewn. It is strong but for play I trust the factory stitching more. I also don't like to replace a logo body with a plain one. And, since right now I charge $200 plus return shipping for a total body replacement it is cheaper to just repair the problem area. 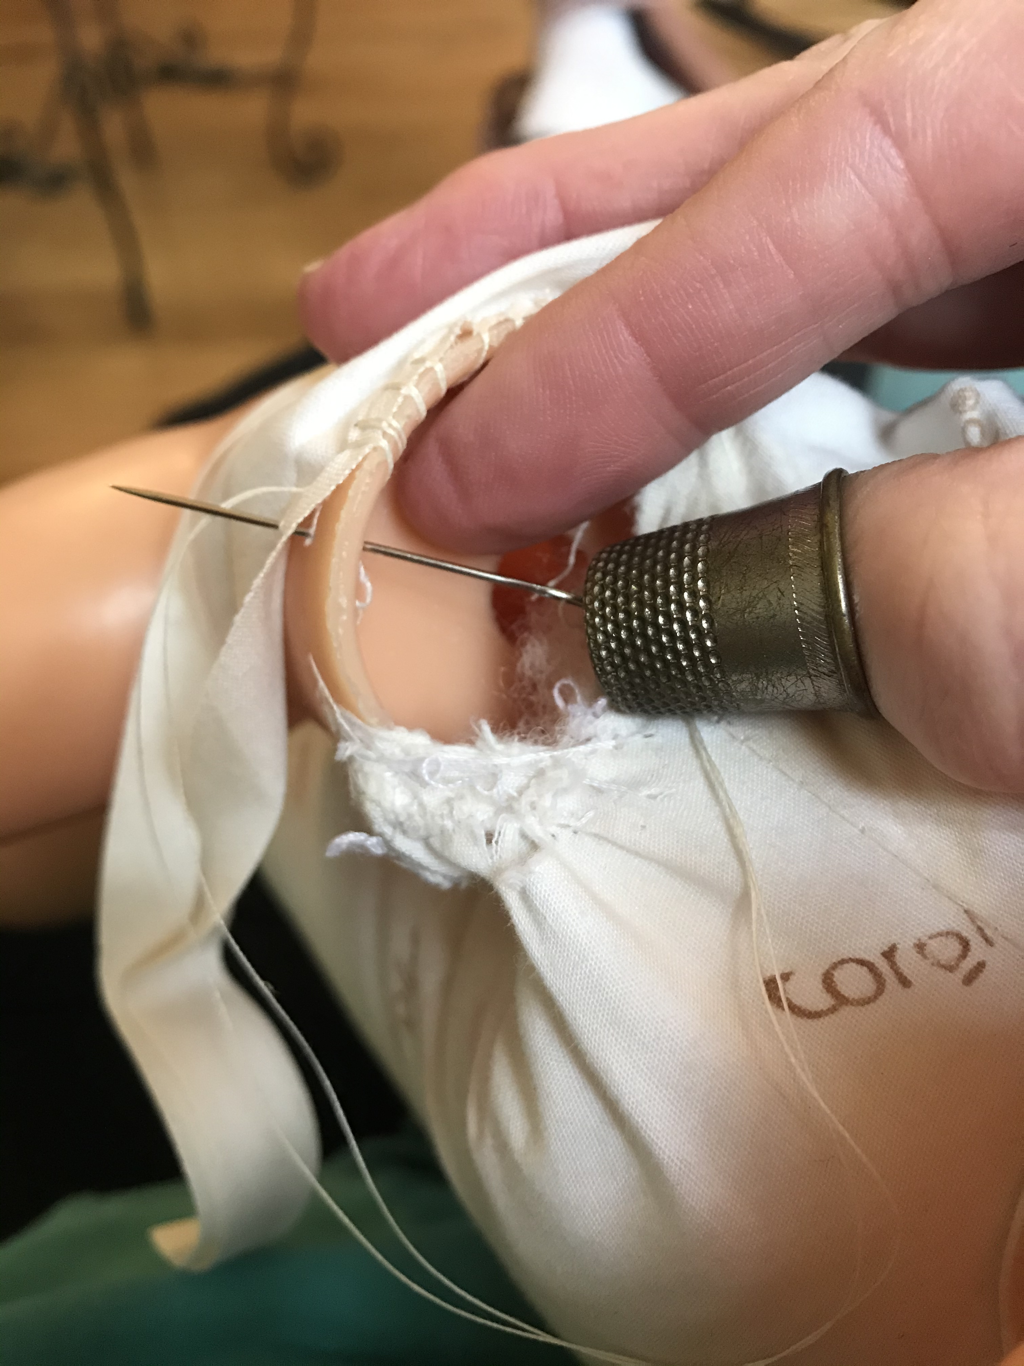 As I mentioned in my last post, you could just buy another doll of the same size and race from a thrift store or online and move the head to that body. In this case the owner might be too young to understand why the body looks different and this particular doll is an unusual size. So I repaired the limb. Start by finding material of the best possible match to your doll body. I found wide bias tape in an oyster shade was just the right color and size. I cleaned up the torn area, removing hanging threads. Then I poked a needle felting needle into all the holes I planned to sew to open them up a little more. You will need to use heavy-duty thread. I used hand quilting thread for this repair as it is very strong. If you're using bias tape, which I recommend as it's usually the easiest, line up the edge with the edge of the arm. Stitch through the vinyl using a whipstitch to attach it to the tape. You will need a metal thimble to help push the needle through the tiny holes. 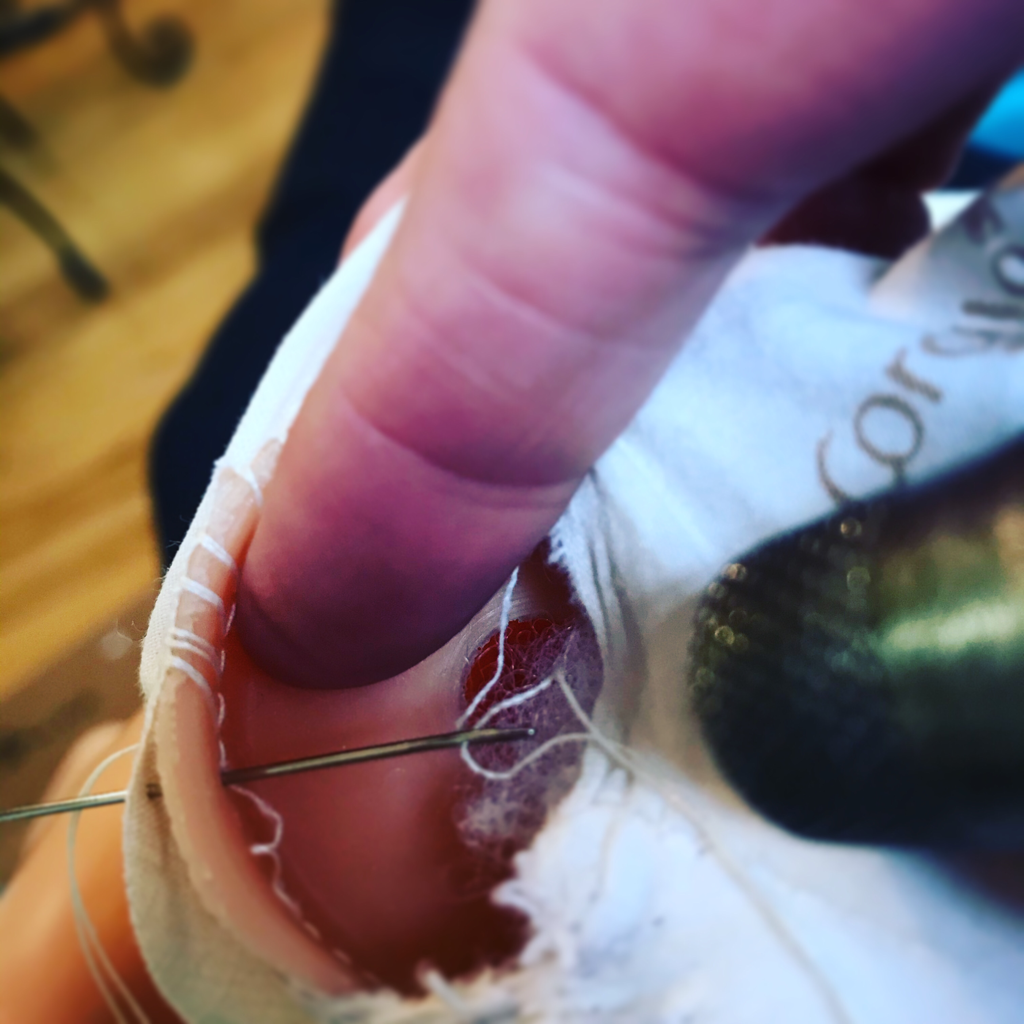 A curved upholstery needle works best for this repair but all mine are lost right now so I'm just using a heavy-duty straight needle. If you get to a hole that's still too tight you can poke your needle felting tool into it again to widen it as shown below. The reason I hate this repair so much is I always manage to stab myself. Even with the thimble I stabbed my thumb today and had to wait for the bleeding to stop and I also stabbed myself in the stomach when my hand slipped. That's my own fault for sitting on the couch to do this instead of at a table. You have to push so hard on the needle at times that it will suddenly pop out and poke you unexpectedly. 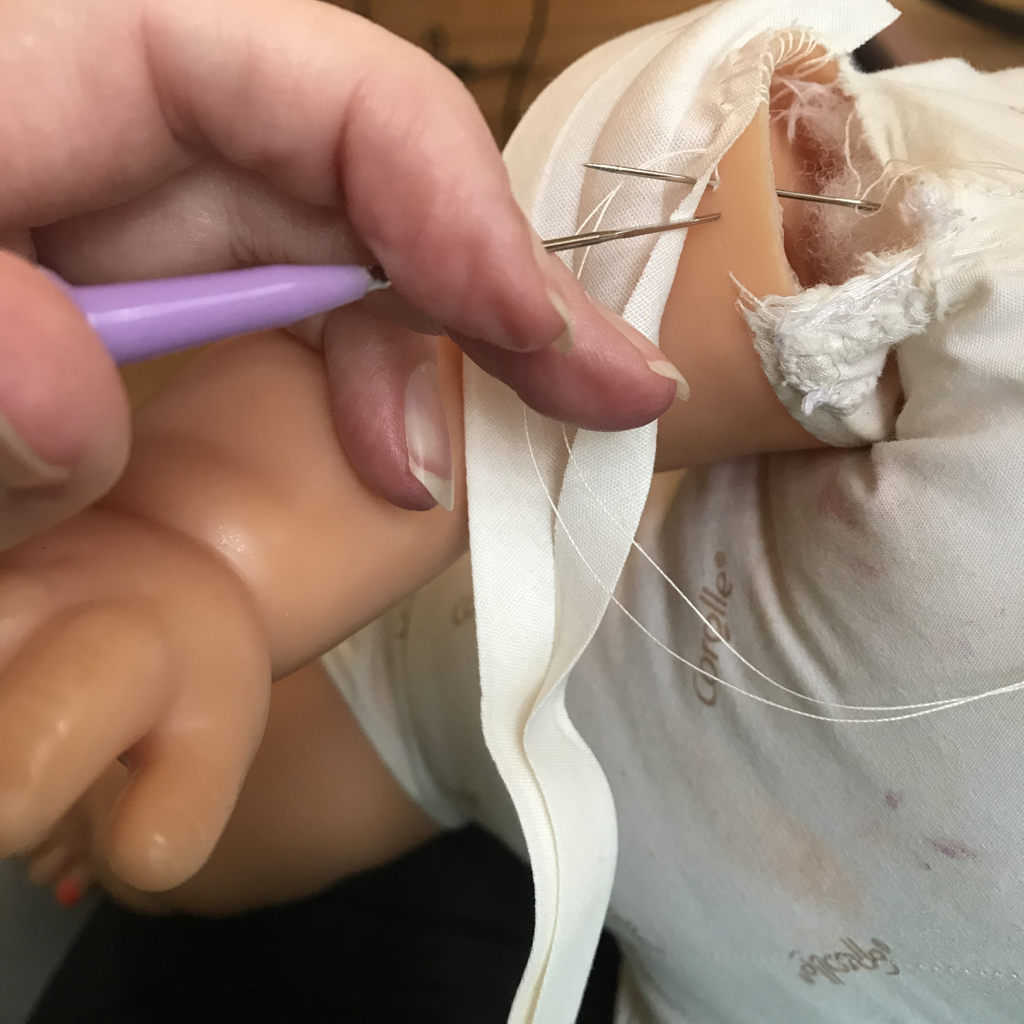 Once you've attached the limb, open the bias tape and sew the folded edge to the doll's body, easing around any curves. I stitched over this two times to make sure it's sturdy enough for play, almost making a satin stitch. 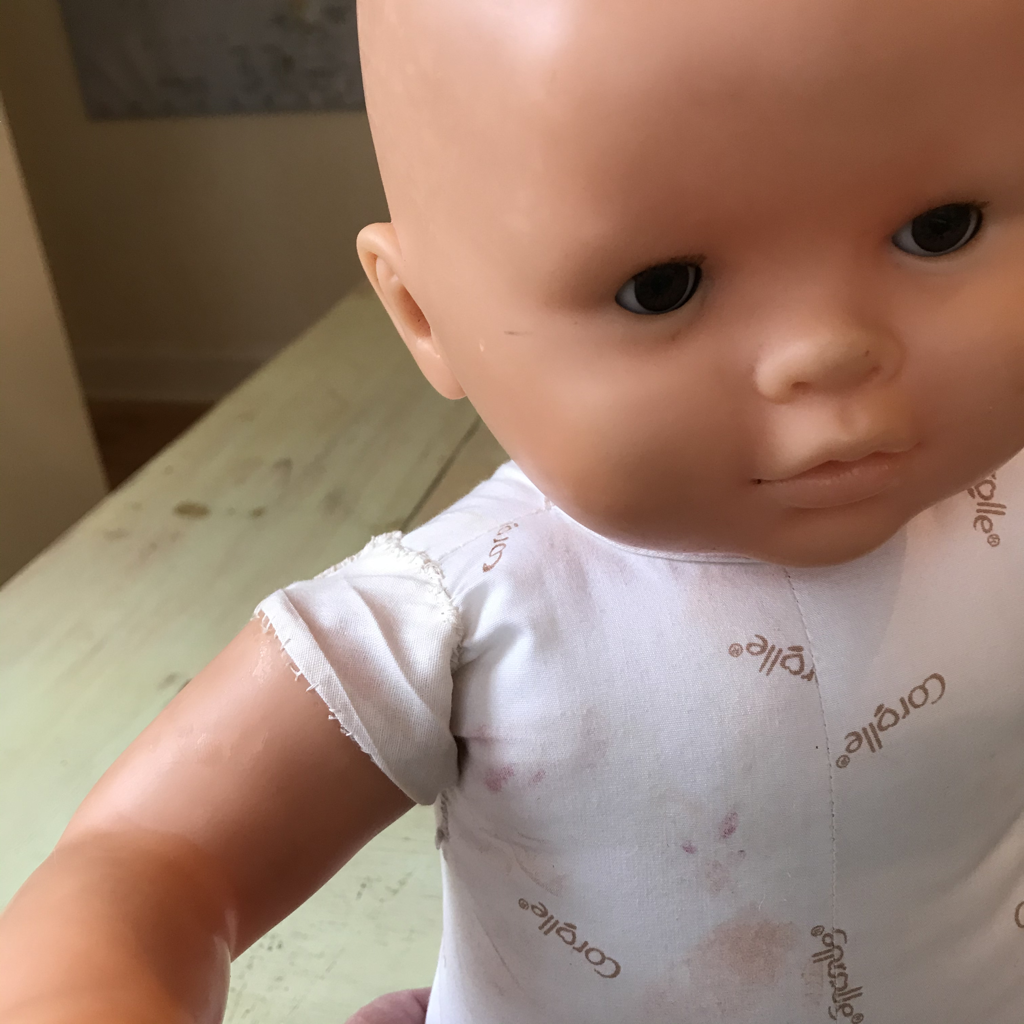 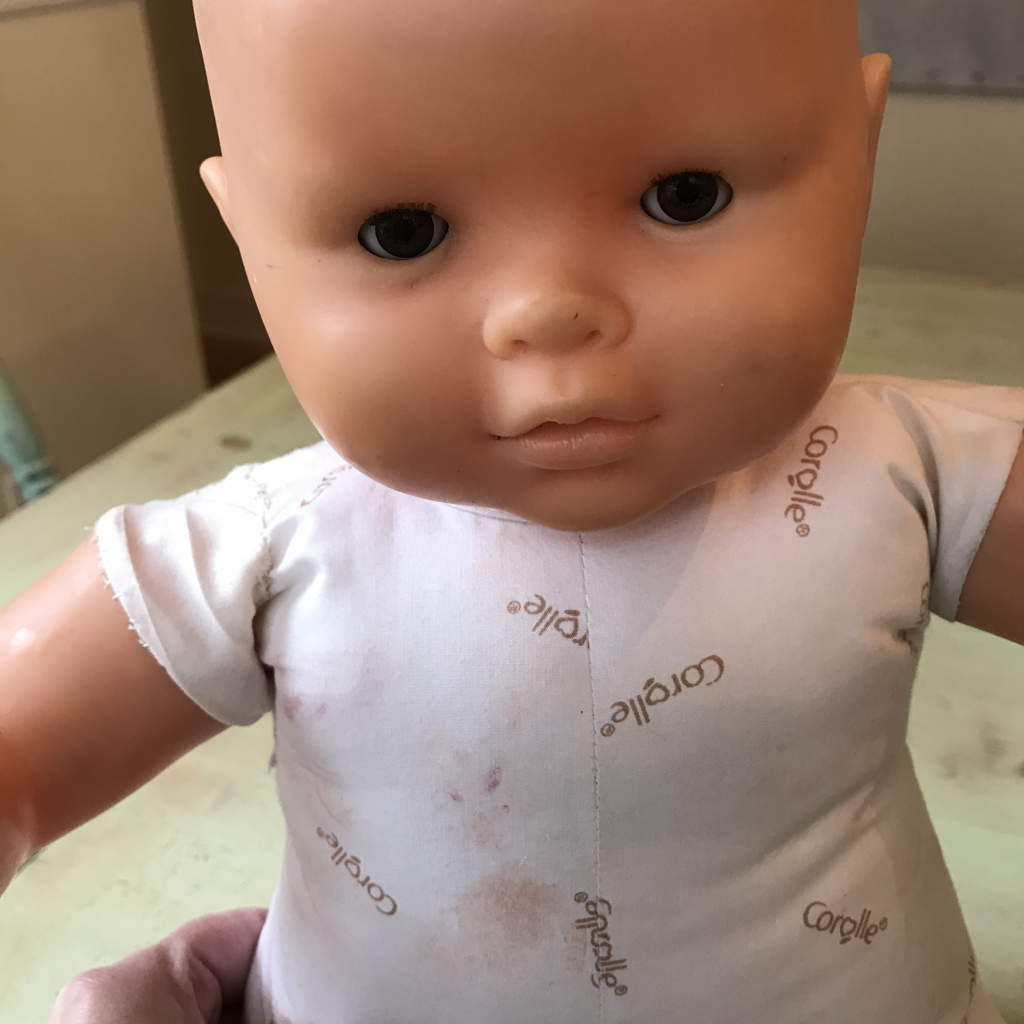 Although this is a visible repair it's not terribly noticeable since the color is such a good match. The other shoulder doesn't have any logo print so that helps the new one blend in. Ayla, as you can see, enjoys a full life. She had glitter on her head, highlighter-painted finger and toenails, makeup on her body, chocolate stuck in her mouth where her mother has been feeding her, and general dirt all over. I spot cleaned her cloth body (you could also remove the head and stuffing and run the body through the washing machine) and scrubbed her vinyl with Thieves Foaming Hand Soap (purchase from my Young Living link on the Home page) and a toothbrush. 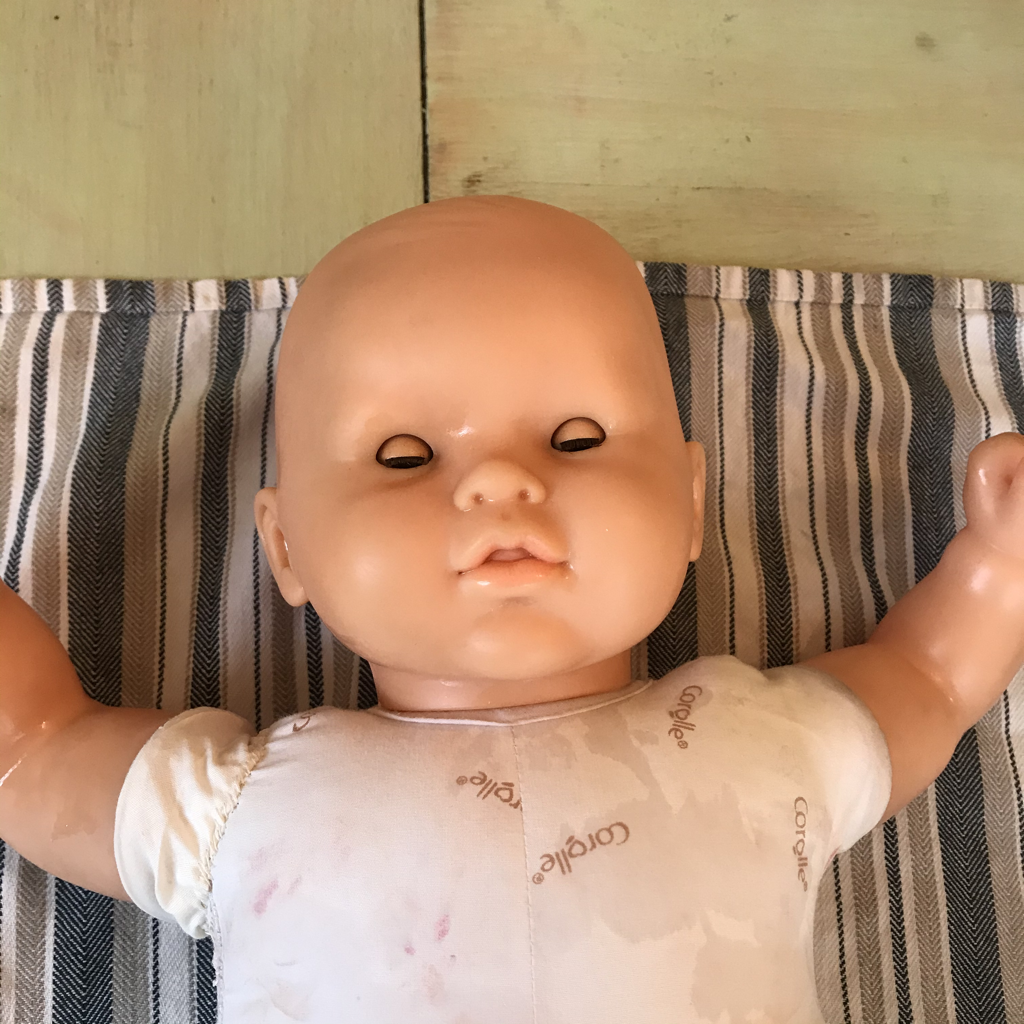 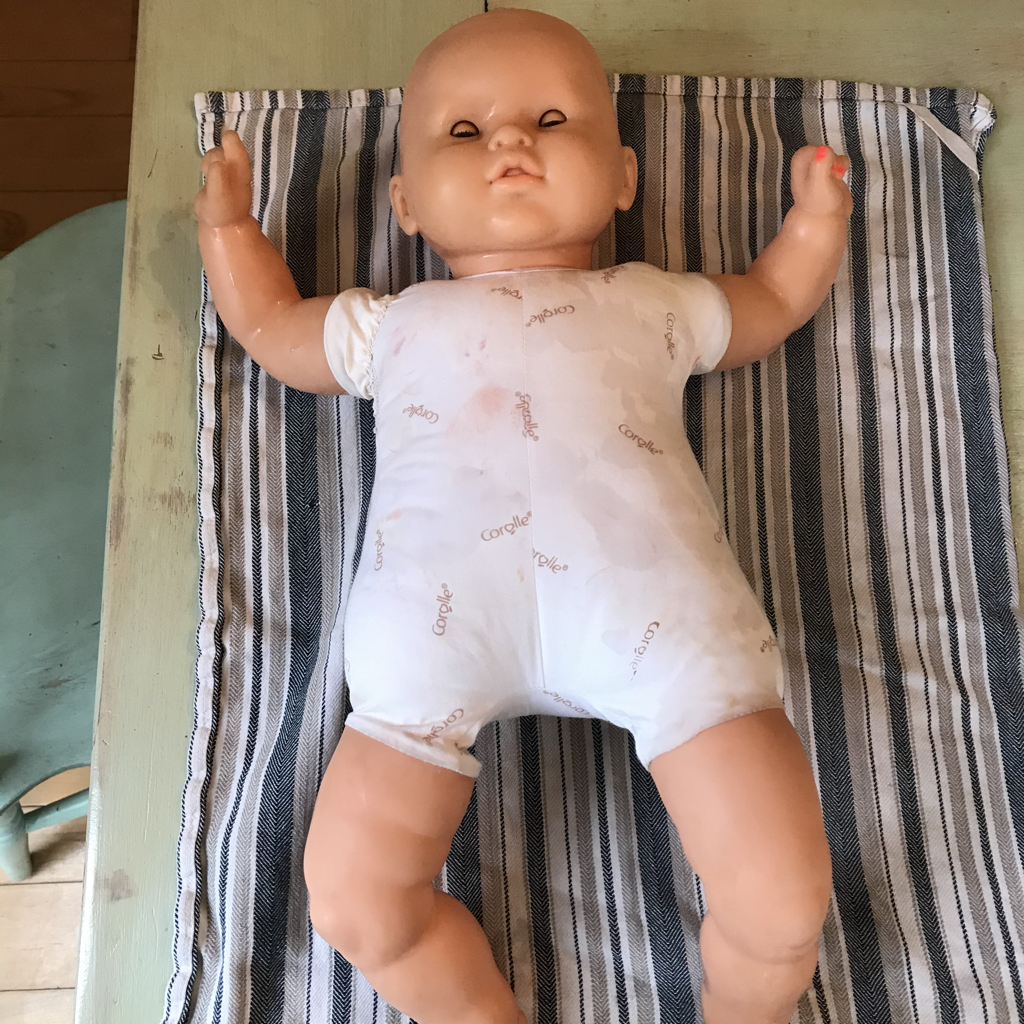 Ayla is taking a nap while she dries after her bath. As soon as she's dry she will be ready to head home. I know her mother will be happy to see her! Of course you may send me any kind of doll repair, but now you know how to do this one yourself! You can use the Repair Form below to get an estimate for your doll repair and find out how to send your doll to my hospital.
13 Comments
Well, here we are again. My husband used someone else's office while on a business trip to Raleigh. A few days later he was sick and he found out the guy whose office he used was also out sick. Our youngest caught it and has been home from school again. And now today I am sneezing and coughing and achy and my eyes are running, so I'm pretty sure that despite all the Zicam and cod liver oil and all my other immunity supplements I am catching it. I've been cleaning the house daily too. The trouble is the weather, I think. Last week we had a little snow. Then three days later the temperature was 71 degrees. It's been raining like crazy and we've killed several mosquitoes in the house. Germs thrive just as well as mosquitoes in this kind of weather. We really just need a long period of below-freezing temperatures to kill everything off and we aren't getting it. So, chicken soup to the rescue. This is my Chicken and "Dumpling" keto soup recipe with a carnivore option for those who are continuing World Carnivore Month. 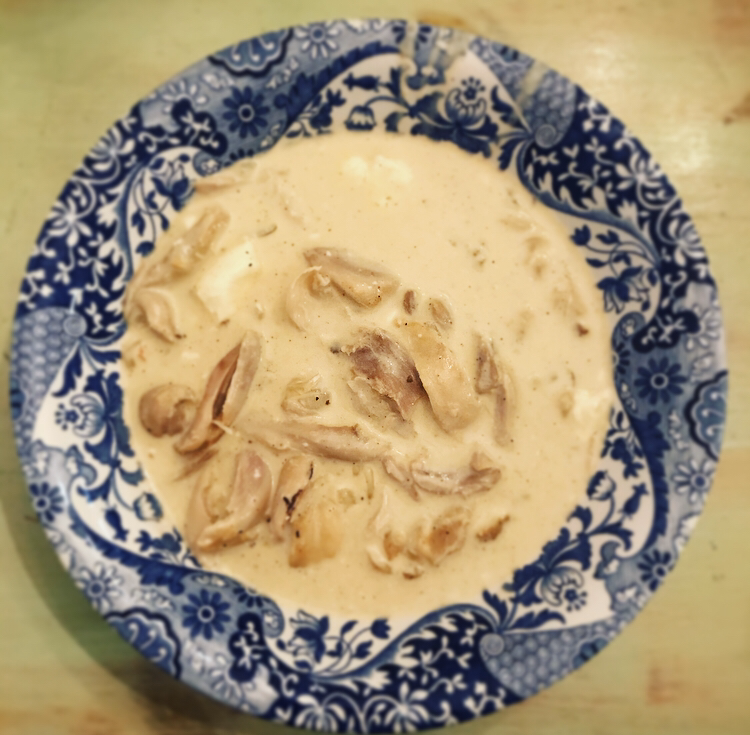 Chicken and "Dumpling" Soup Serves 4-6 2 cups cooked chicken, shredded 64 ounces chicken bone broth 1 onion, finely chopped 2 cloves garlic, minced 1 quart water 3 tsp salt 2 tsp poultry seasoning 1 tsp black pepper 1 cup sour cream 8 ounces cream cheese, diced Mix chicken broth and water and bring to a boil over high heat. Add onion and garlic and spices and cook until the onion is transparent and soft, about 15 minutes. Lower heat to medium-low. Add the chicken and sour cream and stir until the mixture is smooth, thick, and bubbly. Taste the soup and add any additional seasoning you desire. If you want a thinner soup you can add more water at this time. Add the cubes of cream cheese. Cook on low until the cream cheese is warm but not melted. These are the "dumplings". Serve, making sure each person has a mix of chicken and dumplings. 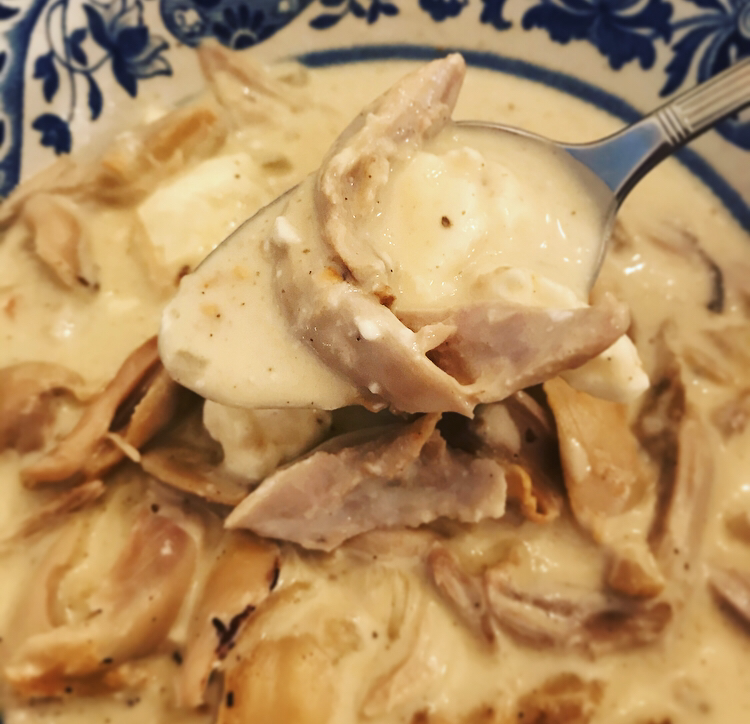 If you want a carnivore option of course you can leave out the onion and garlic and even the spices if you're a purist. In the case of trying to boost immunity I think it's a good idea to leave these in, as all have medicinal properties. This is just the ultimate comfort food, exactly what I want when I'm sick, and easy enough to make even for someone who isn't feeling well. I almost always have cooked chicken in the freezer to use for quick suppers and I usually have homemade bone broth as well as canned bone broth. Today I used a mixture of homemade and store-bought. Here's to chicken soup, and here's hoping we will soon all be well.
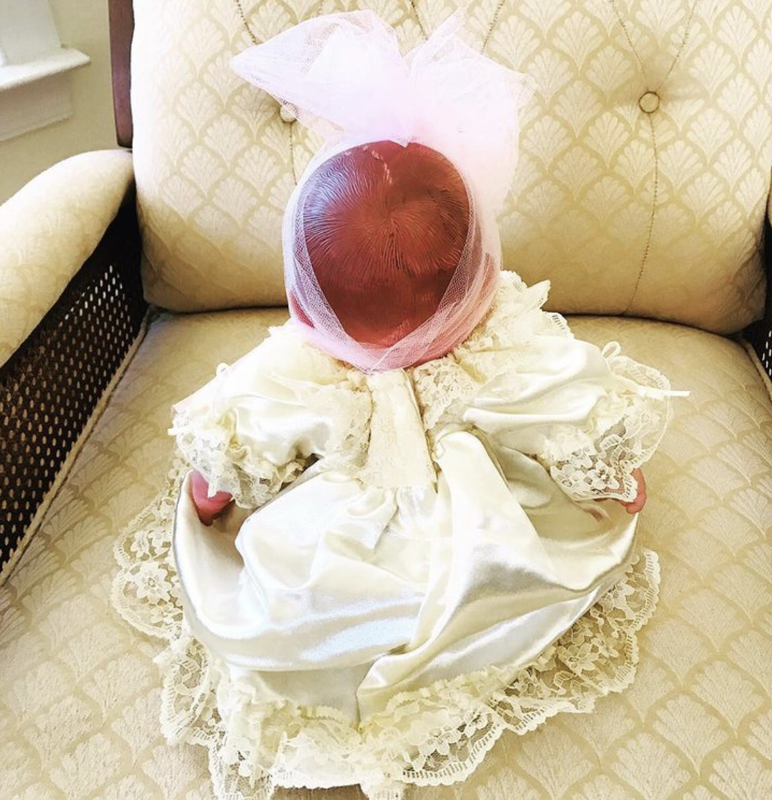
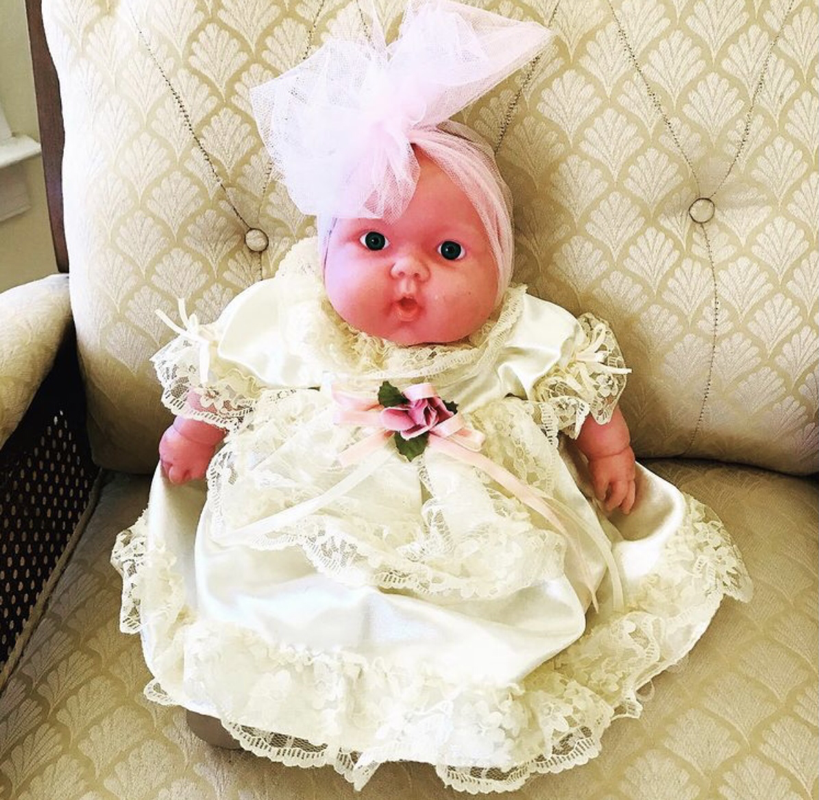
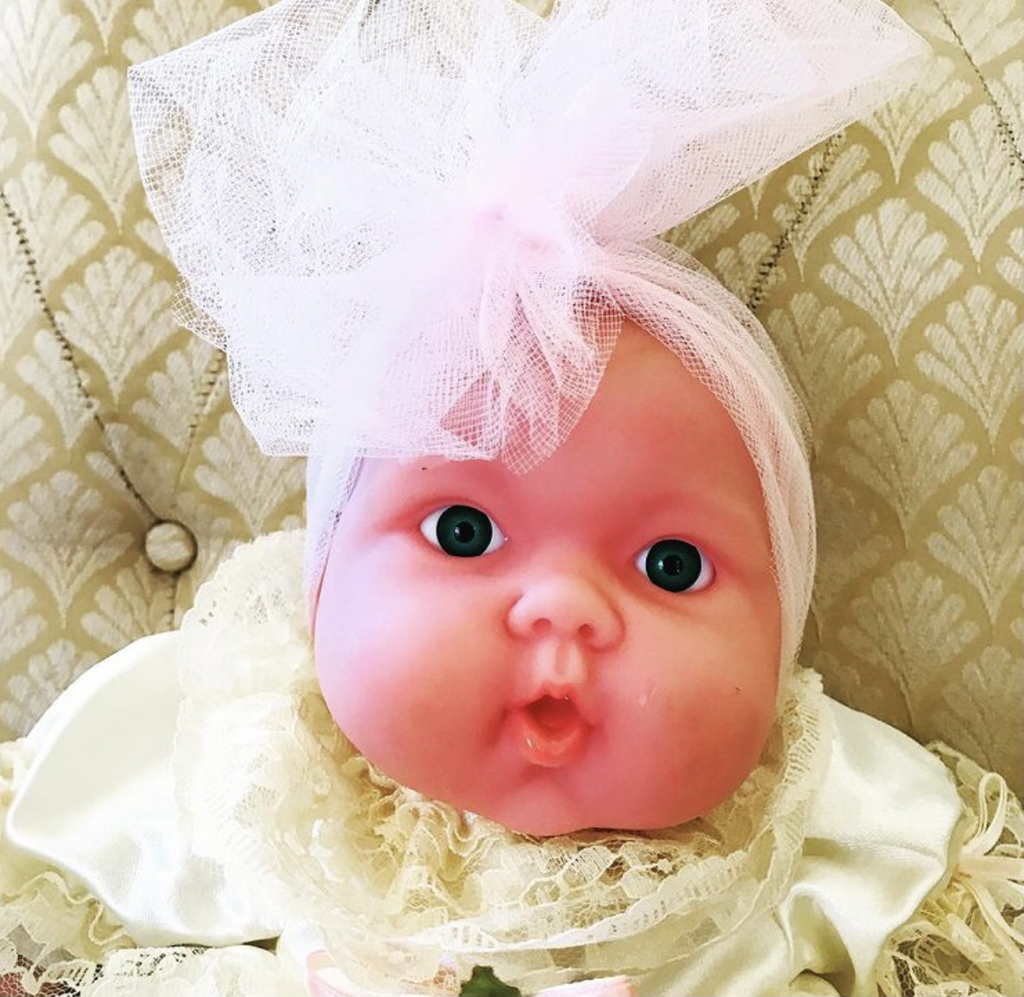 Pretty often my doll hospital patients are sent to me so I can repair just one of multiple issues. In the case of the doll above, I replaced the eyes but did not address anything else beyond cleaning the doll. This doll was found in the street by her new owner. Her eyes were broken and she had road rash. I replaced the doll's eyes and cleaned her. When I took the head off to repair the eyes I removed the stuffing and ran the body through the clothes washer. I cleaned the head and body vinyl with my go-to Young Living Thieves Foaming Hand Soap and a Mr. Clean Eraser. However, while these methods helped, they didn't remove all the tar from the road or scrapes and scars on the vinyl. These things could be repaired, of course. I could sew a new body for the doll. I could fill in the scrapes in the vinyl and sand and re-paint the face and limbs. At that point, however, my customer would be around $100 into the doll in repair costs, far more than the doll is worth. She isn't a sentimental doll really; she didn't belong to the owner or her children. So, what do you do when you have a doll you want to repair without spending a lot of money? Here are some tips. First of all, think of how you could dress your doll. It may seem obvious but you can camouflage a multitude of damages with clothing, and many people don't think of that. If your doll has a stained body consider pants, long dresses, and tights. Damage to the arms can be hidden under long sleeves. Scraped or scuffed hair paint or a damaged wig disappear under a hat or large hair bow. In this case I used a long sleeved, full-length dress with a wide lace collar to hide the marks on the body and limbs. I made a large tulle headband like a turban to hide the damage to the head. When you see the doll now she looks sweet and well-loved and you don't notice the marks. In the end, this doll's owner decided to go with a different outfit, so this outfit is for sale in my shops. It will fit 12-14 inch baby dolls, such as Bitty Baby. Maybe you really want a new-looking doll and clothing doesn't hide enough of the damage. Especially if your doll is a beloved toy and still in use, you might need a sturdier body for safety's sake. In that case, consider buying a parts doll. Modern play dolls aren't that expensive for the most part. If your doll has damaged eyes it's often cheaper to buy the same doll, maybe with a damaged body but intact head, and move the new head onto your doll than it is to pay someone to replace the eyes. Likewise, if your doll needs a new body it's often less expensive to find the same doll on eBay or elsewhere online and move the head to a better body. You can often even find your same doll in new condition for less than the sum of several repairs. That's not usually an option for my clients, since the dolls I get are generally very high in sentimental value, but most people don't object to replacing certain parts of their doll. In the case of a baby doll like this moving the head to a new body or replacing the head is a matter of cutting the zip tie in the neck, placing the head in the hole, and threading a new zip tie or drawstring into the casing. It's something almost anyone can manage. You can often find baby dolls like this one for just a few dollars at thrift stores. If you find a doll of the same size and race you can use the body even if it's not the exact same doll. Of course I am always happy to have a new patient in my hospital, but I wanted you to know you have options beyond paying for lots of repairs. I hope you find these tips useful! I'm having a rough week and I always feel better if I try to help someone else. Focusing on the needs of others truly does distract me from my own problems! |
AuthorMy name is Amanda, but my childhood nickname was "Mandaline". I am a mother of three turning my passion for creating into a full-time business. Archives
April 2024
Categories |


 RSS Feed